
The safest way to handle glue residue removal on car paint is a four step sequence: soften the adhesive with low heat, lift the bulk of it with a plastic scraper, dissolve what’s left with a paint-safe solvent, then wash and re-wax. Test any product on a hidden spot first. Skip the heat gun cranked to high, skip the metal razor blade, and skip straight to acetone. Those shortcuts are exactly what strips clear coat and turns a ten-minute job into a paint correction bill.
TL;DR:
- Use low, sustained heat with a hairdryer to soften adhesive without risking paint damage or clear coat stripping.
- Start with mild solvents like diluted isopropyl alcohol and only escalate to professional-grade removers if necessary.
- Always patch test solvents on hidden areas, especially for matte or satin finishes, and wait 24 hours to ensure no damage occurs.
- Mechanical pressure from scraping is the biggest risk; keep tools at a flat angle and avoid metal blades to protect the paint.
- When adhesive or residue has baked in the sun for months or covers a large area, professional help with paint correction is recommended.
Table of Contents
- What You Need for Safe Glue Residue Removal on Car Paint
- Step-by-Step: How to Remove Glue From Car Paint Safely
- Choosing the Right Solvent for Stubborn Automotive Adhesive
- How Do You Test for Paint Damage Before and After Removal?
- Rinsing, Rewaxing, and Preventing the Next Sticky Mess
- When Glue Residue Calls for a Professional Detailer
- What Most DIY Advice Gets Backwards
- Let Cdcautodetailing Handle the Stubborn Spots
- Sources
- FAQ
What You Need for Safe Glue Residue Removal on Car Paint
Before touching the panel, get everything within reach. Adhesive removal goes sideways when you improvise mid-job, reaching for whatever’s under the kitchen sink because you didn’t plan ahead.
Heat source. A standard hairdryer works for most jobs. If you’re dealing with a low-temp heat gun, keep it on the lowest setting and never let the nozzle sit in one spot. Hold either tool 4 to 6 inches from the surface and keep it moving in slow circles. Adhesive softens around 100 to 120°F, well below the temperature that threatens most factory clear coats, but sustained direct heat on one spot is still risky.
Lifting tools. A plastic razor blade, a dedicated plastic scraper, or even an old expired credit card will lift softened adhesive without scoring paint. Microfiber towels handle the wiping. Keep a couple of clean, dry towels and one damp towel in rotation.
Solvents, ranked mild to strong:
- Diluted isopropyl alcohol (roughly 50/50 with water) for light residue and a first pass
- Goo Gone Automotive Spray Gel, a citrus-based gel built for automotive adhesive
- 3M™ Adhesive Remover, a professional-grade blend of non-abrasive solvents for cured paint
- Soap and water, which should honestly be your very first attempt before any solvent touches the panel
What to leave in the garage. Acetone, brake cleaner, lacquer thinner, and gasoline all show up in DIY forums as “quick fixes.” All four are strong enough to cut through clear coat, not just adhesive. Acetone in particular can haze or strip a clear coat in seconds on some finishes, and there’s no walking that back without professional polishing or a repaint. If a product warns you to wear gloves and work in a ventilated garage, that’s a signal it’s too aggressive for direct paint contact.
One more thing worth having on hand: painter’s tape to mask off trim, rubber seals, or plastic body cladding near the residue. Solvents that are fine on paint can still cloud or discolor unpainted plastic trim.
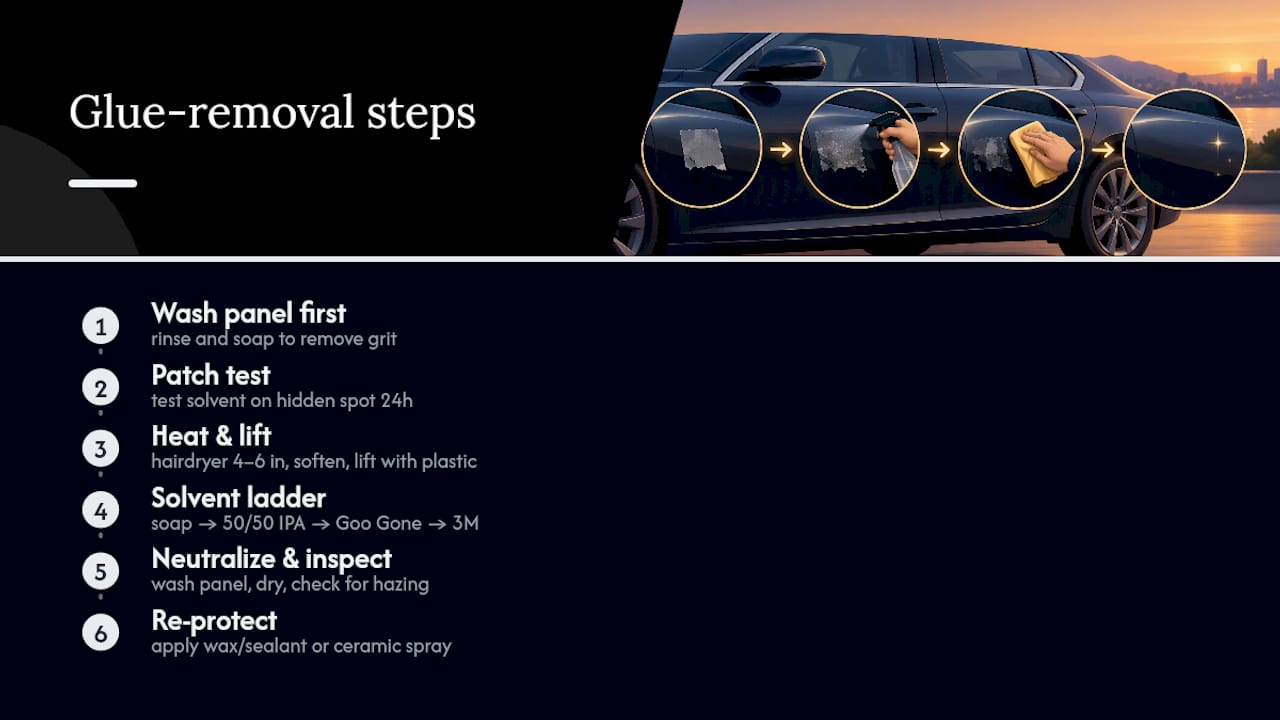
Step-by-Step: How to Remove Glue From Car Paint Safely
This is the order detailers actually follow, not the internet shortcut version. Skipping steps is how people end up with a dull patch where a sticker used to be.
1. Wash the area first.
Grit and road dust sitting on top of the glue will grind into your paint the second you start scraping. A quick rinse and soap wash of just that panel removes loose debris and gives you a clean view of exactly how much residue you’re dealing with.
2. Patch test before anything else touches the panel.
Pick a spot you rarely see, like the inside of a door jamb or a small area under the bumper lip. Apply your chosen solvent, wait the full recommended dwell time, and check for dulling, hazing, or color change. If the patch test area looks fine after 24 hours, you’re clear to proceed on the visible panel.
3. Apply gentle heat.
Hold the hairdryer 4 to 6 inches from the glue and move it in slow circles for 30 to 60 seconds at a time. You’re looking for the adhesive to go slightly glossy or tacky, a visual cue that it’s softening. Never park the heat source in one place, and never use a heat gun’s high setting on paint.
4. Lift the bulk with a plastic tool at a low angle.
Hold your plastic scraper at roughly a 45 degree angle to the paint, almost flat, and push under the edge of the softened glue. You’re gliding, not digging. If it doesn’t lift easily, that’s your cue to add more heat or move to solvent rather than forcing the scraper.
5. Work through the solvent ladder in order.
Start with plain soap and water on a microfiber towel. If residue remains, move to diluted isopropyl alcohol (50/50 with water) and let it sit for a minute before wiping. Still stubborn? Goo Gone Automotive is the next step up, applied per label directions with the recommended dwell time. Reserve 3M™ Adhesive Remover for the toughest cases, since it’s a stronger solvent blend meant for cured paint and shop use.
6. Neutralize and wash.
Once the glue is gone, wash the entire panel with soap and water again. This step matters more than people think. Leftover solvent residue sitting under a fresh coat of wax can cause streaking or uneven gloss down the road.
7. Dry and inspect.
Use a clean microfiber towel and check the spot in direct light from a couple of angles. Any dulling or hazing means you move to the safety and inspection steps covered later in this guide, not straight to wax.
8. Re-protect.
Apply wax, sealant, or your regular ceramic maintenance spray once the area is confirmed clean and undamaged. Skipping this leaves fresh paint exposed exactly where it just lost its old wax layer.
Pro Tip: Keep a Sharpie cap or the plastic edge of an old gift card in your glovebox. Fresh parking permit residue lifts almost instantly with a little heat and a soft plastic edge, before it has time to bake in the sun and harden.
When do you stop and call in help? If the glue has clearly been baking in the sun for months, if it’s spread across a large panel rather than a small sticker, or if your patch test shows even faint hazing, that is the point to hand it off. Pushing harder at that stage almost always makes things worse, not better.
Choosing the Right Solvent for Stubborn Automotive Adhesive
Not every glue spot needs the strongest product in your garage. Matching solvent strength to the job is what separates a clean removal from an accidental paint strip.
Diluted isopropyl alcohol is the reasonable starting point for most detailers, mixed roughly 1:1 with water. It’s mild enough to use without much risk, breaks down light adhesive residue like parking passes and price tags, and dries without leaving a film. The catch: used at full strength or scrubbed in aggressively over repeated sessions, it can dull clear coat over time. Dilution and a light hand are what keep it safe for repeated use.
Citrus-based gels like Goo Gone Automotive sit a step up in strength. The gel formulation is designed to cling to vertical surfaces without dripping, which matters if you’re working on a door panel rather than a flat hood. It’s built specifically for adhesive residue and labeled safe for automotive paint when used per instructions, but the manufacturer is explicit that you need to wash the treated area with soap and water afterward to clear away product residue. Skip that wash step and you’ll notice a slightly oily film that attracts dust.
Professional-grade removers like 3M™ Adhesive Remover are formulated with a blend of non-abrasive solvents strong enough to dissolve tar, wax buildup, and old attachment tape residue, and the product is labeled safe for most cured automotive paint. This is the one to reach for after diluted IPA and citrus gel have both failed, not the one to start with. Stronger doesn’t mean safer here. It means less margin for error if you leave it sitting too long or use it on paint that hasn’t fully cured after a recent repaint.
Household options get mentioned constantly in online forums, and two actually have some merit. WD-40 can loosen tar and adhesive binders, and peanut butter’s oil content does the same thing in a pinch. Both leave an oily residue behind that needs a proper wash afterward or it’ll just collect road grime. Treat these as backup options, not first choices, since neither was engineered for paint.
Here’s what never belongs on painted panels: acetone, brake cleaner, lacquer thinner, and gasoline. All four are solvent-strong enough to cut through cured clear coat finishes, not just the adhesive sitting on top of it. Clear coat is a thin, plastic-like layer, generally just a few thousandths of an inch, and once a strong solvent starts breaking it down, buffing or repainting is the only fix.
| Product type | Best for | Dwell time | Follow-up needed |
|---|---|---|---|
| Soap and water | First attempt, light residue | Immediate | Dry and inspect |
| Diluted isopropyl alcohol (50/50) | Light adhesive, parking passes | 1 to 2 minutes | Wipe and rewash |
| Goo Gone Automotive gel | Bumper stickers, moderate residue | Per label, several minutes | Wash with soap and water |
| 3M™ Adhesive Remover | Tar, wax buildup, stubborn residue | Per label directions | Wash and re-wax |
Manufacturer and detailing guides consistently point to this same mild-to-strong escalation approach: try the gentlest option first, only escalate when it fails, and always finish with a wash. It’s slower than grabbing the strongest bottle on the shelf, but it’s the difference between a clean fix and a trip to a paint shop.
How Do You Test for Paint Damage Before and After Removal?
Patch testing isn’t optional, and skipping it is the single most common mistake in DIY adhesive removal. Paint variations between panels, prior repairs, and clear coat age all affect how a solvent reacts, so what worked fine on your neighbor’s car isn’t a guarantee for yours.
Pick a spot that’s genuinely out of sight, not just “the side people don’t look at much.” Inside a fuel door, under a door handle, or along the inside edge of a wheel well all work well. Apply a small amount of your chosen solvent, follow the label’s recommended dwell time exactly, then wipe and inspect the spot in direct sunlight. You’re checking for three things: hazing (a cloudy, matte patch where gloss used to be), dulling (a soft loss of shine without visible clouding), and color shift, which shows up more on metallic and pearl finishes than solid colors.
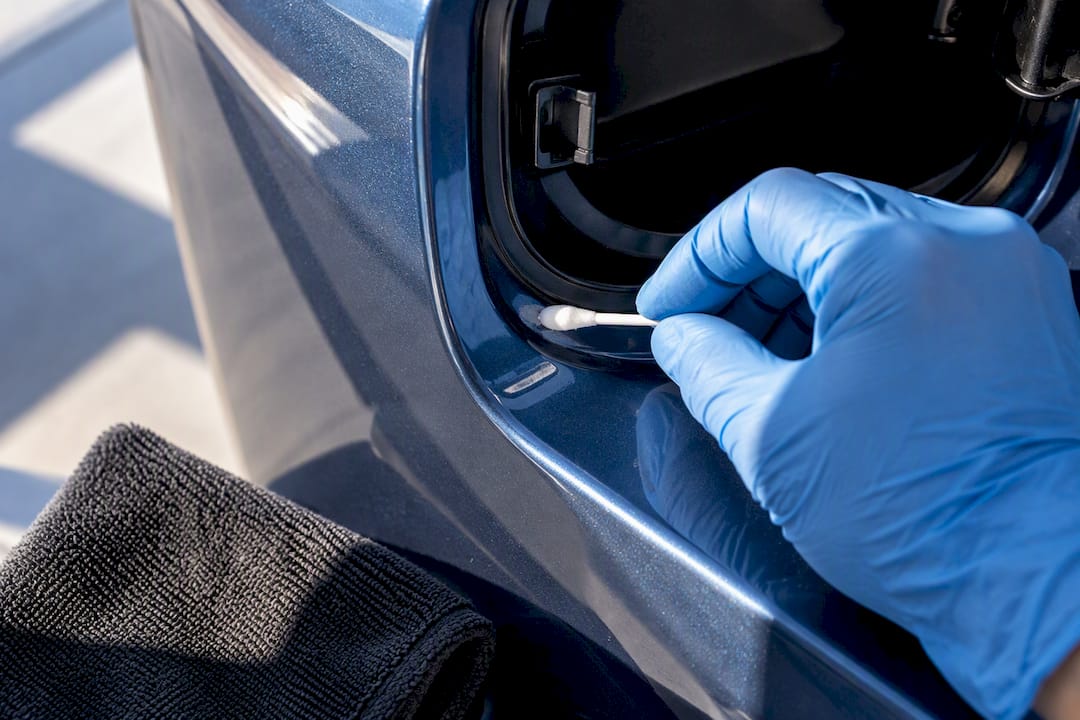
Wait a full 24 hours before declaring a solvent safe. Some reactions don’t show up immediately, especially with matte and satin finishes, which have a textured clear coat that behaves differently than a standard glossy finish. Matte paint in particular has almost no margin for aggressive solvents or heavy rubbing, since the textured clear coat can’t be polished back to a glossy repair the way standard paint can. If you’re working on a matte or satin vehicle, stick to the mildest end of the solvent ladder and skip the stronger professional-grade removers entirely unless a professional is doing the work.
Mechanical safety matters just as much as chemical safety. Experts point out that clear coat is thin, and it’s excessive friction or heat from aggressive scraping and rubbing, not the solvent itself, that causes most DIY paint damage. A few rules worth locking in:
- Keep your scraper at a low, near-flat angle. Never dig in at a steep angle or apply heavy downhand pressure.
- Never substitute a metal razor blade, putty knife, or box cutter for a plastic scraper, even “just this once.”
- Limit heat exposure to 30 to 60 second bursts, moving constantly, and stop immediately if the panel feels hot to the touch.
- If a spot needs more than two or three solvent applications to budge, that’s a sign to switch products or call a professional, not to scrub harder.
Pro Tip: Run your fingertip lightly over the treated area after it dries. A rough or slightly grippy texture where the rest of the panel feels smooth is often your first sign of clear coat damage, and it usually shows up before your eyes can see it.
If a patch test or a full removal leaves visible hazing, don’t try to fix it with more solvent or a heavier polish pass. That’s a job for professional paint correction, which uses graduated compounds and controlled buffing to restore gloss without cutting through what’s left of the clear coat.
Rinsing, Rewaxing, and Preventing the Next Sticky Mess
Removing the glue is only half the job. Whatever solvent touched that panel also stripped away the wax or sealant sitting on top of it, which means the paint underneath is temporarily bare and more vulnerable to water spots, UV exposure, and the next round of road grime.
Start with a full soap-and-water wash of the treated panel, not just a wipe-down. This step neutralizes any leftover solvent film, since residue left behind can interfere with how evenly your next wax or sealant lays down. Dry the area completely with a clean microfiber towel, then check it one more time in good light for any hazing you might have missed during the removal itself.
Once you’ve confirmed the spot is clean and undamaged, reapply protection right away rather than waiting for your next scheduled wax. A quick spray sealant works in a pinch, but a proper carnauba wax or synthetic sealant gives longer-lasting coverage over that freshly exposed paint. If your vehicle already has a ceramic coating, a dedicated ceramic booster spray restores hydrophobic properties without disturbing the underlying coating.
A few habits cut down on how often you’ll deal with this in the first place:
- Wax or seal every three to four months if you’re not running a ceramic coating, since a fresh protective layer makes future stickers and tape peel off far easier.
- Park under cover or in a garage when you can. UV exposure is what bakes adhesive into paint, turning a 30-second peel into a 20-minute solvent job.
- Peel off parking permits, dealer stickers, and inspection tags as soon as they’re expired rather than letting them sit for a full year.
- If you drive for work and deal with magnetic signs or temporary decals often, ask about a paint protection film layer, which takes the adhesive contact instead of your actual clear coat.
Tree sap deserves a special mention here too. It’s more acidic than most parking stickers realize, and left on paint long enough it can etch into the clear coat rather than just sitting on the surface. If you park under trees regularly, treat sap the same way you’d treat fresh glue: remove it promptly rather than letting it accumulate over a season.
When Glue Residue Calls for a Professional Detailer
DIY removal handles the vast majority of stickers, tape residue, and parking permits without issue. But there’s a real line where continuing on your own risks turning a cosmetic annoyance into an actual paint repair, and knowing where that line sits saves you money in the long run.
Hand it off to a professional when the residue has clearly been baking in the sun for months rather than days, when it covers a large section of a panel rather than a small sticker-sized spot, or when your patch test comes back hazy no matter how mild the solvent. Matte, satin, and metallic finishes also carry less margin for error, since color shift and texture damage are harder to hide and harder to correct on those surfaces than on a standard glossy solid color.
A mobile detailer working through Cdcautodetailing approaches stubborn residue differently than a DIY attempt. Professional-grade solvents get matched to the specific paint and residue type rather than applied blind, and any surface that’s already showing hazing or dulling gets addressed through actual paint correction, which uses graduated polishing compounds to restore gloss without further thinning the clear coat. The panel gets re-protected afterward as part of the service, not as an afterthought.
Here’s what typically separates a professional visit from a solo attempt:
- Access to solvent strengths and correction compounds that aren’t sold for retail DIY use.
- The experience to judge, by touch and sight, when a panel has already lost some clear coat thickness from age or prior scrubbing.
- Paint correction equipment that can restore gloss on a hazed spot instead of just cleaning it.
- A finished job that includes rewaxing or ceramic reapplication, so you’re not left with a bare patch.
If you’re weighing whether a spot is DIY territory or not, err toward getting an assessment before you start applying solvent. A quick look from someone who works on paint daily costs a lot less than fixing a mistake.
What Most DIY Advice Gets Backwards
Most articles on this topic treat heat and solvent as the whole story and barely mention friction. That’s backwards. The research here points to mechanical pressure, not chemistry, as the more common cause of real damage. A plastic scraper pushed too hard at too steep an angle does more harm than a mild solvent left on for an extra minute.
The other thing conventional advice underplays: patch testing gets treated as an optional extra step for the cautious, when it should be step one, every time, no exceptions. Paint condition varies panel to panel on the same car, especially after prior repairs. Skipping that test is the actual gamble here, not the solvent choice.
If there’s one thing to prioritize, it’s restraint. Use the mildest product that works, keep the scraper nearly flat, and stop the second you see hazing rather than pushing through with more product. The glue isn’t going anywhere in the next five minutes it takes to grab a hairdryer and do this right.
— Charles
Let Cdcautodetailing Handle the Stubborn Spots
If you’ve worked through the steps above and you’re still staring at a hazy patch or residue that won’t budge, that’s exactly the point where a mobile detailer earns its cost. A mobile detailer brings professional-grade solvents, paint correction tools, and the judgment to match strength to your specific paint, providing service at your location to help you avoid guesswork and reduce the risk of making things worse.

An Exterior Detail starting at $175 covers safe cleaning, adhesive and contamination removal, and a fresh protective finish in one visit. If you’re dealing with recurring sticker residue, sap, or sun damage on a panel that’s already showing wear, the detail packages range from the Bronze Package at $375 up to the Gold Package at $1,500, each scaled to how much correction and protection your paint actually needs. For vehicles that pick up stickers and tape often, like commercial or fleet vehicles, a paint protection film layer takes future adhesive contact instead of your clear coat. Book an assessment through the site and get a straight answer on whether your spot is a quick fix or needs a professional hand.
Sources
FAQ
Will WD-40 remove glue from car paint?
WD-40 can help loosen tar and some adhesive binders, but it’s an oil-based product not formulated specifically for automotive paint. If you use it, follow up with a full soap and water wash to clear the oily residue it leaves behind, or it’ll attract dust and grime.
Is Goo Gone safe on car paint?
Yes, Goo Gone Automotive is a citrus-based gel formulated specifically for automotive adhesive removal and is labeled safe for clear coat when used per instructions. The manufacturer recommends washing the treated area with soap and water afterward to remove any leftover product residue.
What dissolves automotive glue without hurting the paint?
Diluted isopropyl alcohol, citrus-based gels like Goo Gone Automotive, and professional solvent blends like 3M™ Adhesive Remover all dissolve adhesive without cutting into cured clear coat when used correctly. Avoid acetone, brake cleaner, lacquer thinner, and gasoline entirely, since all four are strong enough to strip clear coat along with the glue.
How long can glue sit on car paint before it causes damage?
There’s no fixed safe window, but the longer adhesive bakes in sunlight and heat, the harder it bonds to the clear coat and the more aggressive the removal becomes. Residue that’s been sitting for months rather than days is far more likely to require professional-grade solvent or paint correction rather than a simple home remedy.