You pull your car out of a detailing shop, and something feels off. The paint looks the same as before, the interior still carries that faint smell, and you’re not sure if anything was actually done right. This is more common than you’d think, and it usually comes down to one skipped step: a proper assessment before any work begins. Most vehicle owners in South Jersey have no clear system for figuring out what their car actually needs, which means they either overpay for services they don’t need or miss critical treatments that protect their investment. This guide gives you a practical, no-experience-required framework to change that.
Table of Contents
- Why assessing detailing needs matters
- What to check before scheduling detailing
- Tools and materials checklist for at-home assessments
- Common issues identified (and what they mean for detailing needs)
- Our take: Why a tailored approach wins over generic detailing
- Bring expert-level detailing to your driveway
- Frequently asked questions
Key Takeaways
| Point | Details |
|---|---|
| Check before detailing | A thorough vehicle inspection ensures you get only the services your car truly needs. |
| Use simple tools | Basic household items like a flashlight let anyone assess paint and interior condition effectively. |
| Tailor your care plan | Matching your findings to the right detailing solutions prevents wasted money and protects your vehicle. |
| Professional help adds value | Experienced detailers can address deeper issues and offer long-term protection you might overlook. |
Why assessing detailing needs matters
Skipping a detailing assessment is a bit like going to the doctor and skipping the exam. You might get a prescription, but there’s no guarantee it’s the right one. When it comes to your vehicle, the stakes are real. Paint damage left untreated compounds over time, and interior issues like moisture or embedded odors can become permanent if ignored long enough.
The most obvious risk is resale value. A car that hasn’t been properly maintained and protected loses its appeal fast. Proper detailing protects your car’s value and finish, and that protection only works when it’s applied to the right areas at the right time. A tailored assessment tells you exactly where your car needs attention before problems get worse.
Beyond resale, there’s the daily satisfaction of driving a clean, protected vehicle. A proper assessment also helps you avoid wasting money on generic packages that may polish a panel that’s already in great shape while completely missing a section with clear coat damage.
Here’s what you stand to gain from a structured assessment:
- Targeted treatment: Only pay for services your car actually needs
- Early problem detection: Catch paint, trim, and interior issues before they escalate
- Better communication with detailers: Show up knowing what to ask for
- Longer-lasting results: Treatments applied to properly assessed surfaces hold up better
- Stronger resale position: Documented care history adds buyer confidence
The regular detailing benefits go well beyond a clean look. They include protection from UV rays, oxidation, and environmental contaminants that slowly degrade your vehicle’s surfaces. Assessment is the first step in making sure those benefits actually reach the areas that need them.
“A vehicle that receives consistent, targeted care retains both its appearance and its market value far longer than one that gets occasional generic treatments.”
Taking 20 minutes to walk around your car with a critical eye before booking any service is one of the highest-return habits you can build as a vehicle owner.
What to check before scheduling detailing
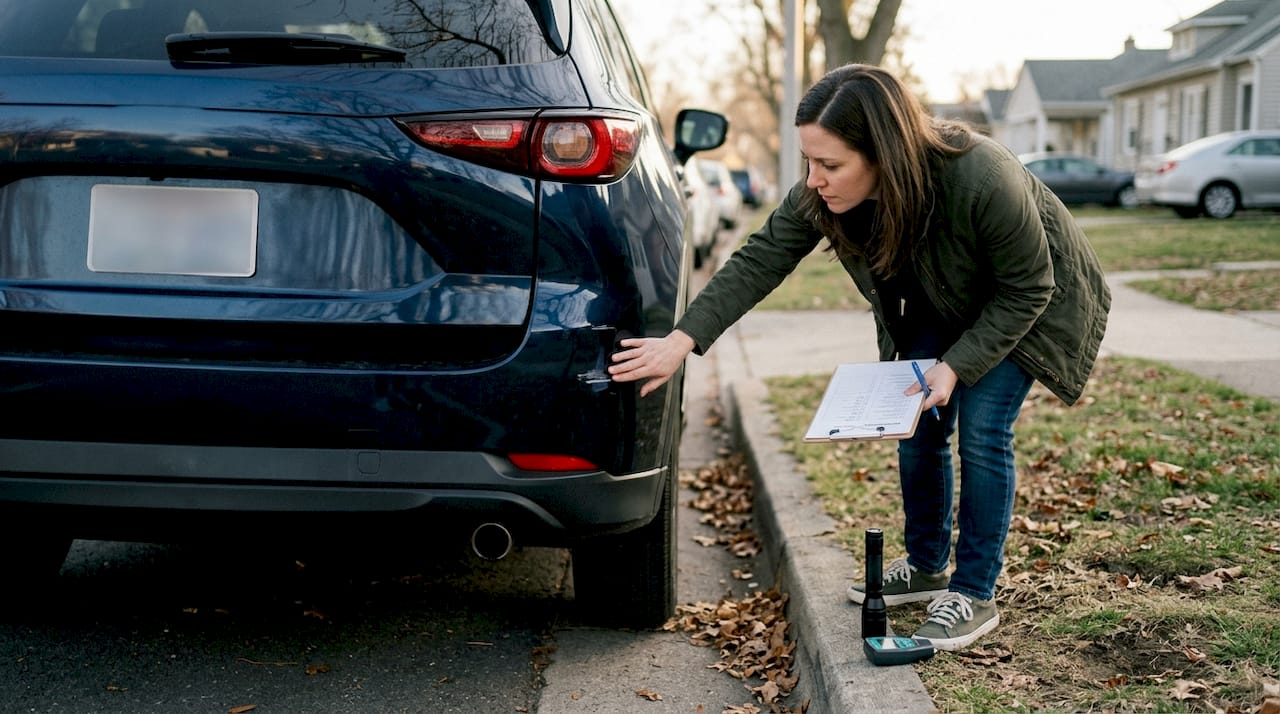
Now that you understand the value of assessments, let’s get into what you should actually be looking for on your vehicle. This doesn’t require professional training. It requires good lighting, a slow pace, and knowing what to look for.
- Start with the exterior paint: Walk around the car in natural daylight or under a bright artificial light. Look for dull patches, uneven sheen, or areas where the paint looks slightly different in tone. These can signal oxidation, previous repaints, or clear coat failure.
- Check for texture issues: Run your fingertips lightly across panel surfaces. A rough, bumpy texture (often called “orange peel”) is a common sign of poor paint application or environmental buildup.
- Inspect panel gaps and door jambs: Check paint for color variations, orange peel texture, overspray, panel gaps, and door jambs to detect repaints or poor repairs. Overspray inside a door jamb is a red flag.
- Evaluate the interior surfaces: Sit in each seat. Check for stains on fabric or leather, cracked trim, sticky surfaces, and any signs of moisture under mats.
- Smell the interior: Close the doors and windows for a minute, then take a breath. Musty, pet, or smoke odors indicate deep cleaning needs that a surface wipe won’t fix.
- Document everything: Use your phone to photograph each issue. A timestamped photo log is invaluable when talking to a detailer about what needs attention.
Pro Tip: Before prepping your car for detailing, do your assessment when the car is dirty. Dirt and grime actually make surface defects easier to spot under angled light.
Once you’ve gone through this process, you’ll have a much clearer picture of what category of service you need. Your notes and photos also become a useful reference for your interior detailing checklist when working with a professional.
“The best detailing results come from clients who arrive knowing their car’s condition. It cuts guesswork and lets us focus on what actually matters.”
Tools and materials checklist for at-home assessments
Before you get hands-on, make sure you have these essential items ready. You don’t need a garage full of equipment. The right basics go a long way.
| Tool | Purpose | Required? |
|---|---|---|
| Flashlight or work light | Reveals surface scratches, swirls, and dull spots | Yes |
| Microfiber towels | Test surface texture without scratching | Yes |
| Notepad or phone | Document findings with notes and photos | Yes |
| Nitrile gloves | Protect hands during interior checks | Yes |
| Magnifying glass | Spot fine scratches and paint texture issues | Optional |
| Paint thickness gauge | Detect repainted panels or thin clear coat | Optional |
| Odor test strips | Identify specific interior odor sources | Optional |
Proper tools are essential for spotting paint and panel issues that are easy to miss with the naked eye. Even a basic LED flashlight held at a low angle to the paint surface will reveal swirl marks and light scratches that disappear in overhead lighting.
Here’s what to prioritize if you’re starting from scratch:
- A bright, focused flashlight is the single most useful tool for any at-home assessment
- Microfiber towels let you feel texture differences across panels without adding scratches
- Your phone camera in portrait mode can capture surface defects surprisingly well
- A simple notepad keeps your findings organized by panel or zone
Pro Tip: Use your flashlight at a 45-degree angle to the paint surface and move it slowly. This “raking light” technique makes swirl marks, water spots, and fine scratches pop out clearly.
If you want to go deeper, a paint thickness gauge (available for under $50 online) can tell you whether a panel has been repainted. Readings significantly higher than factory spec suggest added paint layers. This matters a lot when deciding whether your car cleaning workflow should include paint correction or just a polish.
You don’t need to spend a lot to assess your car like a pro. The goal is to gather enough information to make smart decisions, not to replicate a body shop inspection.
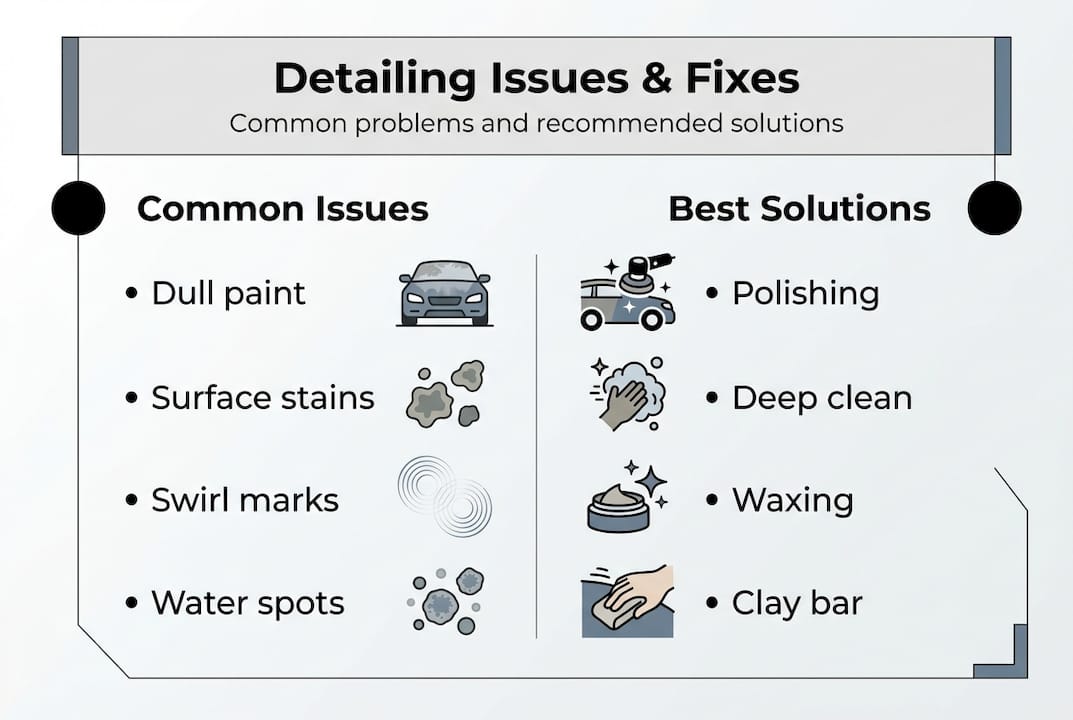
Common issues identified (and what they mean for detailing needs)
With your checklist in hand, you’ll start to spot common issues. Here’s what they mean and how to address them.
| Finding | What it means | Recommended service |
|---|---|---|
| Dull or faded paint | Oxidation or UV damage | Paint correction or polish |
| Orange peel texture | Poor paint application or buildup | Wet sanding or professional correction |
| Light swirl marks | Improper washing technique | Machine polish |
| Deep scratches | Clear coat or base coat damage | Paint correction or touch-up |
| Stains on upholstery | Embedded soiling | Deep interior cleaning |
| Persistent odors | Bacterial or mold growth | Ozone treatment or deep clean |
| Pet hair throughout | Heavy embedded debris | Specialized interior extraction |
| Overspray on trim | Previous poor repair | Professional removal |
Identifying paint and surface flaws helps guide the right detailing procedures, so matching your findings to the correct service saves both time and money.
Some issues are clear DIY territory. Light dust, minor smudges, and fresh bird droppings can be handled with a proper wash. But here’s where many owners get it wrong: they apply a basic wash to a car that actually needs paint correction, and then wonder why results disappoint.
Signs that you need professional help include:
- Overspray: Tiny paint dots on glass, rubber, or trim that feel rough to the touch
- Orange peel: A bumpy texture that doesn’t smooth out after polishing
- Clear coat failure: Peeling or chalky patches that won’t respond to wax
- Deep odors: Smells that return within days of cleaning
Knowing these distinctions helps you when selecting the right detailing package for your specific situation. A professional detailer can confirm your findings and recommend the most efficient path forward.
Our take: Why a tailored approach wins over generic detailing
Let’s step back and share why our approach to vehicle detailing assessment stands apart. Most detailing packages are built for convenience, not for your car. They’re designed to be fast, repeatable, and easy to sell. That’s not always bad, but it becomes a problem when your vehicle has specific needs that a standard package simply doesn’t address.
We’ve seen it repeatedly: a car gets a full-package treatment, and the owner is still unhappy because the one issue they cared about most, a stubborn odor or a dull hood, wasn’t targeted. The package looked great on paper but missed the point.
Time spent on assessment upfront isn’t wasted. It’s the foundation of every result worth being proud of. When you document your car’s condition before any service, you hold detailers accountable, you get better outcomes, and you build a record that supports your vehicle’s long-term value.
Following solid [detailing best practices](https://cdcautodetailing.com/detailing-best practices clean protected cars) isn’t about being picky. It’s about being smart with your investment. A 20-minute walkthrough before every appointment is one of the simplest habits that separates vehicle owners who are consistently satisfied from those who keep trying new shops and getting the same mediocre results.
Bring expert-level detailing to your driveway
Once you know what your car needs, here’s the fastest path to results. At CDC Auto Detailing, we come to you across South Jersey with the tools, products, and expertise to handle exactly what your assessment uncovered.

Our mobile technicians are trained to fill in the gaps you might miss and to recommend premium protection options like ceramic coatings and paint protection film that keep your results lasting longer. Understanding how auto detailing works helps you see why a mobile, assessment-first approach delivers better outcomes than walk-in shops. Explore our detailing service examples to match your findings to the right package, then book directly from our site. No guesswork, no wasted appointments.
Frequently asked questions
How do I know if my car needs detailing or just a basic wash?
If you find stains, persistent odors, surface damage, or dull paint after a wash, you likely need detailing. Surface flaws often require professional attention that goes well beyond a basic clean.
What’s the risk of skipping regular detailing assessments?
Skipping assessments can reduce your car’s resale value and allow hidden damage to worsen over time. Neglecting assessment leads to missed protection opportunities and higher repair costs down the road.
Can I assess my vehicle’s detailing needs without professional tools?
Yes. A flashlight, a microfiber towel, and a notepad are enough for most checks. Basic tools are sufficient for a solid at-home assessment; advanced tools just add precision.
How often should I reassess my detailing needs?
Every 3 to 6 months is ideal for most vehicles. Reassess sooner if your car goes through harsh weather, heavy daily use, or you notice a clear change in paint or interior condition.