TL;DR:
- Following a six-phase fleet wash protocol protects vehicle surfaces and reduces maintenance costs. Proper equipment, chemical application, and sequencing prevent damage and recontamination, ensuring professional results. Regular cleaning schedules maintain fleet appearance and long-term asset value.
Step by step fleet cleaning is a systematic six-phase process that removes dirt, grease, and chemical contaminants while protecting vehicle surfaces and preserving fleet value. The standard industry term for this workflow is a fleet wash protocol, and it covers everything from vehicle assessment through final drying. Fleet managers who follow a structured fleet cleaning guide reduce paint damage, lower long-term maintenance costs, and keep customer-facing vehicles looking professional. The core phases are assessment, pre-soak, degreasing, pressure washing, hand cleaning, and rinse with dry. Each phase depends on the one before it, so skipping steps creates compounding problems.
What tools and chemicals are essential for effective fleet cleaning?
The right equipment determines whether a fleet wash protects or damages vehicle surfaces. A pressure washer rated at 1,000–2,000 PSI is the standard for fleet work. That range delivers enough force to cut through road grime without stripping paint or trim.
Nozzle selection matters as much as PSI. A 40-degree nozzle spreads the spray pattern wide, reducing impact force on painted panels. Narrower nozzles concentrate pressure and belong only on concrete surfaces, wheel wells, or undercarriage work. Foam cannons and foamers attach to pressure washers and apply pre-soak chemicals evenly across large surfaces, which saves time on multi-vehicle washes.
Chemical selection follows a two-category logic. Alkaline detergents cut through grease, oil, and organic soils. Acid cleaners dissolve mineral deposits, rust staining, and brake dust. The two-step washing method applies acid first, then alkaline over the still-active acid layer, which produces a more thorough clean than either product alone.
| Tool or Chemical | Purpose | Safety Note |
|---|---|---|
| Pressure washer (1,000–2,000 PSI) | Removes surface dirt and rinses chemicals | Keep wand 12–18 inches from surface |
| 40-degree nozzle tip | Broad spray for painted panels | Never use zero-degree on vehicle paint |
| Foam cannon or foamer | Even pre-soak and soap application | Dilute soap 1:100 to 1:200 |
| Alkaline detergent | Breaks down grease and organic soils | Avoid contact with eyes and skin |
| Acid cleaner | Removes mineral deposits and brake dust | Never apply to dry surfaces |
| Microfiber towels | Spot cleaning and final drying | Use separate towels per zone |
| Stiff-bristle brushes | Wheels, wheel wells, undercarriage | Rinse brush frequently to avoid grit transfer |
Pro Tip: Match chemical dilution and PSI to the soil level of each vehicle type. A lightly soiled delivery van needs a different setup than a construction truck caked in mud and grease. Getting this right reduces labor time and prevents unnecessary paint wear.
How to perform the step-by-step fleet cleaning process correctly?
A complete fleet wash sequence follows six defined steps. Skipping or reordering any step forces you to redo work and risks surface damage. The sequence below applies to commercial vehicles of all sizes.
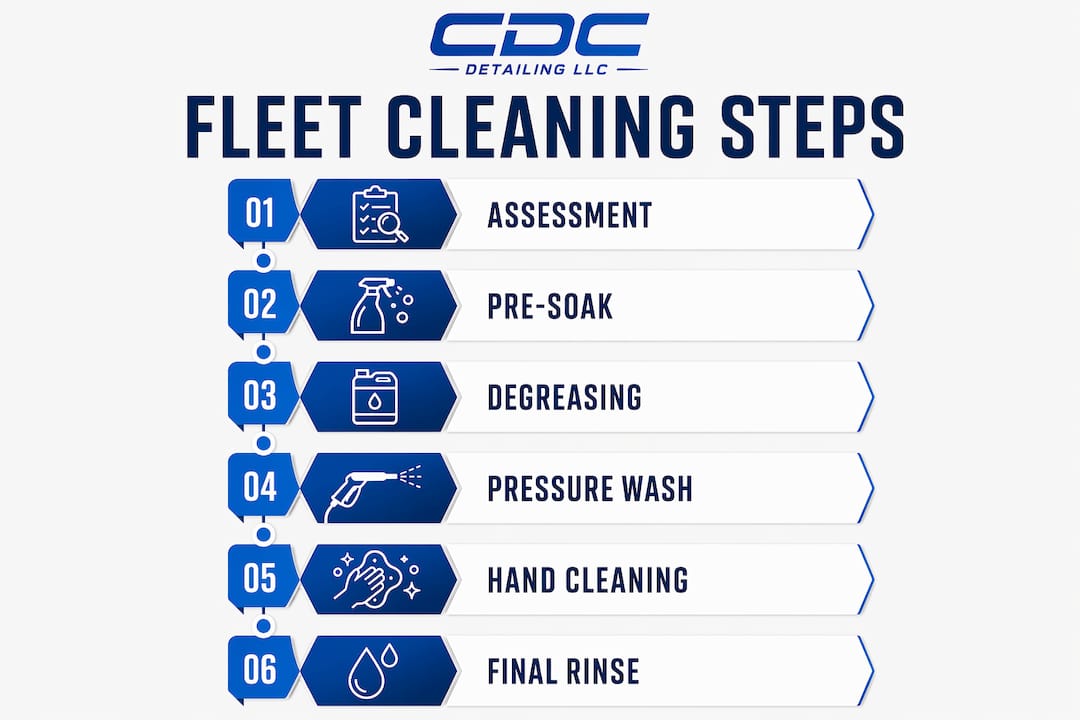
Step 1: Vehicle assessment
Walk the vehicle before touching it with water or chemicals. Note areas with heavy grease buildup, paint chips, damaged trim, or sensitive decals. This assessment tells you which zones need degreaser, which need gentle hand cleaning, and where to avoid high-pressure spray. Document findings on a fleet vehicle cleaning checklist to track condition over time.

Step 2: Pre-soak treatment
Apply a diluted alkaline pre-soak to the entire vehicle surface, starting from the bottom and working upward. Let the product dwell for 3–5 minutes. This dwell time loosens bonded dirt and road film before any mechanical agitation, which means less scrubbing and less risk of grinding grit into the paint.
Step 3: Degreasing high-buildup zones
Wheels, wheel wells, the undercarriage, and exhaust areas accumulate the heaviest contamination. Clean these zones first before washing body panels. If you clean the body first, brake dust and grit from the wheels will redeposit on surfaces you already cleaned. Apply a dedicated degreaser to these hot spots and agitate with a stiff-bristle brush.
Step 4: Pressure washing large surfaces
Set the pressure washer to 1,000–2,000 PSI with a 40-degree nozzle. Hold the wand 12–18 inches from the surface and use a steady sweeping motion. Start at the top of the vehicle and work downward so dirty water runs off cleaned areas. Apply soap diluted at 1:100 to 1:200 using a foam cannon, let it sit briefly, then rinse top to bottom.
Step 5: Hand cleaning detailed areas
Pressure washing cannot safely reach door jambs, mirrors, grilles, and areas near rubber seals. Use microfiber towels, soft sponges, or detail brushes for these zones. Work with clean water and a mild detergent. Rinse each area before moving to the next to prevent soap from drying on the surface.
Step 6: Final rinse and dry
Rinse the entire vehicle from top to bottom with clean water. Do not rush this phase. Residual detergent left on the surface attracts dirt and accelerates corrosion, which means the vehicle gets dirty faster and costs more to maintain. Dry with clean microfiber towels, working panel by panel to prevent water spots.
| Step | Action | Key Detail |
|---|---|---|
| 1. Assessment | Inspect vehicle condition | Note sensitive areas before applying chemicals |
| 2. Pre-soak | Apply diluted alkaline product | Allow 3–5 minutes dwell time |
| 3. Degreasing | Target wheels, undercarriage, exhaust | Clean these before body panels |
| 4. Pressure wash | Wash large surfaces top to bottom | 1,000–2,000 PSI, 40-degree nozzle |
| 5. Hand clean | Detail tight and sensitive areas | Use microfiber and soft brushes |
| 6. Rinse and dry | Full rinse, then microfiber dry | Thorough rinse prevents residue buildup |
Pro Tip: When using the two-step method, apply acid to a wet surface only, then apply alkaline detergent while the acid is still active. This timing is critical. Letting the acid dry before adding alkaline breaks the chemical reaction and wastes both products.
What are the top mistakes to avoid in fleet cleaning?
Most fleet wash failures trace back to improper order of operations and poor residue control. Fixing these two issues alone cuts labor time and protects paint across every vehicle in the fleet.
“Most failures in fleet washing come from improper order and residue control. Starting with pre-rinse and thorough rinsing saves costs and protects paint.” — Triplea Truck Wash
The most common errors fleet managers encounter include:
- Rushing the rinse phase. Detergent residue left on paint attracts dirt and causes corrosion. A thorough rinse takes two to three minutes per vehicle and pays for itself in reduced recontamination.
- Applying acid cleaner to a dry surface. Acid on dry paint causes etching and permanent staining. Always wet the surface before acid application and keep it wet throughout.
- Skipping the pre-rinse. Jumping straight to soap traps grit against the paint surface. A pre-rinse from top to bottom loosens particles before any contact cleaning begins.
- Uneven chemical application. Spotty pre-soak coverage leaves patches of bonded grime that require extra scrubbing. Use a foam cannon for consistent coverage across large panels.
- Skipping degreasing on wheels and undercarriage. Brake dust and grease from these zones transfer to body panels during the wash if not addressed first.
- Poor drying technique. Using a single towel across the entire vehicle transfers contamination from one panel to the next. Use separate microfiber towels per zone.
Pro Tip: Use industrial-grade detergents formulated for commercial fleet soils rather than consumer car wash products. Commercial-grade alkaline detergents cut through road film and diesel exhaust residue faster, which reduces the number of passes needed and protects paint from prolonged chemical exposure.
Safety is non-negotiable during fleet washing. Wear chemical-resistant gloves and eye protection when handling acid cleaners. Never mix acid and alkaline products in the same container. Wash in a designated area with an impervious surface and containment berms to prevent washwater runoff into storm drains, as required by EPA-aligned stormwater standards.
How often should fleets be cleaned and how to schedule washes?
Fleet wash frequency is an asset protection decision, not an optional appearance task. Dirt and road chemicals break down paint and accelerate rust when left on surfaces. A consistent schedule prevents that damage from compounding.
The baseline recommendation is bi-weekly washing for most commercial fleets. Weekly washing applies to vehicles with heavy soiling, high mileage, or direct customer contact. Monthly washing is acceptable only for light-use vehicles with minimal environmental exposure.
| Vehicle Type | Recommended Frequency | Key Reason |
|---|---|---|
| Customer-facing delivery vehicles | Weekly | Brand appearance and client impression |
| Heavy-duty trucks, construction vehicles | Weekly | High soil load, corrosion risk |
| Standard commercial vans | Bi-weekly | Balanced cost and protection |
| Light-use, low-exposure vehicles | Monthly | Minimal contamination buildup |
Several factors push frequency higher than the baseline:
- High mileage routes through road salt, mud, or industrial areas
- Vehicles carrying food, chemicals, or regulated cargo
- Branded vehicles where appearance directly affects client perception
- Seasonal factors such as winter road salt or summer pollen
Fleet washing costs typically range from $25–$75 per vehicle. That cost scales with vehicle size and soil level. A well-scheduled program reduces per-wash labor because vehicles never reach the point of heavy contamination buildup. Use a fleet detailing schedule to assign wash dates by vehicle type and route, rather than washing the entire fleet on the same day.
Key Takeaways
A structured fleet wash protocol, executed in the correct sequence with the right chemicals and equipment, is the most effective way to protect vehicle assets and control long-term maintenance costs.
| Point | Details |
|---|---|
| Follow the six-step sequence | Assessment, pre-soak, degreasing, pressure wash, hand clean, and rinse and dry must stay in order. |
| Match chemicals to soil type | Use alkaline detergents for grease and acid cleaners for mineral deposits, never on dry surfaces. |
| Clean wheels and undercarriage first | Degreasing hot spots before body panels prevents recontamination of cleaned surfaces. |
| Rinse thoroughly every time | Rushed rinsing leaves detergent residue that attracts dirt and accelerates corrosion. |
| Schedule by vehicle type | Bi-weekly is the baseline; customer-facing and heavy-use vehicles need weekly washing. |
What I’ve learned from watching fleet washes go wrong
The most expensive fleet cleaning mistakes I’ve seen share one trait: they happen at the end of the process, not the beginning. A fleet manager invests in good equipment and quality chemicals, then rushes the rinse because the next vehicle is waiting. That shortcut undoes everything that came before it. Residue builds up, paint dulls faster, and the next wash takes longer because the contamination is now bonded.
The second pattern I’ve noticed is treating the fleet vehicle cleaning checklist as paperwork rather than a real operational tool. Checklists exist to catch the steps that feel optional when you’re tired or behind schedule. Skipping degreasing on the undercarriage is invisible until rust appears six months later.
Environmental compliance deserves more attention than most fleet managers give it. New Jersey’s NJDEP stormwater requirements are specific: washwater must stay contained on impervious surfaces with berms, and best management practice documentation must be on file. Non-compliance creates liability that costs far more than a proper wash bay setup.
My honest recommendation is to integrate professional detailing services into your cleaning program at least quarterly. Routine washing handles surface contamination. Detailing addresses paint correction, protective coatings, and areas that standard washing cannot reach. The two approaches work together, and the detailing benefits for fleet image are measurable in client perception and resale value.
— Charles
Professional fleet cleaning support from Cdcautodetailing
Routine washing keeps vehicles clean, but some jobs require more than a pressure washer and a foam cannon. Paint correction, ceramic coating application, and detailed interior work demand professional equipment and trained hands.

Cdcautodetailing provides tailored fleet detailing services for commercial clients across South Jersey, covering everything from exterior decontamination to protective coating application. The mobile service model means your vehicles get serviced at your location, with no downtime for driving to a shop. For fleet managers who want to extend the results of their regular wash program, Cdcautodetailing’s commercial detailing advantages include paint protection, residue removal, and finish restoration that standard washing cannot deliver.
FAQ
What is the correct order for a fleet wash?
The correct order is vehicle assessment, pre-soak, degreasing, pressure washing, hand cleaning, and final rinse with drying. This sequence prevents recontamination and protects paint at every phase.
Can you apply acid cleaner directly to a dry vehicle?
No. Acid cleaners must always be applied to a wet surface. Applying acid to dry paint causes etching and permanent surface damage.
How often should commercial fleet vehicles be washed?
Bi-weekly is the standard baseline for most commercial fleets. Customer-facing vehicles and heavy-use trucks should be washed weekly to control soil buildup and protect paint.
What PSI is safe for washing fleet vehicle paint?
A pressure washer set to 1,000–2,000 PSI with a 40-degree nozzle tip, held 12–18 inches from the surface, is safe for painted panels. Higher PSI or narrower nozzles risk paint and trim damage.
Why does thorough rinsing matter so much in fleet cleaning?
Detergent residue left on the surface after washing attracts dirt and accelerates corrosion. A complete top-to-bottom rinse after every wash prevents residue buildup and extends the time between washes.