
TL;DR:
- Professional car detailers use surface-specific, pH-balanced cleaners, proper tools, and a top-down workflow to clean interiors thoroughly and prevent damage. They apply products with microfiber towels to avoid oversaturation, testing cleaners first on inconspicuous areas, and clean surfaces from headliner to floor for best results. Using the right technique and products ensures long-lasting, damage-free interior detailing that enhances vehicle value.
Professional car detailers use surface-specific, pH-balanced cleaners, microfiber towels sorted by task, detail brushes, and vacuum equipment with dedicated attachments to clean vehicle interiors safely and thoroughly. This approach, known in the industry as “interior detailing,” goes far beyond a quick wipe-down. The right product on the wrong surface causes permanent damage. The right technique on the right surface preserves materials for years. Understanding what detailers actually use, and why they use it, gives car owners a clear picture of what separates a professional result from a DIY disappointment.
What do car detailers use to clean interior surfaces?
Professional detailers select products based on the specific material they are cleaning. Leather, vinyl, fabric, plastic, and glass each require a different formulation. Using a single all-purpose cleaner across every surface is one of the most common mistakes car owners make, and it is one professionals never repeat.
The core product categories detailers rely on include:
- pH-balanced interior cleaners for plastics, vinyl, and leather. These formulas clean without stripping protective coatings or causing long-term dulling. A surface-specific pH-balanced cleaner is the standard for any sensitive touchpoint inside the cabin.
- Fabric and upholstery cleaners for cloth seats and carpets. These are formulated to lift stains without saturating the foam beneath the fabric.
- Ammonia-free glass cleaners for windows and mirrors. Ammonia damages window tint and degrades certain coatings, so detailers always choose ammonia-free formulas.
- Leather conditioners applied after cleaning to restore suppleness and prevent cracking.
- Enzyme-based odor eliminators for deep odor removal in fabric surfaces.
Detailers always test a new cleaner on an inconspicuous area first. This protects against unexpected discoloration or surface reactions before committing to a full application.
What tools are essential for professional interior detailing?
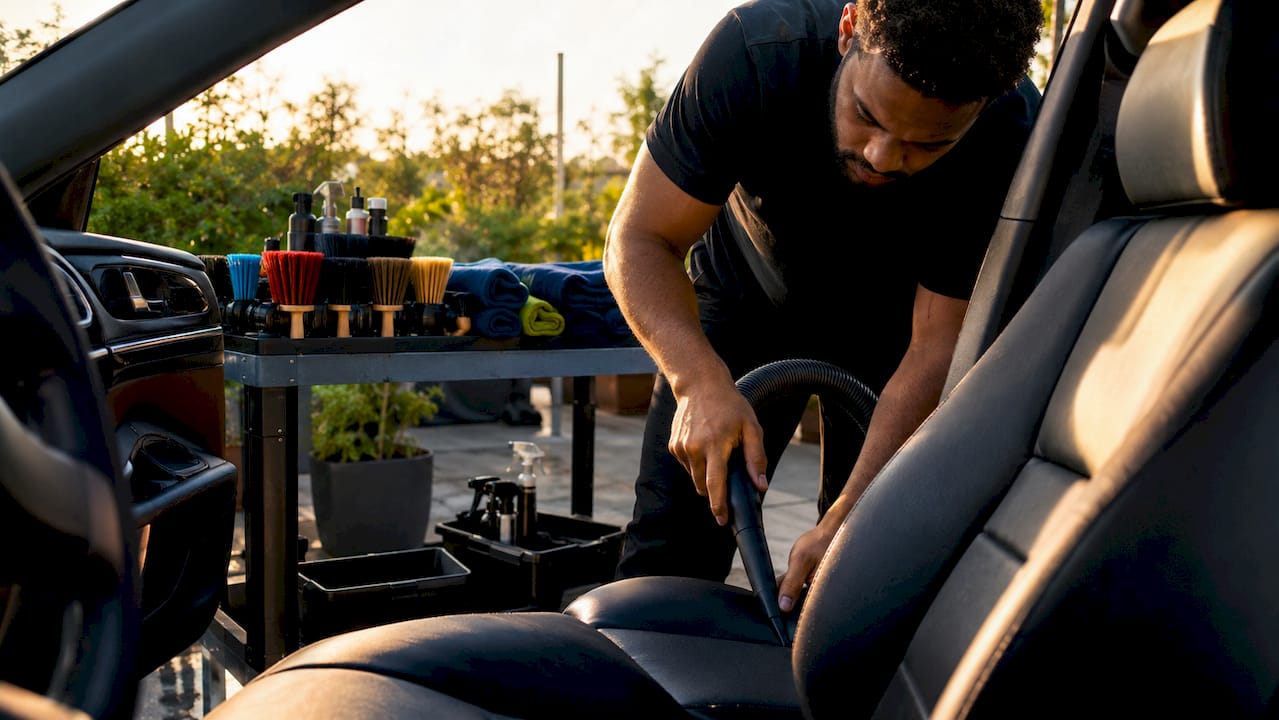
The right tools matter as much as the right products. A professional interior detailing setup includes a vacuum with attachments, microfiber towels dedicated by task, soft detail brushes, and surface-appropriate cleaners. Each tool serves a specific function, and substituting one for another produces inferior results.
Vacuums and attachments
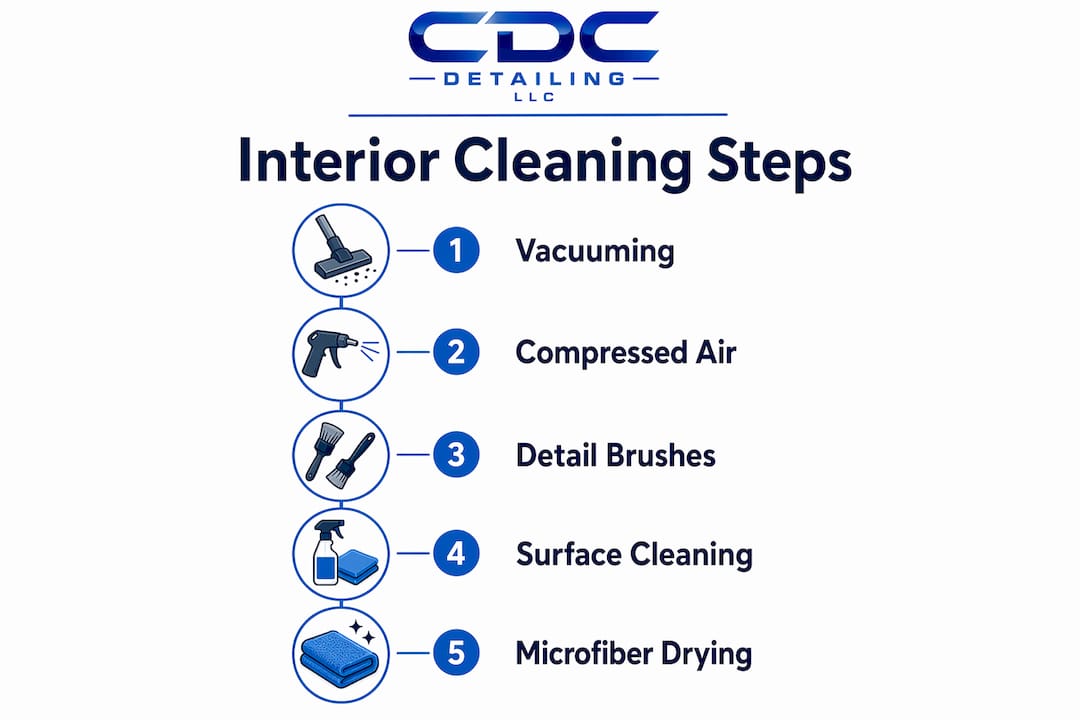
A high-powered vacuum with a crevice tool, upholstery brush, and flat nozzle is the foundation of any interior detail. The crevice tool reaches between seats and into tight console gaps. The upholstery brush agitates fabric gently while the vacuum lifts debris simultaneously.
Detail brushes
Detailers carry multiple brush types. Soft-bristle brushes work on dashboards, vents, and speaker grilles without scratching. Stiffer brushes handle carpet and floor mat agitation. A quality detailing brush set covers the full range of interior surfaces and tight spaces that a cloth or towel simply cannot reach.
Microfiber towels
Detailers sort microfiber towels by function and color code them by surface. One towel for glass, one for leather, one for plastics. Cross-contamination between surfaces transfers residue and causes streaking. A towel used on a greasy dashboard should never touch a glass surface.
Compressed air
An air gun or compressed air canister blasts debris out of vents, seams, and button gaps before vacuuming. This step loosens material that a vacuum alone cannot reach.
Pro Tip: Never spray any cleaner directly onto a surface. Spray onto the microfiber towel or applicator brush instead. This gives you full control over moisture and prevents oversaturation near electronics.
What techniques do detailers follow when cleaning a car interior?
Technique determines the final result as much as product selection. Professional detailers follow a defined workflow that prevents re-soiling and maximizes efficiency on every job.
- Remove loose items and floor mats. Mats get shaken out and cleaned separately. Loose trash is removed before any cleaning begins.
- Vacuum the entire interior. Vacuuming first prevents dust and debris from being pushed onto surfaces that have already been wiped clean. This is a non-negotiable first step.
- Apply compressed air to vents and seams. This loosens hidden debris before the second vacuum pass.
- Clean from top to bottom. The top-down cleaning method starts at the headliner and works down to the floor. Dirt falls downward, so cleaning in this order means you never re-soil a surface you have already finished.
- Treat surfaces with appropriate cleaners. Spray onto the applicator, not the surface. Work in small sections.
- Agitate with the correct brush. Proper agitation with the right brush can lift significantly more embedded dirt from interior surfaces than using a cloth alone. Mechanical agitation does what chemistry cannot do by itself.
- Wipe and buff with a clean microfiber towel. Use a fresh towel for each surface type.
- Address electronics and screens last. Screens get a lightly dampened microfiber towel with no cleaner sprayed nearby. Moisture near electronics causes permanent damage.
Pro Tip: Work in sections no larger than two square feet at a time. This prevents cleaners from drying on surfaces before you can wipe them, which causes residue buildup and streaking.
Controlled moisture application is the defining skill in interior detailing. Oversaturation of any surface, especially fabric, creates problems that are harder to fix than the original dirt.
How do professionals handle stain removal and deep cleaning?
Stain removal on upholstery and carpet requires a different approach than routine surface cleaning. Professionals treat stains with targeted products and controlled technique rather than scrubbing harder with a general cleaner.
- Spot treatment first. Apply a fabric or upholstery cleaner directly to the stain. Allow dwell time of 30–60 seconds so the formula can break down the stain before agitation.
- Agitate with a brush suited to the fabric. Soft-bristle brushes work on delicate cloth. Stiffer brushes handle heavy-duty carpet fibers. Matching brush stiffness to fabric type prevents fiber damage.
- Extract moisture immediately. A wet-dry vacuum or extractor pulls the cleaner and dissolved stain out of the fabric. This step is critical.
- Avoid oversaturation. Soaking cloth upholstery traps moisture in the foam beneath the fabric. That trapped moisture causes musty odors that are difficult to eliminate after the fact.
- Use a steamer for deep cleaning. Steam penetrates fabric fibers and kills odor-causing bacteria without saturating the material. It is the preferred tool for severe staining and odor removal.
| Stain type | Recommended approach |
|---|---|
| Food and beverage | Enzyme-based upholstery cleaner with soft brush agitation |
| Grease and oil | Degreaser formulated for automotive fabric, low moisture application |
| Pet hair and dander | Rubber brush to collect hair, then vacuum, then fabric cleaner |
| Musty odor | Steam treatment followed by enzyme-based odor eliminator |
| Ink or dye | Isopropyl alcohol on a microfiber towel, blot only, no scrubbing |
For severe staining, professional-grade extractors are the only reliable solution. Consumer-grade tools rarely generate enough suction to fully remove dissolved stain material from deep within carpet fibers.
What mistakes do car owners make that professionals always avoid?
Car owners who attempt interior cleaning without professional knowledge consistently make the same errors. These mistakes damage materials and produce results that look worse than before cleaning.
- Spraying cleaners directly onto surfaces. Direct-surface spraying is linked to a significant share of streaking failures during interior detailing. Moisture seeps into seams, saturates electronics, and leaves residue lines on dashboards.
- Using harsh household chemicals. Products like bleach, ammonia-based cleaners, and heavy degreasers accelerate cracking and UV discoloration of vinyl and leather. Automotive surfaces require automotive-specific formulas.
- Skipping the top-down workflow. Cleaning the floor before the dashboard means dust and debris from higher surfaces fall onto already-cleaned areas. The job has to be redone.
- Overwetting upholstery. Excess moisture trapped in seat foam produces a musty smell within days. This is one of the most common complaints after DIY interior cleaning.
- Using the same towel on every surface. A towel contaminated with dashboard cleaner will streak glass. Dedicated towels per surface type are not optional for professional results.
The single most important habit a car owner can adopt is spraying product onto the towel, not the surface. That one change eliminates the majority of streaking and oversaturation problems immediately.
Key Takeaways
Professional interior detailing produces lasting results because it combines surface-specific products, dedicated tools, and a defined top-down workflow that prevents re-soiling and material damage.
| Point | Details |
|---|---|
| Use surface-specific cleaners | pH-balanced formulas protect leather, vinyl, and plastic from long-term damage and dulling. |
| Spray onto the towel, not the surface | Applying product to the applicator prevents oversaturation, streaking, and electronics damage. |
| Vacuum before wiping | Vacuuming first stops debris from being pushed into surfaces during the cleaning process. |
| Follow the top-down method | Cleaning from headliner to floor prevents dirt from falling onto already-cleaned surfaces. |
| Match brush stiffness to material | Soft brushes protect dashboards and vents; stiffer brushes lift embedded dirt from carpet fibers. |
Why product choice matters more than effort
After years of watching car owners scrub away at interiors with the wrong products, I am convinced that effort is the least important variable in interior detailing. Product choice and technique are everything.
The most common misconception I see is that more scrubbing compensates for the wrong cleaner. It does not. A harsh household degreaser applied to leather will strip the protective finish in one session. No amount of conditioning afterward fully reverses that damage. The surface looks clean for a week, then starts cracking within months.
The second misconception is that microfiber towels are interchangeable. They are not. A towel used on a greasy console carries silicone residue. That residue on a glass surface creates a film that no amount of wiping removes cleanly. Color-coding towels by surface is the simplest system, and it works every time.
What I have found is that car owners who invest in a proper interior detailing supply kit and follow the top-down workflow get results that last three to four times longer than those who use whatever is under the kitchen sink. The products do the work. Your job is to apply them correctly.
Long-term vehicle value preservation starts inside the cabin. Cracked leather, faded plastic, and stained carpet all reduce resale value in ways that are visible and immediate to any buyer. Treating the interior with the right products from the start is far cheaper than restoration later.
— Charles
Professional interior detailing from Cdcautodetailing
Cdcautodetailing brings professional-grade interior cleaning directly to your driveway across South Jersey. Every service uses pH-balanced, surface-specific cleaners, dedicated microfiber towels, and the top-down workflow that prevents re-soiling and material damage.
The team at Cdcautodetailing applies the same techniques described in this article on every job, from spot treatment and steam cleaning to compressed air agitation and controlled moisture application. If you want to see what professional auto detailing actually looks like in practice, or you are ready to book a mobile interior detail, Cdcautodetailing makes it straightforward. Visit the site to review interior detailing service options and schedule at a time that works for you.
FAQ
What cleaners do detailers use on car dashboards?
Detailers use pH-balanced interior cleaners applied to a microfiber towel, never sprayed directly onto the dashboard. This prevents oversaturation and protects plastic and vinyl from long-term dulling.
How do professionals clean car upholstery without causing mildew?
Professionals use low-moisture application techniques and extract moisture immediately with a wet-dry vacuum or extractor. Soaking fabric traps moisture in the foam beneath, which causes musty odors within days.
What is the correct order for interior car detailing steps?
The correct order is: remove mats and loose items, vacuum the full interior, apply compressed air to vents and seams, then clean from the headliner down to the floor using surface-specific products.
Why do detailers use ammonia-free glass cleaner?
Ammonia degrades window tint and certain interior coatings. Ammonia-free glass cleaners deliver a streak-free finish without damaging treated surfaces.
Can I use household cleaners on car interiors?
Household chemicals like bleach and ammonia-based sprays accelerate cracking and UV discoloration of vinyl and leather. Automotive-specific, pH-balanced formulas are the correct choice for every interior surface.