TL;DR:
- Regular interior cleaning maintains vehicle value and enhances driving enjoyment.
- Use automotive-specific tools and follow a top-to-bottom cleaning sequence.
- Routine maintenance prevents damage and keeps the interior fresh longer.
Your car’s interior takes a beating every single day. Crumbs work into seat seams, dust settles on every surface, and that mystery smell from last Tuesday is still hanging around. For vehicle owners across South Jersey, keeping the inside of your car clean is not just about comfort. A well-maintained interior can meaningfully improve your car’s resale value and make every drive more enjoyable. The good news is that with the right sequence and the right products, you do not need to spend hours or a fortune to get professional-level results at home.
Table of Contents
- Gathering your tools and preparing the space
- Step-by-step interior cleaning process
- Deep cleaning fabrics: Seats, carpets, and mats
- Finishing touches: Deodorizing and interior protection
- How often should you clean? Maintenance schedule and expert advice
- Why DIY interior cleaning makes a real difference
- Transform your vehicle’s interior with professional detailing
- Frequently asked questions
Key Takeaways
| Point | Details |
|---|---|
| Preparation is key | Organize your cleaning tools and work area before starting to save time and effort. |
| Sequence matters | Always clean from top to bottom and big to small to avoid making extra work for yourself. |
| Use the right products | Automotive-specific cleaners are safer and more effective than household products for car interiors. |
| Protect and maintain | Finishing with protectants and regular upkeep preserves your car’s look and resale value. |
| Consistency delivers results | Sticking to a cleaning routine makes it easier to keep your car fresh and increases long-term value. |
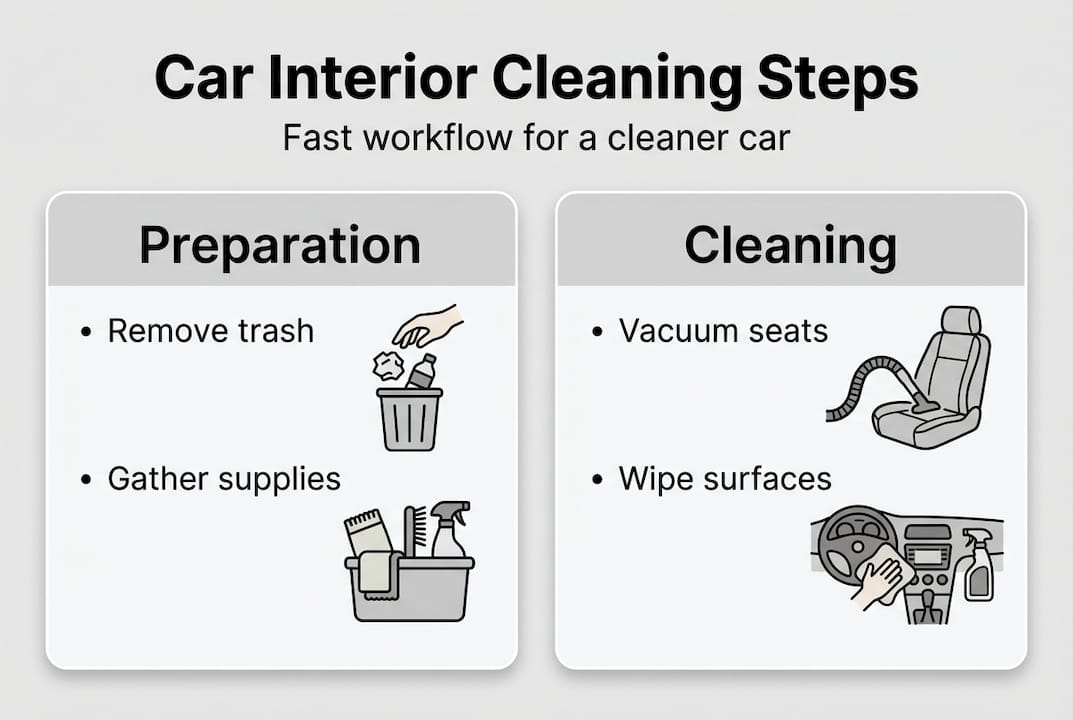
Gathering your tools and preparing the space
Once you understand why a clean interior matters, the first step is getting your tools and space ready. Showing up to clean without the right equipment is like trying to cook dinner without any ingredients. You will waste time, get frustrated, and end up with a half-finished job.
According to professional tips from experienced detailers, preparation is where most DIY cleaners fall short. Before you touch a single surface, gather everything you need.
Essential tools and products:
- Shop vac or handheld vacuum with crevice and brush attachments
- Microfiber cloths (at least 6 to 8 for a full clean)
- Detailing brushes in various sizes for vents and tight spots
- Compressed air canister or compressor
- Automotive interior cleaner
- Ammonia-free glass cleaner
- Leather or fabric protectant
- Optional: steam cleaner
As deep clean guidance confirms, these tools cover the full range of surfaces inside your vehicle. Notice that the list does not include any household multi-surface sprays. That is intentional. Automotive-specific products are pH-balanced for car materials. Household cleaners can strip protective coatings from vinyl, leave residue on screens, and even crack leather over time.
| Product type | Safe for car use | Risk if wrong product used |
|---|---|---|
| Automotive interior cleaner | Yes | None when used correctly |
| Household all-purpose spray | No | Damages vinyl and plastics |
| Ammonia-free glass cleaner | Yes | None |
| Regular window cleaner | No | Hazes tinted windows and screens |
| Leather conditioner | Yes | None |
| Baby wipes | Sometimes | Can leave residue or dry out leather |
Before you start cleaning, prepping your car properly sets the stage for better results. Remove all trash, personal items, and floor mats first. This clears your workspace and prevents you from cleaning around obstacles.
Also, park in the shade. Direct sunlight causes cleaning products to dry too fast, leaving streaks and residue behind.
Pro Tip: Always work top-to-bottom and big-to-small. Start with the headliner and work down to the floor. Tackle large surfaces before tight crevices. This way, any debris you dislodge falls onto surfaces you have not cleaned yet.
Step-by-step interior cleaning process
With everything ready, you can move through each step to deep clean your car’s interior efficiently. Having a clear sequence keeps you from doubling back and re-cleaning areas.
- Remove trash, personal items, and floor mats. As preparation best practices recommend, also remove car seats if applicable. This gives you full access to every surface.
- Vacuum everything. Hit seats, carpets, floor mats, and the trunk. Use the crevice tool for seat seams and the brush attachment for fabric surfaces.
- Clean hard surfaces. Wipe dashboard and console surfaces, door panels, and the steering wheel with an all-purpose automotive cleaner and microfiber cloths. Use detailing brushes for vents and buttons.
- Clean glass and screens. Use ammonia-free cleaner on windows, mirrors, and infotainment screens. For screens specifically, use a microfiber or eyeglass-style cloth. Never spray directly onto a screen.
- Treat seats and carpets. Spot clean stains, shampoo fabric areas as needed, and condition leather surfaces.
- Reinstall mats and items. Only put things back once every surface is dry.
For a more detailed breakdown, this step by step car interior cleaning guide walks through each phase with additional tips.
| Cleaner type | Best use | Avoid on |
|---|---|---|
| Automotive all-purpose | Dashboard, doors, console | Screens, leather |
| Leather cleaner | Leather seats and trim | Fabric or vinyl |
| Ammonia-free glass cleaner | Windows, mirrors, screens | Painted surfaces |
| Fabric shampoo | Cloth seats, carpet | Leather or vinyl |
Pro Tip: Always vacuum before you wipe. If you wipe first, you push loose dust and crumbs into the surfaces you are trying to clean. Vacuuming first removes the bulk of debris so your cleaning cloths actually lift grime instead of spreading it.
This interior cleaning workflow and the interior detailing checklist are both great references to keep nearby while you work.
Deep cleaning fabrics: Seats, carpets, and mats
Now that you have addressed surfaces, it is time to focus on seats, carpets, and mats for a deep refresh. Fabric surfaces trap odors, allergens, and stains in ways that hard surfaces simply do not.
Start by shaking out mats and vacuuming seats separately before any wet cleaning begins. This removes loose debris that would otherwise turn into mud once moisture is introduced.
Fabric cleaning steps:
- Vacuum with a brush attachment using overlapping strokes
- Apply a fabric-safe spot cleaner to stains and let it dwell for 2 to 3 minutes
- Agitate with a detailing brush using circular motions
- Blot (do not scrub) with a clean microfiber cloth
- Repeat for stubborn stains before moving on
For odors, baking soda is a reliable and inexpensive option. Sprinkle it generously over carpets and seats, let it sit for 15 to 30 minutes, then vacuum it up. For biological odors like pet smells or spilled food, enzymatic cleaners break down the odor source at a molecular level rather than just masking it. You can learn more about this through car odor removal resources.
| Method | Best for | Caution |
|---|---|---|
| Steam cleaning | Deep sanitizing, allergens | Use minimal moisture, dry fully |
| Fabric shampoo | General stains and grime | Avoid over-wetting |
| Baking soda | Light odors | Vacuum thoroughly after |
| Enzymatic cleaner | Pet and biological odors | Test on hidden area first |
On steam cleaning: some sources recommend it for deep sanitizing, while others caution against excess moisture. Both are right depending on how you use it. Steam is effective but requires good ventilation and complete drying. For more on this, interior shampooing covers the process in detail.
Warning: Never over-wet your carpets or seat cushions. Trapped moisture underneath leads to mold growth and a musty smell that is far harder to remove than the original stain.
Pro Tip: After any wet cleaning on fabric, leave doors open in a shaded area for at least one hour. A small fan directed into the cabin speeds drying significantly.
Finishing touches: Deodorizing and interior protection
With deep cleaning complete, you are ready for those finishing steps that keep the car feeling fresh and extend interior life. This phase is where most DIY cleaners stop too early, and it shows within a few weeks.
Deodorizing and protection checklist:
- Apply baking soda or an enzymatic cleaner to any remaining odor areas
- Use a fabric protectant spray on cloth seats and carpets
- Apply a vinyl or leather conditioner to all non-fabric surfaces
- Wipe door jambs and handles with a damp microfiber cloth
- Air out the vehicle with windows open to dry and dissipate any remaining smells
Protectants do more than just make surfaces look good. Fabric protectants create a barrier that repels future spills and makes spot cleaning much easier. Leather conditioners prevent cracking and fading caused by UV exposure and everyday friction. Think of it as sunscreen for your car’s interior.
The connection between cleanliness and value is real. Regular interior care prevents wear and directly enhances resale appeal. A car with a stained, smelly interior can lose hundreds to thousands of dollars in trade-in or private sale value compared to one that looks and smells well-maintained.
Statistic callout: A clean, well-maintained interior is one of the top factors buyers evaluate when purchasing a used vehicle, and neglected interiors are among the most common reasons offers come in below asking price.
For more on this topic, lasting value from interior detailing and protecting your car’s interior both explain the long-term financial case for consistent care. You can also explore maintenance detailing benefits for a broader picture.
Pro Tip: After applying any protectant, let it cure for 10 to 15 minutes before closing the doors. This allows the product to bond properly rather than transferring onto clothing or other surfaces.
How often should you clean? Maintenance schedule and expert advice
To keep your car looking great after your big cleaning, it is important to follow a routine. One thorough clean every few months will not hold up if you are not maintaining it in between.
Here is a practical schedule based on recommended cleaning frequency from detailing professionals:
- Weekly: Remove trash, shake out mats, and do a quick vacuum of seats and floor. Wipe down the steering wheel and any high-touch surfaces.
- Monthly: Full vacuum including crevices, wipe all hard surfaces, clean glass, and spot treat any stains before they set.
- Quarterly: Full deep clean as outlined in this guide, including fabric treatment, odor removal, and application of protectants.
| Frequency | Task | Time needed |
|---|---|---|
| Weekly | Trash removal, quick vacuum, surface wipe | 10 to 15 minutes |
| Monthly | Full vacuum, glass, hard surfaces | 30 to 45 minutes |
| Quarterly | Deep clean, fabric care, protectants | 2 to 3 hours |
For South Jersey drivers specifically, this South Jersey cleaning frequency guide accounts for local conditions like summer humidity and beach sand that accelerate interior wear.
Consistency is the real secret here. A car that gets a 10-minute weekly tidy takes far less effort to deep clean than one that only gets attention every six months. Small habits prevent the kind of buildup that requires hours of scrubbing to undo.
Why DIY interior cleaning makes a real difference
Here is something most detailing articles will not tell you: the expensive tools are not what separate a great result from a mediocre one. Sequence and product selection matter far more than equipment cost.
We see this regularly in our work across South Jersey. Customers come in after attempting a DIY clean that left streaks on their screens, sticky residue on their dashboard, or a damp smell from over-wet carpets. In almost every case, the problem was not effort. It was order of operations and product choice.
The misconception that a single intensive cleaning session is better than regular light maintenance is one of the most costly mistakes car owners make. Dirt and UV exposure work on your interior every single day. A quarterly deep clean with nothing in between allows damage to accumulate quietly.
The lasting value of detailing is not just about resale. It is about driving a vehicle that feels cared for. That feeling comes from informed, consistent effort, not from buying a $200 steam cleaner and using it twice a year. The best results we have seen come from owners who follow a simple weekly routine and treat the quarterly clean as maintenance, not a rescue mission.
Transform your vehicle’s interior with professional detailing
If keeping your car pristine feels overwhelming or you want results beyond DIY, discover what professional detailing can do. Sometimes life gets busy, and a thorough clean falls behind schedule.

At CDC Auto Detailing, we bring professional-grade interior care directly to your driveway across South Jersey. From fabric shampooing and odor elimination to leather conditioning and full interior protection packages, our mobile service fits around your schedule. Explore auto detailing service examples to see the full range of what we offer, or learn how detailing works before you commit. Ready to get started? Book mobile detailing in just a few minutes and let us handle the hard work for you.
Frequently asked questions
Can I use household cleaners for my car interior?
It is best to use automotive-specific products over household ones to avoid damaging modern interior finishes like vinyl, leather, and infotainment screens. Household sprays are not formulated for these materials and can cause long-term damage.
How do I remove persistent odors from my car?
Use baking soda or enzymatic cleaners on the affected area, then air out the interior with windows open after applying to fully dissipate the smell. Enzymatic cleaners are especially effective for biological odors.
How often should I deep clean the car interior?
Deep clean monthly or quarterly and do a quick vacuum and spot clean each week to stay on top of buildup between sessions.
Is steam cleaning safe for all upholsteries?
Steam cleaning works well for many fabrics but excess moisture risks mold growth and material damage if the interior is not dried thoroughly afterward. Always allow full drying time with good ventilation.
Will regular interior cleaning increase my car’s resale value?
Yes. Regular interior care prevents wear and directly improves resale appeal, making your vehicle more attractive to buyers and supporting a higher asking price.