TL;DR:
- Proper surface preparation, including washing, decontamination, and correction, is critical for long-lasting ceramic coating adhesion. Applying the coating in small, sectioned areas with proper flash time and using a two-towel buffing method ensures even coverage and prevents defects. Environmental control during application and curing is essential for optimal durability and finish quality.
The ceramic coating application process is a systematic, multi-step method that chemically bonds a protective silica-based layer to your vehicle’s paint, creating a surface that resists UV damage, chemical contamination, and water intrusion. Unlike wax or paint sealant, a properly applied ceramic coating forms a semi-permanent bond that can last years rather than weeks. Brands like Chemical Guys, Gtechniq, and TAC System have refined their formulas to reward precise application technique. Get the process right, and you get a mirror-like finish with serious protective depth. Rush it, and you lock in flaws permanently.
What are the essential steps to prepare a vehicle for ceramic coating?
Surface preparation is the single most important phase of the entire ceramic coating process guide. Coatings chemically lock to paint, not just sit on top of it, which means every contaminant, scratch, or oil residue you leave behind gets sealed in permanently. Preparation is not optional cleanup. It is the foundation that determines whether your coating lasts two years or seven.
Follow these four steps in order before touching a coating bottle:
- Wash with a pH-balanced, wax-stripping shampoo. Standard car soap leaves behind wax and silicone residues that block bonding. Products like Chemical Guys Citrus Wash Clear strip old layers without damaging clear coat.
- Decontaminate with iron remover and a clay bar. Iron particles from brake dust embed in paint and create microscopic bumps. An iron remover like CarPro Iron X dissolves ferrous contamination, and a clay bar removes bonded surface debris that washing cannot reach. Proper decontamination and correction directly controls how long your coating lasts.
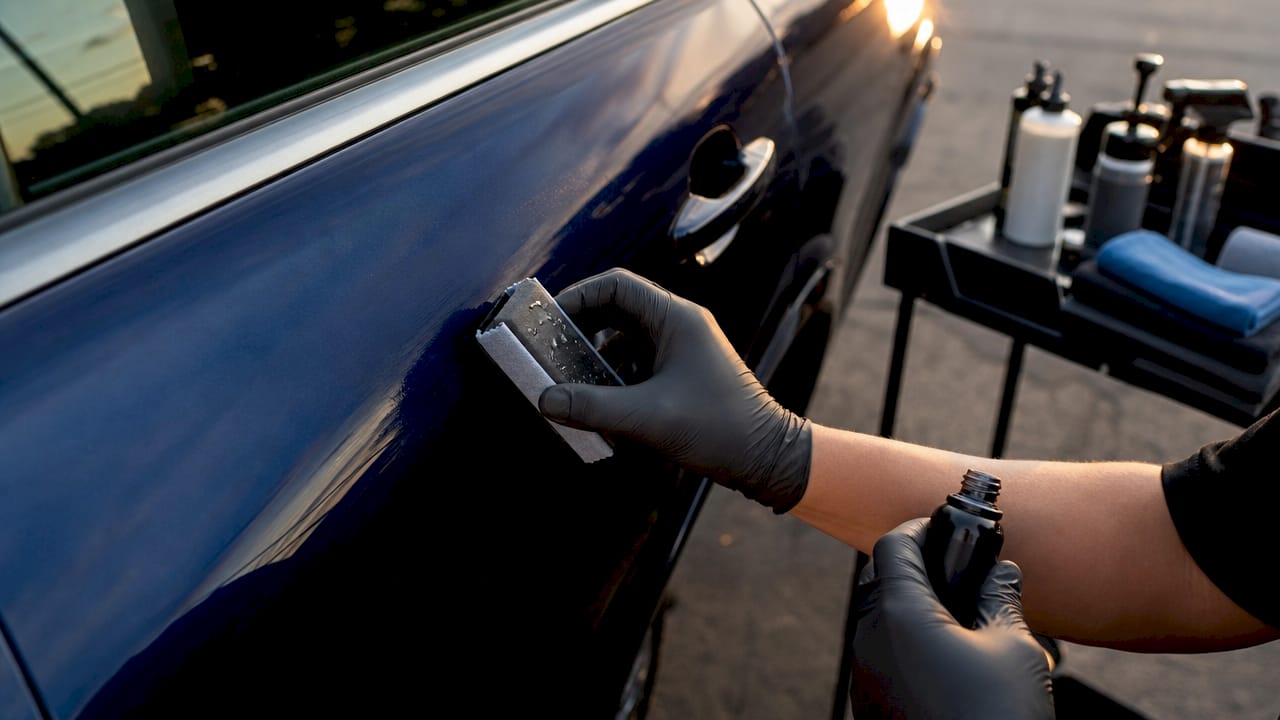
- Perform paint correction. Ceramic coatings amplify whatever is on your paint. Swirl marks and light scratches become more visible under the gloss, not less. Use a dual-action polisher like the Rupes LHR15 Mark III with a light cutting compound to remove surface defects before coating.
- Wipe panels with a dedicated panel prep spray. Polishing compounds leave behind oils and silicones that prevent bonding. Residual polish oils cause bonding failure, bubbling, and premature wear. IPA-based panel prep sprays like CarPro Eraser remove these residues completely. Apply immediately before coating each section.
Pro Tip: Work in sections when doing the panel wipe. Prep one panel, coat it, then move to the next. Prepping the entire car at once allows airborne dust and oils to resettle before you apply the coating.
How is ceramic coating applied step by step?
The ceramic coating application process requires working panel by panel in sections no larger than 2×2 feet. Trying to coat an entire hood at once is one of the most common DIY mistakes. Coating flashes (begins to cure) quickly, and large sections give you no time to buff evenly.
Here is the core application sequence:
- Load the applicator pad. Apply 6 to 8 drops of ceramic coating onto a microsuede applicator block. More product does not mean more protection. It means more residue to remove.
- Apply in straight overlapping passes. Use horizontal passes, then vertical passes in a crosshatch pattern. This ensures even coverage and prevents thin spots. Chemical Guys and TAC System both advise working small panels with a buffing window of 30 to 90 seconds depending on conditions.
- Watch for flash time. Flash time is the window when the coating turns hazy or shows a rainbow-like sheen. This signals the solvent is evaporating and the coating is ready to buff. Flash time ranges from 30 seconds to 2 minutes based on temperature and humidity. Buff too early and you remove the coating. Buff too late and you create high spots that require machine polishing to fix.
- Use the two-towel buffing method. Use one clean microfiber towel to remove the bulk of the residue, then immediately follow with a second fresh towel to level the surface. Two towels is non-negotiable for preventing streaking and high spots.
- Work in a consistent sequence. Start with the roof, then move to the hood, trunk, doors, and finally the bumpers. This prevents you from leaning over freshly coated panels and contaminating them.
Pro Tip: Keep a spray bottle of isopropyl alcohol nearby. If you notice a high spot forming before it fully cures, a light mist of IPA can soften it enough to buff out. After full cure, you will need a polisher.
| Condition | Ideal Range | Effect if Outside Range |
|---|---|---|
| Temperature | 50 to 80°F | Too hot accelerates flash; too cold slows bonding |
| Humidity | 40 to 60% | High humidity causes water spotting; low humidity speeds flash unpredictably |
| Lighting | Bright, indirect | Poor lighting hides high spots and missed sections |
What are best practices for curing and aftercare?
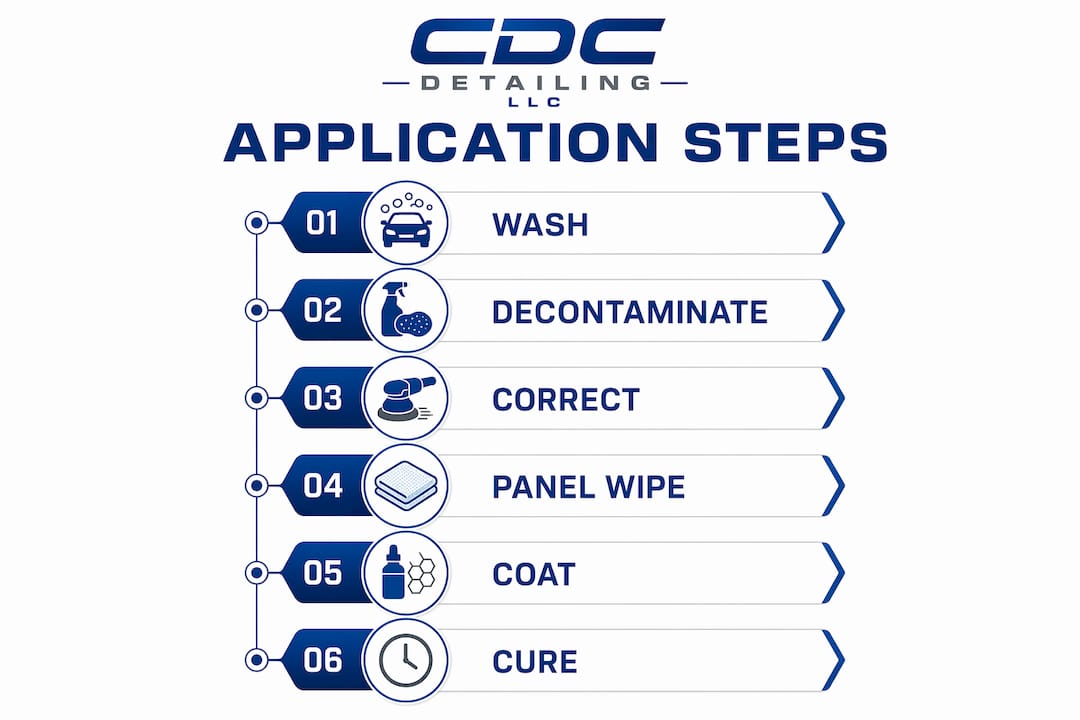
Curing is where most vehicle owners lose the protection they just worked hard to apply. The curing process involves solvent evaporation and chemical cross-linking that build the hard protective layer over several days. Rushing this phase causes permanent defects.
Ceramic coatings cure in three distinct stages:
- Flash cure (30 minutes to 2 hours). This is the window immediately after application when you buff off excess coating. The surface looks dry, but the chemistry is just beginning.
- Soft cure (24 to 48 hours). The coating is touch-dry but still chemically bonding internally. Even after the coating appears dry, moisture or contamination during this phase leads to permanent coating defects. Keep the vehicle dry and away from contaminants.
- Hard cure (7 to 14 days). The coating fully cross-links, reaching its rated hardness and chemical resistance. Avoid washing and water exposure for at least 7 days. Automatic car washes, bird droppings, and tree sap during this window can all cause permanent marks.
After the hard cure completes, use only pH-neutral, coating-compatible soaps like CarPro Reset or Gtechniq G-Wash. Avoid dish soap, all-purpose cleaners, or anything with wax additives. These degrade the hydrophobic layer over time.
Pro Tip: If rain hits your vehicle within the first 48 hours, do not wipe it. Let it dry naturally or gently blot with a clean microfiber towel. Rubbing wet paint during soft cure drags contaminants across the surface and creates scratches that the coating will then lock in.
How do environmental conditions affect the application?
The workspace you choose for ceramic coating application directly determines the quality of the result. A clean garage or shaded space with controlled temperature is not a luxury. It is a requirement. Uncontrolled environments cause dust and particles to embed in the soft film, creating a textured finish that looks worse than no coating at all.
Temperature and humidity control influence solvent evaporation rates and cross-linking kinetics, which directly affect cure time and final coating hardness. Applying in direct sunlight on a hot day causes the coating to flash in under 30 seconds, leaving you no time to buff evenly. Applying in cold, damp conditions slows flash time unpredictably and can trap moisture under the coating.
Detailer protocols include workspace airflow and contamination management because even a light breeze through an open garage door carries enough dust to contaminate a panel mid-application. Close doors, turn off fans that blow toward the vehicle, and let the car reach room temperature before starting. A vehicle brought in from a cold morning needs at least 30 minutes to normalize before coating.
| Environmental Factor | Recommended Control |
|---|---|
| Direct sunlight | Work indoors or in deep shade |
| Wind and dust | Close garage doors; use a clean drop cloth on the floor |
| Cold vehicle panels | Allow 30 minutes for panel temperature normalization |
| Airborne particles | Sweep and mop workspace before bringing the vehicle in |
Pro Tip: Use a high-intensity LED work light positioned at a low angle to the panel surface. This raking light reveals high spots, missed sections, and dust contamination that overhead lighting completely hides.
Key takeaways
The ceramic coating application process succeeds or fails based on preparation quality, flash timing discipline, and environmental control during both application and curing.
| Point | Details |
|---|---|
| Preparation is non-negotiable | Wash, decontaminate, correct, and panel-wipe before applying any coating product. |
| Flash time controls the result | Buff within the 30-to-90-second window to avoid high spots and uneven coverage. |
| Two-towel buffing prevents defects | Use one towel to remove bulk residue and a second to level the surface cleanly. |
| Curing takes up to 14 days | Avoid water, washing, and contaminants for at least 7 days after application. |
| Environment determines quality | Work at 50 to 80°F with 40 to 60% humidity in a clean, enclosed space. |
Why most DIY ceramic coatings fail before they start
I have seen hundreds of ceramic coating jobs, and the pattern is consistent. The coating itself is rarely the problem. The process leading up to it almost always is. Most visible failures, streaks, high spots, and early peeling, trace back to application technique or insufficient buffing rather than the product itself.
The step that separates a coating that lasts two years from one that lasts seven is the panel wipe. Detailers who skip or rush it are essentially applying a coating over a layer of polishing oil. The coating bonds to the oil, not the paint, and it lifts within months. I have seen this on cars where the owner spent $80 on a premium coating and $0 on panel prep spray.
Timing discipline is the other factor most DIY guides understate. Ceramic coating application does not forgive rushing. You cannot coat three panels and then go back to buff the first one. Flash time waits for no one. The best approach is to treat each 2×2 section as its own complete job. Apply, watch, buff, move on.
If you are applying multiple coats for added thickness and hardness, wait the full recommended cure interval between layers. Multi-layer application increases film thickness and hydrophobicity, but only when each layer has properly bonded before the next goes on. Stacking coats too quickly traps solvents and causes clouding.
For high-value vehicles or anyone doing this for the first time, I genuinely recommend a professional application for the first coat. You will learn more watching an experienced detailer work one panel than reading ten guides. After that, maintaining or adding a top coat yourself becomes much more manageable.
— Charles
Get professional ceramic coating results in South Jersey
Cdcautodetailing brings professional-grade ceramic coating services directly to your driveway across South Jersey, including Pitman, NJ and surrounding areas. Every application starts with a full paint correction and decontamination process to give the coating the clean surface it needs to bond properly.

Whether you need a single-layer protective coat or a multi-layer system for a show car, Cdcautodetailing uses professional-grade products applied in controlled conditions for results that hold up for years. The team also offers mobile detailing services including paint correction and aftercare maintenance to keep your coating performing at its best. Book your ceramic coating service with Cdcautodetailing and get the protection your vehicle deserves, applied correctly the first time.
FAQ
What is the ceramic coating application process?
The ceramic coating application process involves washing, decontaminating, correcting, and panel-wiping the vehicle’s paint before applying the coating panel by panel in small sections and buffing within the flash window. The coating then cures over 7 to 14 days to reach full hardness and chemical resistance.
How long does ceramic coating take to apply?
A full ceramic coating application typically takes 1 to 2 days for a standard vehicle when including paint correction and preparation. The coating itself may take 4 to 8 hours to apply, with curing continuing for up to 14 days afterward.
Can I wash my car after ceramic coating?
Driving resumes after 24 hours, but washing should be avoided for at least 7 days to allow the coating to reach hard cure. After that, use only pH-neutral, coating-compatible soap and avoid automatic car washes.
What temperature is best for applying ceramic coating?
The ideal application temperature is between 50 and 80°F with 40 to 60% humidity. Temperatures outside this range affect solvent evaporation and flash timing, which can result in uneven coverage or bonding failure.
How many coats of ceramic coating do I need?
One coat provides solid protection, but additional coats increase hardness and hydrophobicity when applied after the recommended cure interval between layers. Most professional applications use two to three coats for maximum durability.