
Preservation comes first with any classic: hand-wash gently, inspect for corrosion, and skip aggressive polishing on original paint. A street-driven classic generally needs a deep clean about every few months, more often with salt or heavy exposure (https://www.hagerty.com/resources/car-maintenance/classic-car-detailing-everything-you-need-to-know), following conservation principles closer to museum vehicle care than typical detailing. If the paint looks original or is flaking, call a specialist before touching it.
TL;DR:
- Wash regularly driven classics about every three months, increasing frequency after salt or heavy exposure and reducing it during long storage.
- Check paint type and condition before correction; avoid powered compounding on original single stage or nitrocellulose finishes, and consult a specialist for flaking paint.
- Choose reversible wax or a mild sealant for original paint; avoid ceramic coatings over active corrosion because they can trap moisture.
- Test steam in an inconspicuous spot first, or skip it on cars with original trim, because it can loosen old carpet and headliner adhesives.
Table of Contents
- Essential Supplies and Setup for Safe Classic Car Detailing
- Exterior Detailing: Wash, Decontaminate, and Correct With Care
- Interior Detailing: Preserving Vintage Upholstery, Trim, and Dashboards
- Protection and Storage: Waxes, Sealants, Coatings, and Long-Term Care
- When to Hire a Professional Classic Car Detailer
- CDC Auto Detailing: Procedural Assets and How They Map to Preservation Work
- How to Assess Paint Condition Before You Touch It
- Correcting Swirl Marks and Oxidation Without Losing Original Paint
- Engine Bay Detailing on a Classic: What to Skip and What to Protect
- Handling Delicate Trim and Chrome Without Losing Detail
- Environmental Factors That Hit Classic Cars Harder
- Building a Seasonal Maintenance Schedule
- Author’s Perspective: Why Conservative Care Usually Wins
- Booking a Preservation-Aware Detail With CDC Auto Detailing
- FAQ
- Sources
Essential Supplies and Setup for Safe Classic Car Detailing
A classic deserves a smaller, gentler kit than a daily driver. Two buckets with grit guards keep grit out of your wash mitt, and separate microfiber towels for paint, glass, and wheels stop cross-contamination that causes fine scratching. Soft natural-bristle or boar’s hair brushes work better than stiff synthetic ones on aged trim and badges.
Stick to pH-balanced, non-abrasive cleaners, and avoid automatic car washes, which use brushes and chemicals that can strip wax and etch thin original clear coats. Ammonia-based glass cleaners can discolor tinted windows and damage rubber seals near chrome trim, so reach for an ammonia-free formula instead.
- Use a two-bucket wash system with grit guards and a dedicated wheel bucket.
- Choose pH-balanced shampoos and ammonia-free glass cleaners.
- Keep separate microfiber mitts and towels for paint, glass, and wheels.
- Work in shade, on cool panels, to avoid water spotting and streaking.
Set up before you touch the car: park in shade, let panels cool if they have been in the sun, and stage every tool so nothing touches the paint before it is rinsed clean.
Pro Tip: Pre-wet the entire car and let a diluted snow foam or pH-balanced pre-wash sit for a few minutes before touching a mitt to the surface. It lifts loose grit that would otherwise grind into old paint.
Exterior Detailing: Wash, Decontaminate, and Correct With Care
Work top to bottom and outside in, since this keeps heavier road grime on the lower panels from ever touching your mitt after it has cleaned the hood or roof. A consistent order protects thin, aged paint from avoidable swirling.
- Rinse from roof to rocker panels, flushing loose dirt before any contact washing.
- Clean wheels and tires first, using a dedicated mitt and bucket so brake dust never reaches paint.
- Wash the body with the two-bucket method, section by section, rinsing the mitt after every pass.
- Clay or iron-decontaminate only if contamination is visible or felt as roughness, and only with a lubricated, fine-grade clay or iron remover.
- Dry with a plush microfiber or waffle-weave towel, blotting rather than dragging.
- Address brightwork last: remove loose trim pieces if practical, solvent-wipe, then protect.
Polishing is where most damage happens. On modern clear coats, light hand polishing or a gentle machine pass can remove minor haze. On single-stage or nitrocellulose finishes common to pre-1970s cars, skip powered compounding entirely: each pass removes a thin layer of the only original paint the car has left, and there is no clear coat buffer underneath it. Hand-wash routines and two-bucket technique are the safest way to prevent swirl marks from forming in the first place, which matters more on black and dark paint where marring shows most.
A deep clean roughly every few months for regularly driven classics, per Hagerty’s guidance, keeps contamination from building up to the point where aggressive correction feels necessary. For more on correction limits and when to stop, see our paint correction overview.
Interior Detailing: Preserving Vintage Upholstery, Trim, and Dashboards
Old interiors are often more fragile than the paint. Original leather, vinyl, cloth, and early plastics can crack, shrink, or discolor if cleaned with the wrong products or too much moisture.
Work top to bottom: glass first, then dash and upper panels, then seats, then carpets, vacuuming thoroughly before any wet cleaning touches a surface. Steam cleaning can loosen decades-old adhesives under carpet and headliners, so test in an inconspicuous spot first or skip steam altogether on cars with original trim.
- Vacuum every surface, including crevices and under seats, before applying any cleaner.
- Use leather cleaners made for vintage hides, and avoid over-conditioning, which can leave a tacky film that attracts dust.
- Clean vinyl and early plastics with mild, non-silicone cleaners that will not leave them slick or discolored.
- Detail vents, gauges, and switchgear with soft brushes and small amounts of solvent only where grime will not budge otherwise.
A full breakdown of this sequence, including product choices for each material, is in our step-by-step interior cleaning guide.
Protection and Storage: Waxes, Sealants, Coatings, and Long-Term Care
Every protective product carries trade-offs on an older car. Carnauba wax is the most reversible option and easiest to remove if you change your mind, while synthetic sealants last longer but can be harder to strip off original paint later. Ceramic coatings bond for years and resist environmental etching, but they are difficult to remove and can trap moisture against paint that already has active corrosion underneath it, so museum and conservation guidance favors reversible treatments over permanent ones wherever originality matters. Paint protection film shields high-wear areas without altering the paint beneath it, which makes it a reasonable option for a show car’s most exposed panels.
- Choose wax or a mild sealant on original paint you want to keep reversible.
- Consider ceramic coating or PPF only after confirming there is no active corrosion underneath.
- Store under a breathable cover, never plastic, to let moisture escape.
- Use axle stands to prevent tire flat-spotting during long storage.
- Re-grease chassis and mechanical fittings periodically, as conservation guidelines recommend.
Pro Tip: Check for rust bubbling or soft spots before applying any long-term coating. Sealing over active corrosion traps moisture and accelerates the damage you are trying to prevent.
For a maintenance-plan approach that pairs protection with a realistic schedule, see our guide to extending paint life.
When to Hire a Professional Classic Car Detailer
Some jobs are not worth the risk of doing yourself. Fragile original paint, heavy oxidation, active corrosion, embedded contaminants, or multi-piece brightwork that needs disassembly all call for someone who works on classics regularly, not just daily drivers.
- Ask whether they have hands-on experience with vintage or single-stage paint specifically.
- Ask if they hand-polish or rely on powered compounding by default.
- Confirm insurance coverage and ask for references from other classic owners.
- Ask whether they remove trim pieces for cleaning rather than polishing around them.
Cost expectations vary by scope. Bodywork and paint remain the largest cost driver in any restoration-adjacent work, so a careful preservation detail typically costs far less than a full repaint or restoration, and a driver-quality approach keeps costs well below show-quality work.
CDC Auto Detailing: Procedural Assets and How They Map to Preservation Work
We built our process around documented checklists rather than guesswork, including a 7-step interior detailing checklist that spells out exactly what happens at each stage. For owners who prefer professional hands on a vintage interior or exterior, our mobile setup brings that same documented process to your driveway, and our interior and exterior package pages outline what each visit covers.
How to Assess Paint Condition Before You Touch It
Before washing or polishing, figure out what you are actually working with. A repainted panel often shows subtle differences from the original: slightly different orange peel texture, overspray on rubber seals or door jambs, or a color that does not quite match under direct sunlight versus shade.
A paint thickness gauge is the most reliable way to confirm this. Original single-stage paint typically reads thinner and more consistent panel to panel, while a repainted section often measures noticeably thicker where filler primer or extra clear coat was applied. These gauges are inexpensive and non-destructive, making them a reasonable first purchase before attempting any correction.
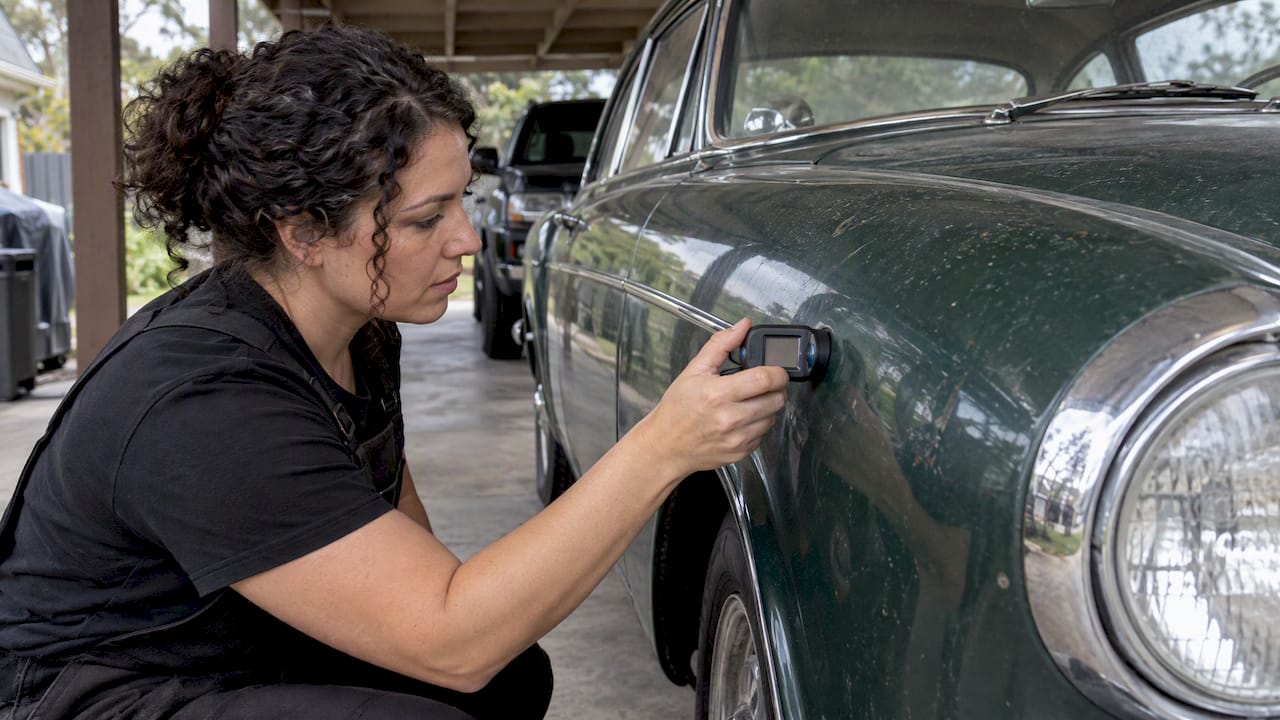
Oxidation shows up as a chalky, dull haze, most visible on horizontal surfaces like the hood and trunk lid where UV exposure is heaviest. Lightly wiping a white microfiber towel with isopropyl alcohol over a small area tells you quickly whether what is coming off is surface grime or degraded paint itself, since oxidized paint will leave a visible chalky residue on the towel.
Knowing whether you are dealing with original single-stage paint, a quality repaint, or heavy oxidation changes every decision that follows, from which cleaners are safe to whether polishing is appropriate at all. When in doubt, a professional with a thickness gauge can confirm in minutes what might otherwise take an afternoon of careful testing on your own.
Correcting Swirl Marks and Oxidation Without Losing Original Paint
Swirl marks and oxidation are the two most common complaints on classic paint, and both tempt owners toward aggressive fixes that do more harm than good. The safer path depends entirely on what kind of paint you are correcting.
On original single-stage or nitrocellulose finishes, skip powered polishers. A light hand-applied polish with a foam pad and minimal pressure can reduce swirl marks without removing much material, since there is no clear coat layer to protect what is underneath. Multiple thin passes, checking progress between each, beat one aggressive pass that strips color you cannot replace.
On a quality repaint with modern clear coat, a dual-action polisher with a finishing pad and a light-cut polish can address swirl marks safely, since clear coat has more material to work with than single-stage paint does. Even here, less is more: start with the least aggressive pad and product combination and only step up if needed.
Oxidation on original paint often responds better to a dedicated oxidation remover applied by hand than to compounding, which removes material faster than most classics can afford to lose. If oxidation is severe enough that hand correction will not touch it, that is a sign to stop and consult a specialist rather than reach for a stronger abrasive. Our paint correction guide covers where correction makes sense and where it does not.
Engine Bay Detailing on a Classic: What to Skip and What to Protect
Engine bays on classics hold decades of original paint, decals, hose clamps, and sometimes factory stickers that are part of the car’s documented history. Treat this area with the same caution as the exterior, not with the degreaser-and-pressure-washer approach that works fine on a modern daily driver.
Cover sensitive components like the distributor, carburetor intake, and any exposed electrical connections before introducing water or cleaner nearby. A soft detailing brush and a mild, water-based degreaser handle most grease and grime without stripping original paint or fading decals that cannot be replaced. Compressed air is useful for blowing dust out of tight spaces where a brush cannot reach.
Avoid high-pressure washing in the engine bay entirely. It forces water into connectors, distributor caps, and seals that were never designed for it, and it can lift original paint or decals that a gentler approach would leave intact. If the bay has not been cleaned in years, work in small sections and test your cleaner on an inconspicuous spot first.
Handling Delicate Trim and Chrome Without Losing Detail
Chrome and pot-metal trim on classics is often original, irreplaceable, and more fragile than it looks. Pitting, hazing, and light surface rust respond well to a dedicated chrome polish applied by hand with a soft cloth, working in small sections rather than trying to restore the whole bumper in one pass.
Where practical, remove trim pieces before polishing rather than working around them on the car. This avoids polish residue building up in stamped recesses and seams where it is nearly impossible to clean out once the piece is reinstalled. After polishing, a solvent wipe with something like isopropyl alcohol or mineral spirits removes residue, and a clear protective coating such as Incralac helps slow future oxidation on bare or restored chrome.
Pot-metal trim pieces that show deep pitting or flaking plating are often better left to a specialist who can assess whether re-plating is worthwhile, since aggressive home polishing on heavily pitted pot metal tends to remove what little plating remains rather than restore it.
Environmental Factors That Hit Classic Cars Harder
Sun, humidity, and road salt affect every car, but classics absorb the damage differently because their materials were never engineered to modern standards. Single-stage paint fades and oxidizes faster under UV exposure than a modern clear coat does, and original rubber seals and gaskets dry out and crack years before a comparable modern part would.
Garage or carport storage matters more for a classic than for a daily driver, since even a few seasons of full sun exposure can visibly dull original paint that a modern car’s clear coat would shrug off. Humidity swings are just as damaging in the other direction: a damp, unventilated garage promotes rust on original sheet metal and mildew on original upholstery and headliners.
Road salt exposure during winter months accelerates corrosion on undercarriage components and wheel wells that may never have been treated with modern rust-proofing. If a classic sees any winter driving, rinsing the undercarriage after salt exposure and keeping it out of damp storage afterward does more to prevent corrosion than any product applied after the fact. Tailoring your detailing calendar to your actual climate, not a generic schedule, protects the car far more effectively than following a one-size routine.
Building a Seasonal Maintenance Schedule
A classic benefits from a calendar that shifts with the seasons rather than a fixed monthly routine applied year-round. Spring and fall are good windows for a deeper detail, since temperatures are mild enough to work comfortably and before or after the heaviest exposure seasons.
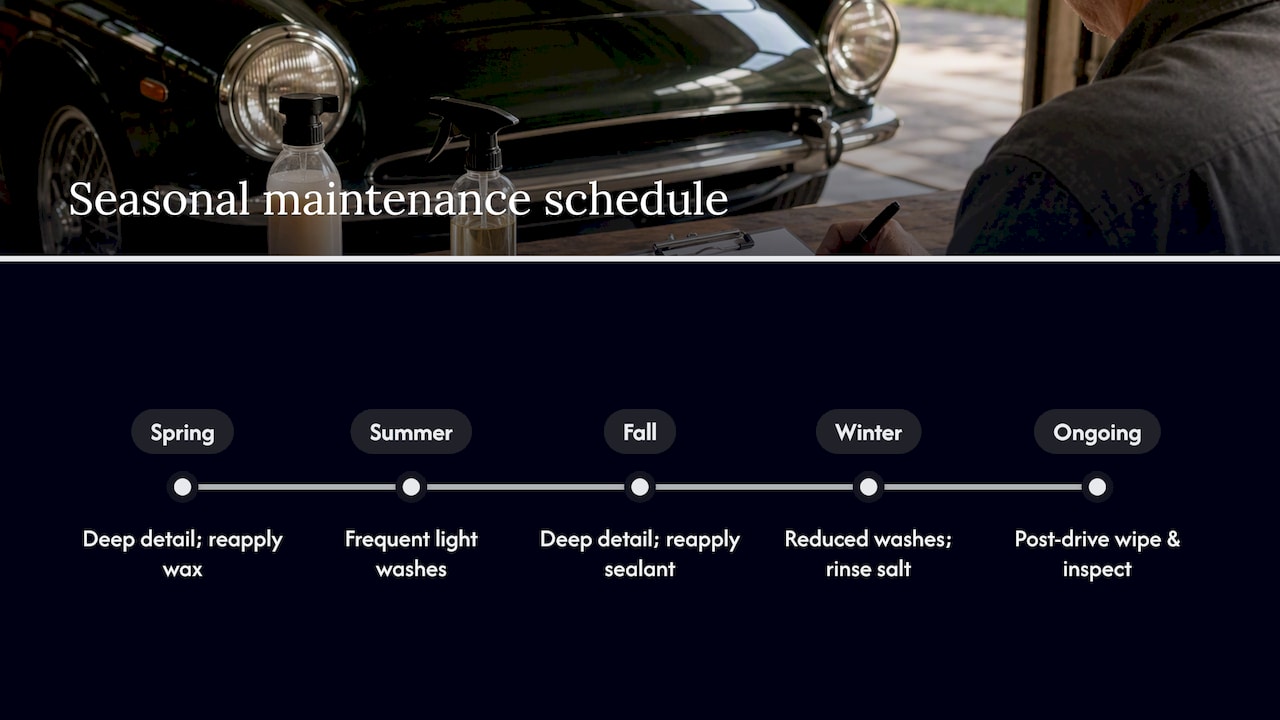
Summer calls for more frequent light washing if the car is driven, since UV exposure and bug residue build up faster, while winter calls for reduced washing frequency balanced against prompt attention after any salt exposure. Hagerty’s recommendation of a deep clean roughly every three months works as a baseline for regularly driven classics, adjusted up for heavy exposure and down for cars that spend most of the year in storage.
Between deep cleans, a quick wipe-down after driving and a visual inspection for new corrosion, loose trim, or fluid leaks catches small problems before they become expensive ones. Reapplying wax or sealant on a seasonal cadence, rather than waiting until water stops beading, keeps protection consistent without requiring correction later.
Author’s Perspective: Why Conservative Care Usually Wins
Preservation protects both history and value better than aggressive correction ever does. A driver-quality classic with honest original paint often holds more appeal, and avoids more risk, than one pushed toward concours perfection. Document original finishes with photos before any invasive work, so you always know what you started with.
— Charles
Booking a Preservation-Aware Detail With CDC Auto Detailing
We bring the same checklist-based approach described above directly to your driveway, with our mobile service. A booked appointment follows documented steps rather than guesswork, whether you need an Interior Detail, an Exterior Detail, or longer-term protection.

- Interior Detail pricing details are available on our website and cover preservation-minded steps.
- Exterior Detail pricing details are available on our website for a careful, hand-focused wash and protection routine.
- Ceramic coating packages pricing is available on our website for owners ready to commit to long-term protection.
- Paint Protection Film is available with pricing provided on request for high-wear panels.
See the full range of detail packages and book the service that matches where your classic is in its preservation journey.
FAQ
How much does it cost to detail an old car?
A standard exterior detail on a classic starts from $175 and an interior detail starts from $275 through our package pages, though preservation-focused work on fragile original paint can cost more depending on condition. Bodywork and paint remain the largest cost driver in any restoration-adjacent work, so a careful detail costs far less than correcting damage after the fact.
Is it worth getting an old car detailed?
Yes, especially with a preservation-first approach, since regular gentle cleaning prevents the buildup of contaminants and corrosion that eventually require expensive correction. Museum conservation guidance treats this kind of routine care as the most effective way to protect a historic vehicle’s value and originality over time.
What not to do to a classic car?
Avoid automatic car washes, powered compounding on single-stage or nitrocellulose paint, and ammonia-based glass cleaners near trim and seals. Also avoid sealing coatings over active corrosion or steaming near old adhesives, both of which can cause damage that is difficult or impossible to reverse.
How much is classic car restoration?
Restoration cost depends heavily on scope, but bodywork and paint typically account for 35 to 45 percent of total restoration cost, with driver-quality work costing meaningfully less than show-quality or concours restoration. Most owners are better served by conservative maintenance unless structural or safety issues require full restoration.
Sources
- Classic Car Detailing: Everything You Need to Know | Hagerty
- Conserve O Gram: Preparing Historic Motorized Vehicles for Storage or Exhibit | National Park Service
- Classic car restoration cost benchmarks and calculator | Verywell Auto