
The safest first move for decal removal on trucks is controlled heat paired with a plastic scraper, with an automotive adhesive remover on standby for the residue. Warm the vinyl, lift a corner, and peel slowly at a shallow angle. If paint lifts, the decal is baked in, or the panel is corrugated or riveted, stop and call a professional before you turn a sticker problem into a paint problem.
TL;DR:
- Using a variable heat gun and plastic scraper minimizes the risk of paint damage during decal removal, but caution is required on textured or curved surfaces.
- Applying heat evenly to around 120°F and testing small areas first helps prevent clearcoat damage, especially on older or layered graphics.
- Adhesive residue can be safely removed with automotive-grade solvents like 3M’s formulas, followed by polishing or decontamination to restore surface finish.
- Larger or fleet graphics should be approached in sections to avoid re-heating and damaging core paint or clearcoat over repeated passes.
- Professional removal services can save time and prevent costly repainting, especially for complex, long-term, or multi-panel decals.
Table of Contents
- What you need: tools, materials, and safety gear
- Step-by-step removal workflow: prep, heat and peel, escalate safely
- Adhesive residue removal and surface finishing
- Safety, paint preservation, and common pitfalls
- Pro-detailer tips and practitioner notes
- DIY vs. professional removal: honest trade-offs
- Book a paint-safe decal removal with CDC Detailing
- FAQ
- Sources
What you need: tools, materials, and safety gear
Before touching a decal, gather the right tools so you are not improvising halfway through the job. A variable-temperature heat gun gives you the most control, though a hair dryer works for smaller jobs; check surface temperature by feel rather than relying on the gun’s dial setting, since paint and vinyl respond differently panel to panel.
- A variable heat gun or hair dryer for controlled, even warming
- Plastic scrapers or plastic razor blades, never metal, to avoid scratching clearcoat
- Microfiber towels and a detailing spray for wiping down residue
- An automotive-grade adhesive remover, such as 3M’s wipe-on/wipe-off formula, built to dissolve sticker adhesive without harming cured paint
- Optional specialty tools like a rubber stripe-off wheel or a trim tool for stubborn jobs
- Gloves and eye protection, plus a shaded, ventilated workspace to limit fume exposure and keep panels from overheating in direct sun
Skip citrus-based solvents only if your adhesive remover already handles the job. Avoid strong household solvents and degreasers not labeled for automotive paint, since they can soften or stain clearcoat.
Step-by-step removal workflow: prep, heat and peel, escalate safely
Work through this in order, and resist the urge to skip the test step even on a decal you have removed before.
- Wash the area first so dirt and grit do not scratch the paint as you work, and park in the shade; warm ambient air helps the vinyl respond faster to heat.
- Test an inconspicuous spot, like a small corner of the decal or a hidden panel edge, to see how the paint and film react before committing to the whole graphic.
- Apply heat evenly, keeping the target surface around a moderate warm temperature, moving the gun constantly rather than parking it on one spot. Manufacturer bulletins recommend starting simple, with heat and a slow peel, before escalating to chemical or mechanical methods.
- Lift a corner with a plastic scraper once the vinyl feels warm and pliable.
- Peel at a shallow angle, under 45 degrees, pulling slowly and steadily in the direction the vinyl naturally releases. If it starts to tear, stop and reheat that section rather than forcing it.
- Reheat as needed for long runs of vinyl, working in short sections so you never let one area cool and re-stick halfway through the pull.
- Escalate if the decal resists, switching to a stripe-off wheel or adhesive eraser on a low-speed tool. Avery Dennison’s removal bulletin outlines heat distance and dwell times for exactly this kind of stubborn film.
- Watch for red flags: paint lifting with the vinyl, clearcoat separating, brittle or chalky paint flaking off, or bare metal showing through. Any of these means it is time to stop and bring in a professional.
Pro Tip: Work one small section at a time on long fleet graphics rather than trying to peel an entire stripe in one pull. You will waste less vinyl and spend less time reheating torn edges.
Panel shape matters as much as technique. Flat hoods and doors forgive a little trial and error, but corrugated trailer siding and riveted panels trap heat unevenly and hide adhesive in seams, which is exactly the kind of surface where DIY heat work goes wrong fastest.
Adhesive residue removal and surface finishing
Once the decal is off, you are usually left with a ghost outline of adhesive. 3M’s adhesive remover family is formulated as a non-abrasive solvent blend safe for most cured automotive paint, built specifically for sticker residue and tar. A similar four-step method for glue residue walks through the same wipe-on, wipe-off logic for other adhesive types.
- Follow the product’s listed dwell time rather than guessing, since too short a contact time leaves residue behind
- Use a plastic scraper or microfiber towel for leftover film, never a metal blade
- A clay bar or light polish can lift any residual haze once the adhesive is gone
- Finish with a full wash and decontamination pass before applying wax or sealant
Household lubricants are not built for this job: 3M’s product documentation draws a clear line between professional-grade adhesive removers and household lubricants, noting the wrong chemical can risk staining or softening paint rather than dissolving the adhesive cleanly.
If the panel sat under a decal for years, consider a protective step afterward. A paint protection film or ceramic coating gives the repaired area a layer that resists future staining and makes the next decal, if there is one, far easier to remove cleanly.
Safety, paint preservation, and common pitfalls
Heat is the single biggest risk factor in decal removal, and it runs both ways; truck owners should review window film for truck owners advice to understand how heat impacts truck panels and films. Overheating bakes adhesive into the clearcoat instead of loosening it, while cold vinyl becomes brittle and tears before it releases.
- Target around 120°F at the surface and avoid pushing past roughly 160°F, since manufacturer guidance ties higher temperatures to delamination and baked-on adhesive
- Below about 50°F, adhesive stiffens and vinyl tears more easily, so move the job indoors or wait for warmer weather when possible
- Never use a metal blade or scraper, which gouges clearcoat even on a careful pass
- Test a hidden area first and watch how the paint responds before working the visible panel
- Treat staining, clearcoat lift, or complex multi-panel graphics as your signal to call a professional rather than push further
Pro-detailer tips and practitioner notes
On fleet jobs, sequencing panels so no single area gets reheated repeatedly helps protect clearcoat and keeps the job moving across multiple trucks in one visit. A stripe-off wheel earns its place on long, straight graphic runs where friction removal is faster than solvent dwell time, while tight curves, mirrors, and trim edges call for an adhesive remover and a plastic scraper instead. The decision usually comes down to panel shape and how much vinyl is left after the initial peel.
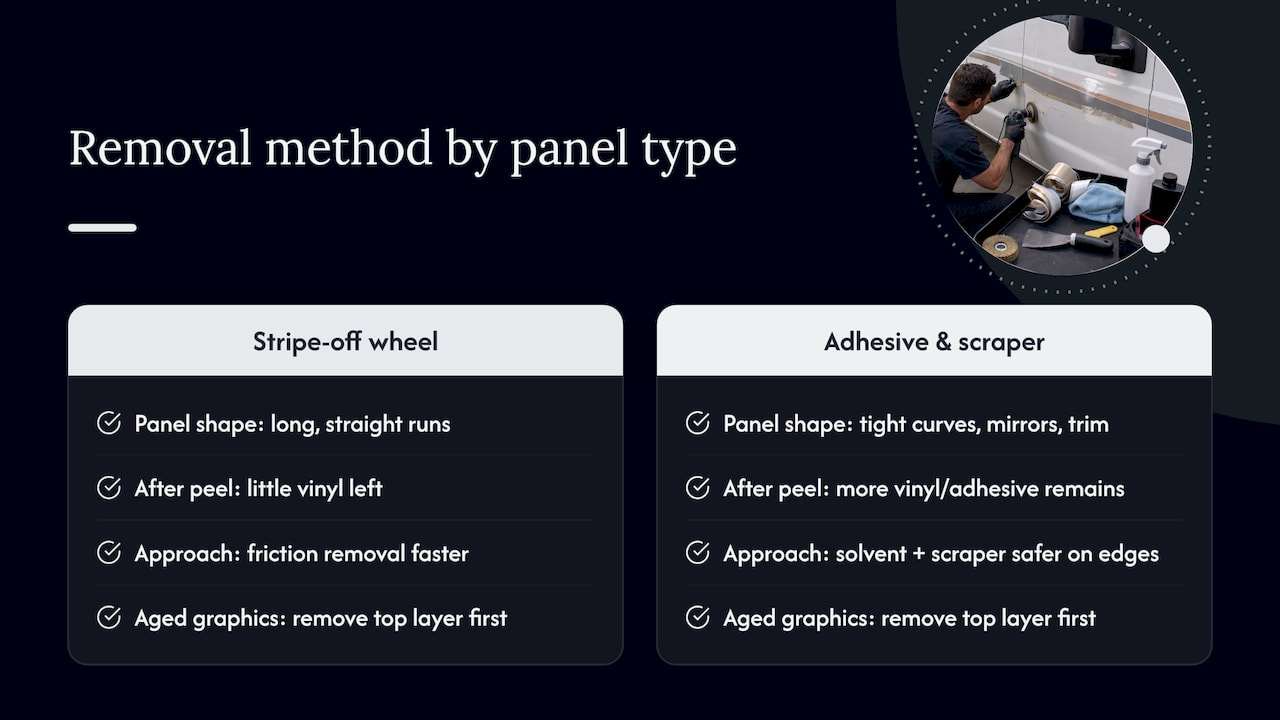
Pro Tip: On aged fleet graphics, remove the top vinyl layer first and treat the adhesive separately. Trying to do both in one pass on sun-baked decals almost always costs more time than it saves.
DIY vs. professional removal: honest trade-offs
A careful DIY removal can take an afternoon and the cost of a heat gun and adhesive remover, which makes sense for a single bumper sticker or small logo. Large graphics, multiple panels, or a fleet of trucks change that math fast, since one damaged panel can cost more to repaint than the entire job would have cost to outsource. Fleet managers in particular benefit from professional consistency across vehicles, since pros finish each panel with decontamination and polish, and can layer on protection like PPF or a ceramic coating afterward.
— Charles
Book a paint-safe decal removal with CDC Detailing
If you would rather hand the heat gun to someone else, paint-safe decal and residue removal can be handled as part of mobile exterior detailing services, bringing the same tools and techniques covered above directly to your driveway or lot. Large graphics, multiple panels, suspected paint lift, or fleet scheduling across several trucks are exactly the situations where booking a pro saves you a repaint bill.

We also offer fleet washing for operators who need decal removal and exterior upkeep scheduled across a whole lineup rather than one truck at a time. Check our detail packages to see pricing and book a visit before an old graphic turns into a bigger paint problem.
FAQ
Does WD-40 remove decals?
WD-40 can help loosen some adhesives by penetrating the bond, but it is not formulated for automotive paint the way dedicated adhesive removers are. Manufacturer-grade removers like 3M’s adhesive remover are built specifically to dissolve sticker residue without risking paint damage.
What dissolves vinyl decal adhesive?
Automotive-grade adhesive removers, including 3M’s wipe-on/wipe-off formulas, are designed to dissolve vinyl adhesive while staying safe for most cured automotive paint. Citrus-based solvents can also work, but always check the dwell time on the label before wiping.
Does AutoZone have an emblem removal tool?
Yes, AutoZone stocks dedicated trim and removal tools, including the Titan Trim Pad Tool, designed to lift emblems and clips without scratching paint. These tools avoid the metal-blade risk that comes with improvising a removal tool.
What is the best decal adhesive remover for trucks?
Automotive-specific removers from the 3M adhesive remover line are a reliable starting point, since they are formulated to dissolve sticker and tar residue without harming cured paint. For large truck graphics, pair the remover with a plastic scraper and follow the label’s recommended dwell time for best results.
Sources
Consult 3M’s removal bulletin and Avery Dennison’s instructions for detailed safety data.
- 3M™ Adhesive Remover | 3M United States
- 3M Instruction bulletin: removal of applied graphics
- Avery Dennison: Removal of pressure sensitive adhesive decals — Instructional bulletin
- Titan Trim Pad Tool — AutoZone listing