TL;DR:
- DIY paint protection film (PPF) significantly reduces costs by applying a thermoplastic urethane layer to protect vehicle surfaces without professional help. Proper surface preparation, the right fluids, and specific tools are essential for successful installation, with pre-cut kits simplifying the process for beginners. While DIY saves money, achieving a professional-looking finish requires patience, practice, and attention to detail, especially on complex panels.
DIY paint protection film (PPF) is the practice of applying a thermoplastic urethane protective layer to your vehicle’s painted surfaces without professional labor, cutting installation costs by 60 to 75 percent compared to shop rates. Professionally known as clear bra or urethane film, PPF shields paint from rock chips, road debris, UV fading, and light scratches. Front-end DIY kits average $800 versus $2,200 professionally, and full-vehicle coverage runs about $2,400 DIY compared to $6,000 at a shop. Brands like TESBROS, 3M, and XPEL offer pre-cut kits designed for specific vehicle models, making the process far more accessible than it was five years ago.
What you need for DIY paint protection film installation
Choosing the right film is the first real decision. Pre-cut kits from brands like TESBROS or XPEL are computer-plotted to match your exact vehicle model, which removes the need for freehand cutting on the car. Bulk rolls from 3M or SunTek work too, but they require pattern cutting skills that add complexity for beginners. For most first-timers, a pre-cut kit focused on high-impact zones (hood, front bumper, mirrors, and door edges) is the smartest starting point.
Fluids that make or break the install
Two solutions control the entire installation process. Slip solution is distilled water mixed with a few drops of baby shampoo. It lets the film glide across the panel so you can reposition it without the adhesive grabbing prematurely. Tack solution is distilled water mixed with a small amount of isopropyl alcohol. Once the film is aligned, tack solution replaces slip solution to activate adhesion and lock the film in place. Both are inexpensive to mix at home and critical to get right.
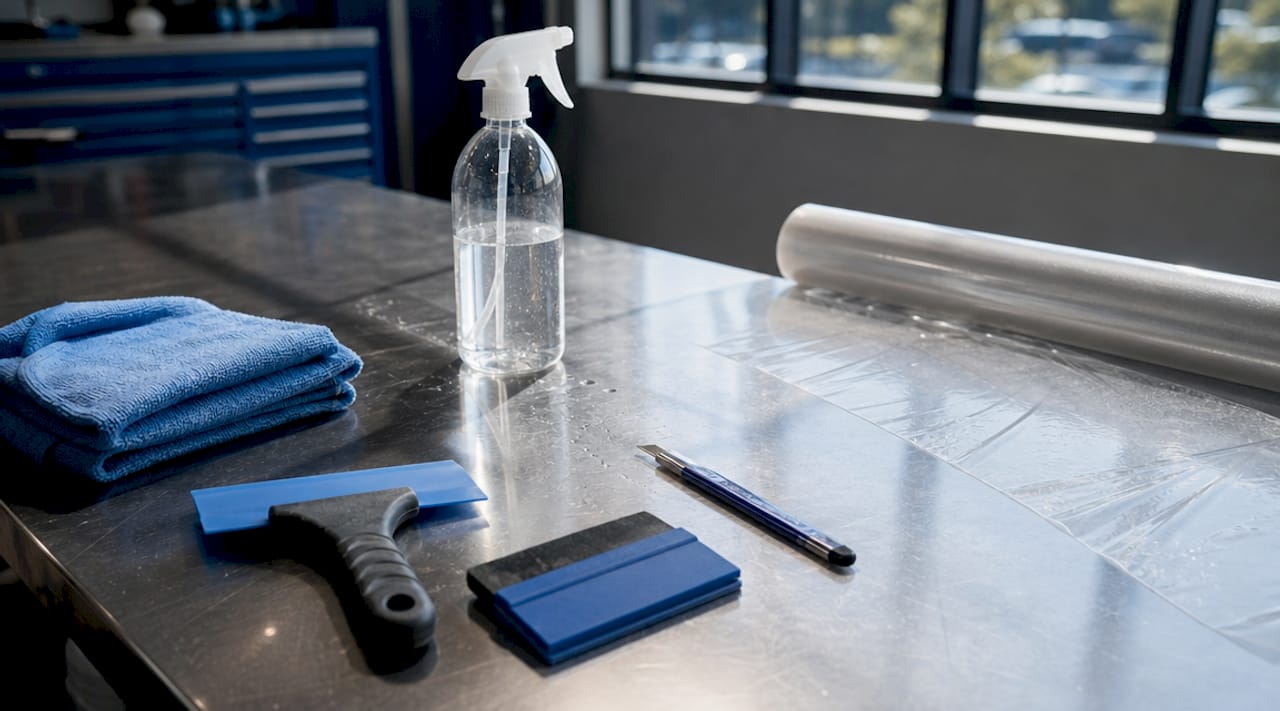
Tools you need before you start
| Tool | Purpose | Priority |
|---|---|---|
| Squeegee (hard and soft) | Push out fluid and bubbles | Must-have |
| Spray bottles (x2) | Hold slip and tack solutions | Must-have |
| Heat gun or hair dryer | Conform film around curves | Must-have |
| Isopropyl alcohol (70%+) | Final surface wipe before film | Must-have |
| Clay bar kit | Remove bonded surface contaminants | Must-have |
| Microfiber cloths | Lint-free drying and wiping | Must-have |
| Cutting knife or Olfa blade | Trim excess film at edges | Recommended |
| Knifeless tape | Clean edge cuts without blade risk | Optional |
| Infrared thermometer | Monitor panel temperature | Optional |
Work in a space between 60°F and 80°F. Cold panels cause the adhesive to resist bonding. Hot panels in direct sun cause the film to grab too fast, eliminating your window to reposition. A garage with the door closed and the car at room temperature is the ideal setup. Dust contamination is a leading cause of visible imperfections and adhesion failure, so sweep the floor and let the air settle before you begin.
How to install paint protection film step by step
Surface preparation is not optional. A contaminated panel will trap particles under the film and create permanent bumps that no amount of squeegeeing will fix.
-
Wash the vehicle thoroughly. Use a pH-neutral car shampoo and a clean wash mitt. Rinse completely and dry with a microfiber towel.
-
Decontaminate with a clay bar. Washing, clay bar decontamination, and an isopropyl alcohol wipe are all three required for proper film adhesion. Clay removes bonded iron particles and industrial fallout that washing alone cannot lift.
-
Wipe with isopropyl alcohol. Spray 70 percent IPA onto a clean microfiber cloth and wipe every surface you plan to film. This removes any remaining wax, polish residue, or oils that would prevent bonding.
-
Lay out your pre-cut panels. Identify each panel from your kit before you start. Lay them on a clean surface in the order you plan to install them. Hood first, then bumper, then mirrors is a logical sequence.
-
Wet the panel with slip solution. Spray the painted surface generously. Spray the adhesive side of the film as well. This is what allows repositioning.
-
Peel the liner and position the film. Work slowly. Float the film over the panel using the slip solution to slide it into alignment. Leave a small overhang on all edges.
Pro Tip: Spray your fingertips with slip solution before handling the adhesive side of the film. Fingerprints on the adhesive cause permanent contamination spots.
-
Squeegee from center outward. Use firm, overlapping strokes from the center of the panel toward the edges. Push fluid out completely. Trapped fluid that is not removed becomes a bubble.
-
Switch to tack solution at the edges. Once the center is flat and fluid-free, spray tack solution on the edges and squeegee them down firmly. The alcohol in tack solution accelerates adhesion.
-
Apply heat to conform around curves. Use a heat gun on a low setting, keeping it 6 to 8 inches from the film surface. Proper heat application is what allows the film to stretch and conform without creasing. Move the gun constantly. Holding it in one spot risks adhesive damage or film distortion.
-
Trim excess film at edges. Use a sharp blade or knifeless tape to cut cleanly along body lines. Dull blades tear film and leave ragged edges that peel prematurely.
-
Seal all edges with heat. Run the heat gun along every edge one final time to activate the adhesive fully and bond the film tight to the panel.
Pro Tip: A hood takes most beginners 60 to 90 minutes. A front bumper with complex curves can take 2 to 3 hours. Budget time generously on your first install.
Troubleshooting common problems during film application
Even experienced installers encounter issues. Knowing how to recover from them is what separates a clean result from a wasted panel.
Dust under the film is the most common frustration. If you spot a particle after squeegeeing, lift the film edge nearest to it, re-wet with slip solution, and float the film back off the panel. Use a piece of tape to lift the particle, then reposition the film. Do not try to push a particle out with the squeegee. You will scratch the adhesive and create a permanent streak.
Bubbles that will not squeegee out usually contain trapped air rather than fluid. Small bubbles may remain after installation but can self-heal over time if quality PPF is used. PPF’s self-healing technology means minor air bubbles often disappear within 24 to 48 hours as the adhesive cures. If a bubble persists after 72 hours, pierce it at the edge with a fine pin at a shallow angle, press the air out, and apply heat to reseal.
Wrinkles on curved panels happen when the film is not stretched evenly before squeegeeing. Complex curved panels like bumpers and side mirrors demand precise stretching and heat shaping. Lift the wrinkled section, apply heat to relax the film, and re-stretch it gently before squeegeeing again.
- Never stretch cold film. Heat it first, then stretch. Cold stretching creates stress points that cause the film to shrink back and lift at edges.
- Avoid overstretching. Film stretched beyond its limit thins out and loses its protective properties in that zone.
- If an edge keeps lifting after heat sealing, apply a small amount of tack solution directly under the edge, press firmly, and heat again.
Pro Tip: Certain vehicles like Teslas have smoother panels and fewer trim interruptions, making DIY PPF installation more beginner-friendly compared to traditional models with complex body lines.
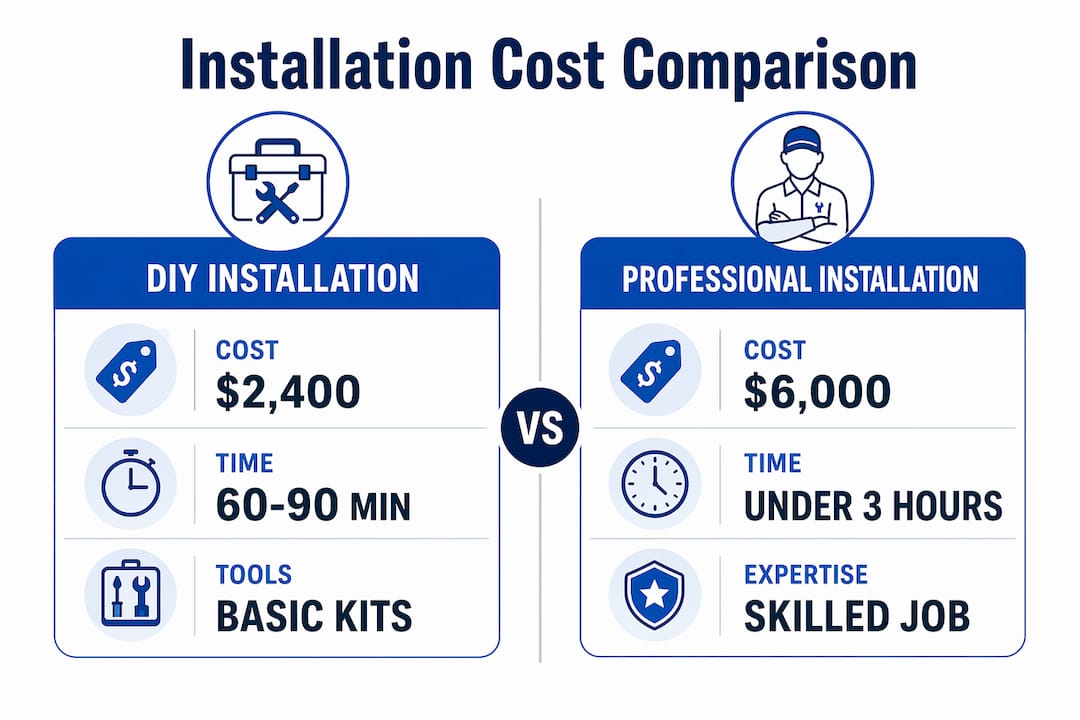
DIY vs professional PPF: what the cost difference actually means
Professional installs cost between $1,500 and $8,000 depending on coverage area and shop rates. DIY kits for the same coverage range from $800 to $2,400. The math is straightforward: DIY saves real money, but the finish quality depends entirely on your preparation and technique.
| Factor | DIY installation | Professional installation |
|---|---|---|
| Cost (full vehicle) | $2,400 average | $6,000 average |
| Cost (front end only) | $800 average | $2,200 average |
| Finish quality | User-dependent | Consistently high |
| Scheduling flexibility | Complete control | Shop availability |
| Warranty | Kit warranty only | Labor and material warranty |
| Learning curve | Moderate | None for owner |
| Correction if errors occur | Owner responsibility | Shop responsibility |
Professional installation makes sense for exotic or high-value vehicles where a single panel error could cost more than the labor savings. It also makes sense for anyone who wants a warranty-backed result on a daily driver without investing time in learning the process. DIY makes sense for budget-conscious owners who are willing to practice, accept a learning curve, and improve quickly with modest practice to achieve results close to professional level. For context, you can also explore ceramic coating vs wax as a lower-cost alternative for paint protection if PPF is outside your current budget.
Key takeaways
DIY paint protection film installation saves 60 to 75 percent over professional labor costs when you use the right tools, proper surface preparation, and correct slip and tack solution technique.
| Point | Details |
|---|---|
| Cost savings are significant | DIY full-vehicle coverage averages $2,400 versus $6,000 for professional installation. |
| Surface prep determines success | Clay bar decontamination and an IPA wipe are non-negotiable before film goes down. |
| Two fluids control the process | Slip solution enables repositioning; tack solution locks the film in place at edges. |
| Heat is required for curves | A heat gun applied at 6 to 8 inches conforms film without distorting the adhesive. |
| Bubbles often self-resolve | Minor air bubbles in quality PPF typically disappear within 24 to 72 hours of curing. |
What I’ve learned after watching hundreds of first-time PPF installs
Most people who hesitate on DIY PPF are not worried about the cost. They are worried about ruining a $40,000 car with a $20 mistake. That fear is understandable, but it is also slightly misplaced. The film does not bond instantly. You have time to reposition, lift, and correct. The slip solution is specifically designed to give you that window.
What actually trips people up is impatience. They rush the surface prep, skip the clay bar, or try to squeegee too fast before the film is properly aligned. Every installation problem I have seen traces back to one of those three shortcuts. The technique itself is learnable in a single session. The discipline to slow down is what separates a clean result from a frustrating one.
My honest recommendation: start with a door edge guard kit or a small mirror set before you tackle a hood. These smaller panels cost less if you make an error, and they teach you squeegee pressure, heat distance, and fluid management faster than any video tutorial. Exploring PPF installation examples before you buy your kit also helps you set realistic expectations for what a finished install should look like.
The satisfaction of protecting your own vehicle is real. So is the money you keep in your pocket.
— Charles
Protect your car with help from Cdcautodetailing

If you have completed your DIY install and want to take your vehicle’s protection further, Cdcautodetailing in Pitman, New Jersey offers professional-grade services that complement what you have already done. From professional PPF installation on complex panels to ceramic coating applications that bond over your existing film, the team at Cdcautodetailing handles the jobs where precision matters most. Mobile service means they come to you across South Jersey, so there is no need to drop your car off and wait. Book directly through the website and get a clear quote before any work begins.
FAQ
How hard is it to install paint protection film yourself?
DIY PPF installation has a moderate learning curve but is manageable for most vehicle owners. The first panel takes the longest; technique improves quickly with practice, and pre-cut kits remove the need for freehand cutting.
What is the best paint protection film for DIY use?
Pre-cut kits from TESBROS, XPEL, and 3M are the most beginner-friendly options because they are plotted to fit specific vehicle models. Starting with a front-end kit covering the hood, bumper, and mirrors gives the best protection per dollar spent.
How do I remove bubbles after installing PPF?
Small bubbles often self-heal within 24 to 72 hours as the adhesive cures. Persistent bubbles can be pierced at a shallow angle with a fine pin, pressed flat, and resealed with a heat gun.
Can I install paint protection film in my garage?
Yes, a garage is the ideal environment for installing protective film yourself. Close the door to prevent dust, work at temperatures between 60°F and 80°F, and sweep the floor before you start to minimize airborne particles.
Is DIY paint protection film as good as professional installation?
DIY PPF uses the same film materials as professional installs, so the protection level is identical. Finish quality depends on surface preparation and technique, meaning a careful DIY install can match professional results on flat and moderately curved panels.