
Most cloudy or yellowed polycarbonate headlights can be restored at home using progressive wet sanding, polishing, and a UV-grade sealant. The process works because factory UV coatings on polycarbonate lenses fail over time, and what looks like deep damage is usually just a degraded surface layer you can sand away. Restore the lens correctly and you get clear, bright headlights again. Skip the UV sealant at the end and you’ll be back to cloudy in 2–3 months.
Here’s what a successful DIY restoration requires:
- Correct grit progression: start coarse enough to cut through oxidation, finish fine enough to polish out
- Thorough masking: two full passes of automotive painter’s tape around every edge of the lens
- Time to do it right: plan 1–3 hours per headlight depending on damage severity
- A UV-grade topcoat: the single step that separates a lasting repair from a temporary fix
Realistic durability depends almost entirely on the sealant you choose. A kit UV sealant typically holds 1–2 years. A professional ceramic coating can last 3–5 years or longer. An unsealed polish job re-oxidizes within a short period.
Key Takeaways
Headlight restoration lasts only as long as the UV sealant you apply at the end: skipping that step means re-oxidation within 2–3 months regardless of how well you sanded.
| Point | Details |
|---|---|
| Diagnose before you sand | Run a fingernail across the lens; internal haze or moisture means replacement, not sanding. |
| Follow the grit progression | Start at 800–1000 for heavy oxidation, finish at 3000 before polishing for a bondable surface. |
| Seal with UV protection | Kit sealants last 1–2 years; aerosol clear coat 2–3 years; professional ceramic coatings 3–5+ years. |
| DIY cost vs. pro service | DIY supplies vary in price; professional service costs vary and can include a warranty. |
| Cdcautodetailing | Offers mobile headlight restoration with professional ceramic coatings across South Jersey. |
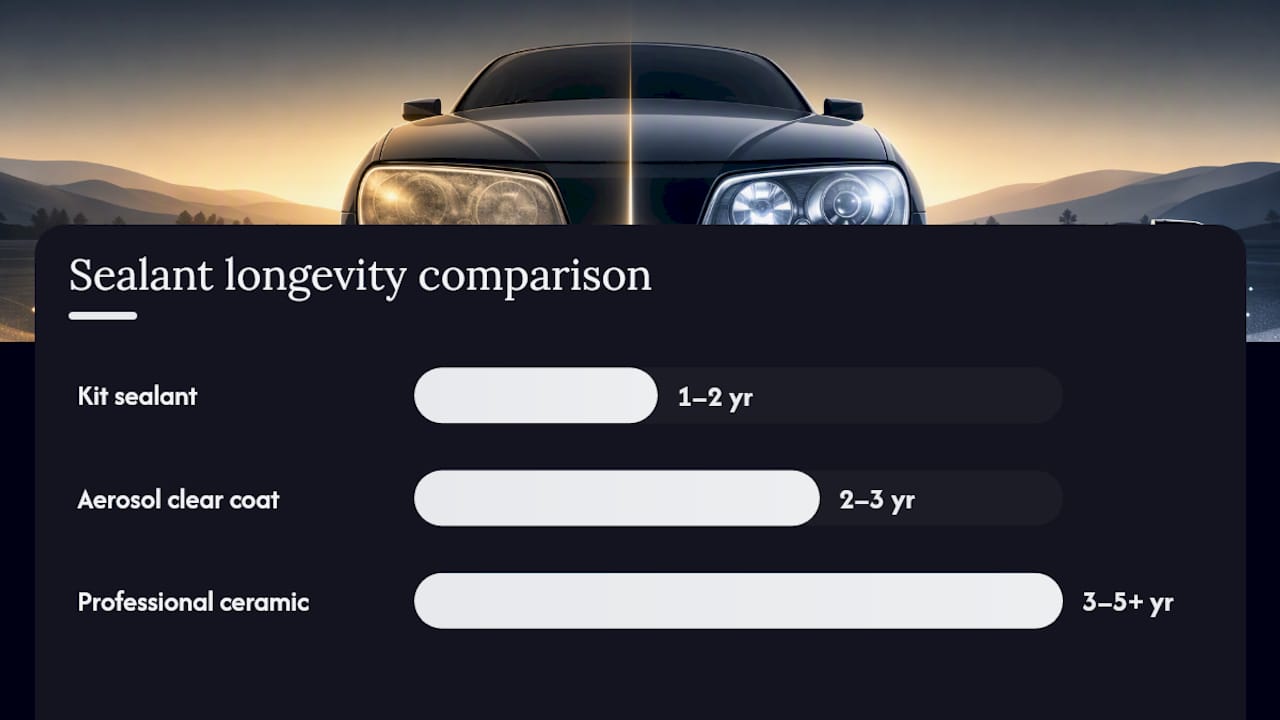
Table of Contents
- What tools and supplies do you need for headlight restoration?
- How to prep and protect your paint before sanding
- How to restore headlights step by step: wet sanding, polishing, and verification
- How should you seal the restored lens?
- Do household hacks like toothpaste or WD-40 actually work?
- How long do DIY restorations last, and when should you replace the lens?
- Common DIY mistakes and how to fix them
- When is hiring a professional the better choice?
- CDC Detailing handles headlight restoration the right way
- Sources
What tools and supplies do you need for headlight restoration?
Getting the right supplies before you start prevents mid-job substitutions that compromise results. Here’s what to gather:
Essential items:
- Wet/dry sandpaper in a grit progression: 800 or 1000 (for heavy oxidation), 1500, 2000, and 3000
- Spray bottle filled with clean water (keep it close)
- Car wash soap and a clean microfiber towel for the initial wash
- Automotive painter’s tape (blue or green, not masking tape)
- Polishing compound formulated for plastics (not metal polish)
- Foam applicator pads or a microfiber polishing pad
- UV lens sealant, aerosol clear coat rated for plastics, or a ceramic coating product
Optional but worth it:
- Dual-action (DA) polisher: cuts polishing time significantly and produces more consistent results than hand polishing
- Foam pads sized for headlights (3–4 inch pads work well with a DA)
- Clay bar or clay mitt to decontaminate the lens surface before sanding
- Safety glasses and a respirator for any aerosol sealant or clear coat steps
Kit vs. buying separately: A restoration kit from brands like Meguiar’s or 3M bundles sandpaper, compound, and a sealant wipe in one box, which makes sense for a one-time job on one or two cars. If you’re restoring multiple vehicles or want a longer-lasting topcoat, buying a quality polishing compound and a dedicated UV sealant or aerosol clear coat separately gives you better control over each step.
Pro Tip: Check the grit range before buying a kit. Some budget kits skip the coarser grits (800–1000) and start at 1500, which won’t cut through heavy yellowing. If your lenses are badly oxidized, you need that coarser starting grit.
How to prep and protect your paint before sanding
Skipping prep is the most common reason DIY restorations go wrong. A slipped sanding stroke on unmasked paint can scratch clear coat in seconds, and professionals recommend two full passes of automotive painter’s tape to protect the surrounding panel.
- Wash the lens and surrounding area. Use car soap and water to remove road grime, bug residue, and loose dirt. Contaminants caught under sandpaper drag across the lens and create deep scratches.
- Dry completely. Water under tape causes it to lift mid-job. Give the surface 10–15 minutes of air dry time or use a clean microfiber to speed it up.
- Apply painter’s tape in two passes. First pass: run tape flush along the lens edge. Second pass: overlap the first strip by half, extending coverage onto the paint and trim. Cover any chrome trim, rubber seals, and painted bumper sections within 6 inches of the lens.
- Check for internal haze. Run your fingernail across the lens surface. If you feel roughness on the outside, the damage is external and restorable. If the lens looks milky from the inside even when the outside is smooth, or if you see water droplets or fogging inside the housing, external sanding won’t fix it. That’s a replacement or disassembly job.
- Put on safety glasses. Wet sanding kicks up fine plastic slurry. If you’re applying aerosol sealant later, add a respirator for that step.
Pro Tip: When taping, press the tape edge down firmly with a plastic trim tool or your thumbnail. Tape that’s only lightly pressed lifts under the friction of sanding and lets the paper catch the paint edge. One slip at 800 grit leaves a visible scratch in clear coat. For more on protecting paint during detailing work, the paint correction guide covers masking and surface protection in depth.
How to restore headlights step by step: wet sanding, polishing, and verification
This is the core procedure. Follow the grit sequence, keep everything wet, and don’t rush the polishing stage. A stepwise approach gives the surface a uniform finish that a topcoat can bond to; uneven cutting leads to short-lived results.
Step 1: Final prep and grit selection (5–10 minutes)
Confirm the lens is clean, dry, and fully masked. Decide your starting grit:
- Heavy yellowing or deep oxidation: start at 800
- Moderate haze with some texture: start at 1000
- Light surface haze only: start at 1500
When in doubt, start coarser. You can always refine, but you can’t undo a polish job that didn’t cut deep enough.
Step 2: Wet sanding (15–20 minutes per grit)
Soak the sandpaper in water for 5 minutes before use. Keep the lens and paper wet throughout. Cross-hatch your sanding direction between grits so you can see when the previous scratch pattern is gone: sand horizontally at 800, vertically at 1500, horizontally at 2000, and so on. When the lens looks uniformly matte with no glossy islands or visible deep scratches from the prior grit, move up.
Spray water frequently. Dry paper loads fast on polycarbonate and creates heat that can warp the lens surface.
Step 3: Refining to 3000 grit (10–15 minutes)
By 3000 grit the lens should look like frosted glass: uniformly hazy, no visible scratch lines, no shiny spots. This is the checkpoint before polishing. If you see any remaining deep scratches or uneven areas, drop back to the previous grit and work them out now. Trying to polish out 1500-grit scratches with compound takes far longer than stepping back.
Step 4: Compounding and polishing (15–25 minutes per headlight)
Apply a plastic-safe polishing compound to a foam pad. Work in overlapping passes, keeping the pad flat against the lens. If you’re using a DA polisher, set it to medium speed (around 3–4 on most machines) and let the weight of the tool do the work. Pressing hard generates heat and can cause micro-marring.
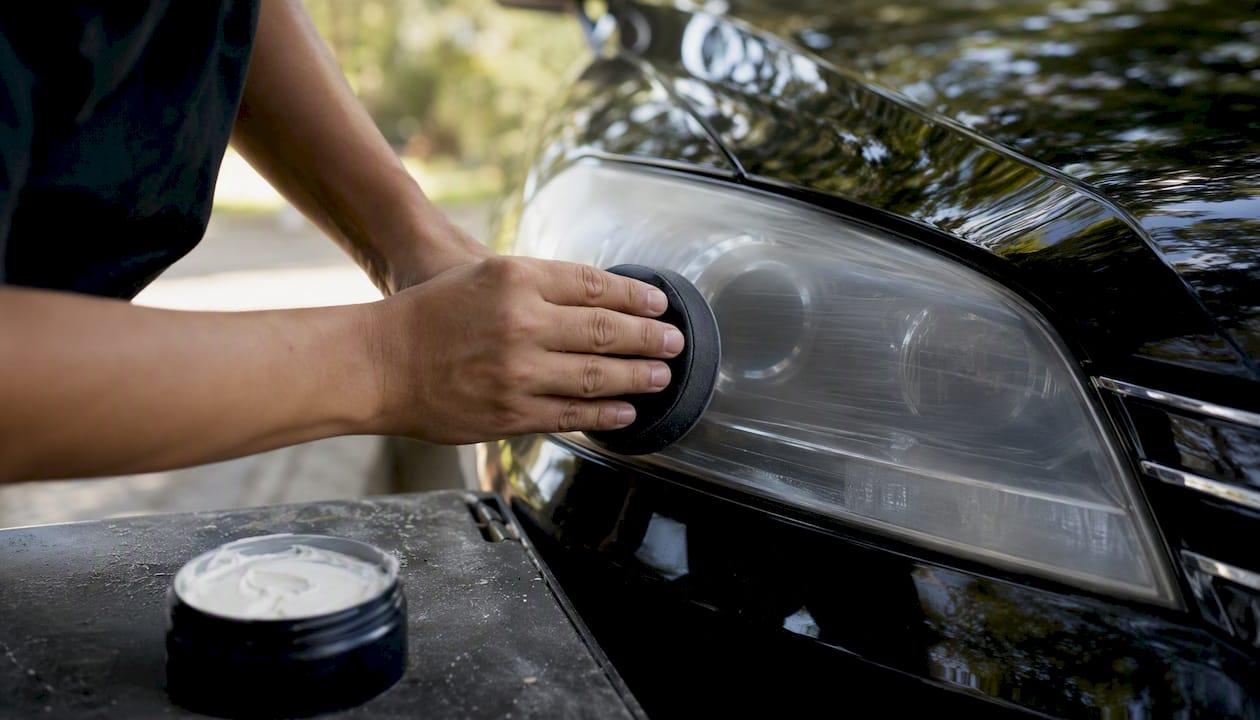
By hand, use firm circular motions and check progress every 2–3 minutes. The lens should transition from matte to hazy to clear as you work. Wipe residue with a clean microfiber and inspect under direct light.
Pro Tip: After polishing, hold a flashlight at a low angle across the lens surface. Sanding lines show up as fine parallel scratches under raking light that look invisible under overhead lighting. Catching them now saves you from stripping the sealant later.
Step 5: Verification (5 minutes)
Wipe the lens clean and inspect it in natural daylight and under a direct light source. Look for:
- Pigtail marks (circular scratches from a DA pad edge): caused by holding the pad at an angle
- Sanding lines: step back to the grit that created them
- Uneven clarity: one section clearer than another means uneven sanding pressure
Total time per headlight: roughly 60–90 minutes for moderate damage, up to 3 hours for severe oxidation.
How should you seal the restored lens?
Sealing is not optional. Polished polycarbonate with no UV protection re-oxidizes quickly, and skipping a topcoat can allow re-oxidation in roughly 2–3 months depending on sun exposure. Here are your main options:
- Kit UV sealant wipe or spray: included in most restoration kits. Easy to apply, dries in minutes. Typical durability: 1–2 years with proper application. Best for owners who want a quick, low-effort finish.
- Aerosol clear coat rated for plastics: a step up from kit sealants. Apply 2–3 thin coats with 10–15 minutes between coats. Cure time is typically 24 hours before the lens sees rain or washing. Durability: 2–3 years. Avoid generic clear coat not rated for plastics — it can crack or peel as the lens flexes.
- Professional ceramic or lens coating: the longest-lasting option. Products like those used by professional detailers bond to the polycarbonate and provide UV resistance for 3–5 years or more. Application requires a clean, dust-free environment and precise timing. For a ceramic coating’s full longevity benefits, professional application makes a real difference.
Application tips for any sealant:
- Wipe the lens with isopropyl alcohol (70% or higher) immediately before applying sealant to remove any polish residue or oils
- Apply in thin, even layers; thick coats run and cure unevenly
- Keep the lens out of direct sunlight during cure
- Don’t wash the car for at least 24 hours after applying aerosol clear coat
Longevity reality check: even the best DIY sealant degrades faster than a professionally cured coating because home environments can’t replicate the controlled cure conditions a detailer uses. Maintenance matters too: washing with a pH-neutral soap and avoiding automatic car washes with stiff brushes extends any sealant’s life noticeably.
Do household hacks like toothpaste or WD-40 actually work?
Short answer: they give a visible improvement for a few weeks, then the haze comes back. Household fixes like toothpaste or WD-40 remove surface grime or mildly abrade the lens but provide no UV protection, so the oxidation returns quickly.
Here’s what each one actually does:
- Toothpaste: the mild abrasives in whitening toothpaste scratch away the very top layer of oxidation. Results are visible but shallow. No UV barrier means re-oxidation starts immediately. Expect improvement for 2–6 weeks.
- Baking soda paste: similar mechanism to toothpaste, slightly coarser. Same durability problem.
- WD-40: fills surface micro-scratches with oil, which temporarily makes the lens look clearer. It doesn’t remove oxidation at all. The effect fades as the oil evaporates or washes off, usually within days to a couple of weeks.
Safety notes: WD-40 and similar petroleum-based products can soften or stain rubber seals around the lens housing. Wipe any overspray off trim and rubber immediately. Toothpaste is generally safe on the lens itself but rinse it off completely before it dries.
When a quick fix is acceptable: if you need a visibility improvement for a short trip and don’t have time for a full restoration, toothpaste or a quick WD-40 wipe is harmless. Just don’t mistake it for a repair. For anything beyond a temporary fix, the wet-sand and seal process described above is the only approach that holds up.
How long do DIY restorations last, and when should you replace the lens?
Durability depends almost entirely on the sealing method:
| Sealing method | Typical durability | Notes |
|---|---|---|
| No sealant (polish only) | 2–3 months | Re-oxidizes quickly in sun |
| Kit UV sealant | 1–2 years | Convenient; reapply annually |
| Aerosol clear coat (plastic-rated) | 2–3 years | More durable; requires careful application |
| Professional ceramic coating | 3–5+ years | Best longevity; controlled cure |
When restoration won’t help:
- Internal haze or moisture inside the housing: external sanding can’t address haze or moisture trapped inside the housing. The lens needs disassembly or replacement.
- Cracks, crazing, or large pitting: surface cracks can’t be sanded flat without removing too much material. Replacement is the right call.
- Heat or reflector damage: if the reflector bowl inside the housing looks burned or the lens has warped, no amount of surface work restores light output.
- Broken mounting tabs: a lens that can’t be secured properly is a safety issue regardless of clarity.
DIY vs. professional cost comparison:
- DIY supplies (sandpaper, compound, sealant): cost varies but generally affordable for basic kits and components with a quality aerosol clear coat
- Professional headlight restoration service: costs vary but typically moderate per vehicle pair, with a warranty-backed coating included
- Time: DIY takes 2–6 hours total for both headlights; a professional service is usually done in under 2 hours
Quick decision checklist:
- Is the haze on the outside of the lens? (Yes = restorable; No = replace or disassemble)
- Is the lens cracked, crazed, or deeply pitted? (Yes = replace)
- Do you have 2–3 hours and the right supplies? (No = hire a pro)
- Do you want a 3–5 year result with a warranty? (Yes = hire a pro)
- Is this a fleet with multiple vehicles? (Yes = professional service is more efficient)
Common DIY mistakes and how to fix them
Even careful work runs into problems. Here’s what goes wrong most often and how to recover:
- Persistent sanding lines after polishing: the compound didn’t cut deep enough to remove the scratch pattern. Wipe the lens clean, step back to the grit that created the lines, re-sand until they’re gone, and work back up through the progression.
- Uneven clarity (one section clearer than another): uneven sanding pressure. Re-sand the dull sections with the finest grit you used, keeping pressure consistent, then re-polish.
- Edge haze: the lens edge is harder to reach with a flat pad. Use a folded piece of sandpaper by hand on edges, then follow with a small foam pad or a folded microfiber with compound.
- Paint scuffs from slipped abrasives: if tape slipped and the sandpaper caught the paint, stop immediately. Assess the depth. Light scuffs in clear coat can often be corrected with paint-safe polishing compound. Deep scratches need professional paint correction.
- Runs or orange peel in aerosol sealant: let the coat cure fully (24 hours minimum), then wet sand lightly with 2000–3000 grit to level the surface, and reapply a thin coat.
Red flags that need professional attention:
- Internal moisture or condensation inside the housing
- Crazing (a network of fine surface cracks) that returns after sanding
- Large pitting deeper than the sandpaper can safely remove
- Any sign of heat damage to the reflector or lens housing
When is hiring a professional the better choice?
DIY restoration is often practical with the right supplies, but professional refinishers use cured coatings and controlled environments that extend longevity. There are situations where the professional route is clearly worth the cost:
- Internal haze or moisture: no DIY surface technique fixes this. A professional can assess whether disassembly and resealing the housing is viable, or whether replacement is the only option.
- Badly crazed or heat-damaged lenses: these need a professional assessment before any sanding begins. Removing too much material from a crazed lens can compromise its structural integrity.
- Fleet vehicles: restoring 10 or 20 headlights by hand is a significant time commitment. A professional mobile service handles volume efficiently with consistent results.
- When you want the longest-lasting result: professional ceramic coatings cure in a controlled environment and bond more durably than anything applied in a driveway. The warranty backing is real protection.
Professional services also handle the masking and edge work with paint-safe protocols that reduce the risk of accidental paint damage. For a look at what professional detailing for paint protection actually involves, the process is more thorough than most DIY setups can replicate.
The honest take on DIY vs. professional headlight restoration
DIY headlight restoration works. If you follow the grit progression, keep the paper wet, polish thoroughly, and seal with a UV-rated product, you’ll get a result that looks genuinely good and holds up for a year or two. That’s a real outcome for $30–$50 in supplies.
The part most guides understate is how much the sealant choice matters relative to everything else. You can sand and polish perfectly and still end up with cloudy lenses in three months if you skip the topcoat or use a kit wipe that degrades fast in direct sun. The sanding is the skill; the sealing is the investment.
Where DIY falls short is longevity and edge cases. A careful home job with aerosol clear coat might last two years. A professionally applied ceramic coating on the same lens, cured properly, can last three to five. If you’re keeping the car long-term or the lenses are in rough shape, that gap is worth paying for. If you’re selling the car in a year or just want the headlights to pass inspection, do it yourself.
The other honest note: internal haze and moisture intrusion are not DIY problems. Sanding the outside of a lens that’s fogged from the inside accomplishes nothing. Check first, sand second.
CDC Detailing handles headlight restoration the right way
Doing it yourself saves money and works well for mild to moderate oxidation. But if you want results that last 3–5 years without annual recoating, or if your lenses have damage that goes beyond surface oxidation, professional service is the smarter investment.

Cdcautodetailing offers mobile headlight restoration across South Jersey, coming directly to your home or workplace. The service uses professional-grade coatings applied in a controlled process, with paint-safe masking on every job. No guessing about grit selection, no risk of paint scuffs from a slipped pad, and no wondering whether the sealant will hold through next summer.
- Mobile service: no drop-off required, available across South Jersey
- Professional ceramic lens coatings with real UV durability
- Fleet packages for commercial vehicles and multi-vehicle jobs
- Paint-safe masking and edge work on every restoration
Ready to skip the driveway project and get a warranty-backed result? Book a headlight restoration with Cdcautodetailing or explore the full range of detailing services to find the right package for your vehicle.
Sources
- Restore Your Headlights: A DIY Guide to Clear Vision
- How To Use Wet Sandpaper for Headlights: 2026 Guide | Vektracer
- How to Restore a Headlight Lens for Lasting Clarity