TL;DR:
- Paint protection film protects vehicle paint from chips, scratches, and UV damage by applying a clear urethane layer. Proper installation involves thorough surface prep, correct tool use, and following a precise multi-step process to ensure durability. Skipping steps like paint correction or using improper techniques can lead to issues such as bubbles, edge lifting, or contamination.
Paint protection film installation is the process of applying a clear, durable urethane film onto your car’s painted surfaces to shield them from rock chips, scratches, and UV damage while preserving the factory finish. Known in the industry as PPF or a “clear bra,” this film delivers long-term protection that wax and sealants simply cannot match. A proper paint protection film installation follows a strict sequence: surface decontamination, paint correction, film placement, squeegeeing, heat forming, and edge sealing. Skip any step and you risk locking imperfections under the film permanently. This guide covers every stage so you can get professional results at home.
What does a paint protection film installation guide cover?
A complete automotive film installation guide covers seven distinct stages, from gathering tools to post-cure care. Each stage builds on the last. Rushing or reordering them is the single biggest reason DIY installations fail. The 10-step PPF process includes consultation, decontamination, paint correction, pattern cutting, slip solution application, placement, squeegeeing, heat forming, edge sealing, and final inspection. That structure applies whether you are wrapping a single bumper or the full vehicle.
What tools and materials do you need for DIY PPF?
The right supplies make or break a DIY installation. Showing up without a heat gun or the correct squeegee is like painting a room without tape. Critical tools for PPF include slip solution, tack solution, spray bottles, soft-edged squeegees, microfiber towels, a clay bar, pH-neutral shampoo, isopropyl alcohol (IPA) wipes, and a heat gun.
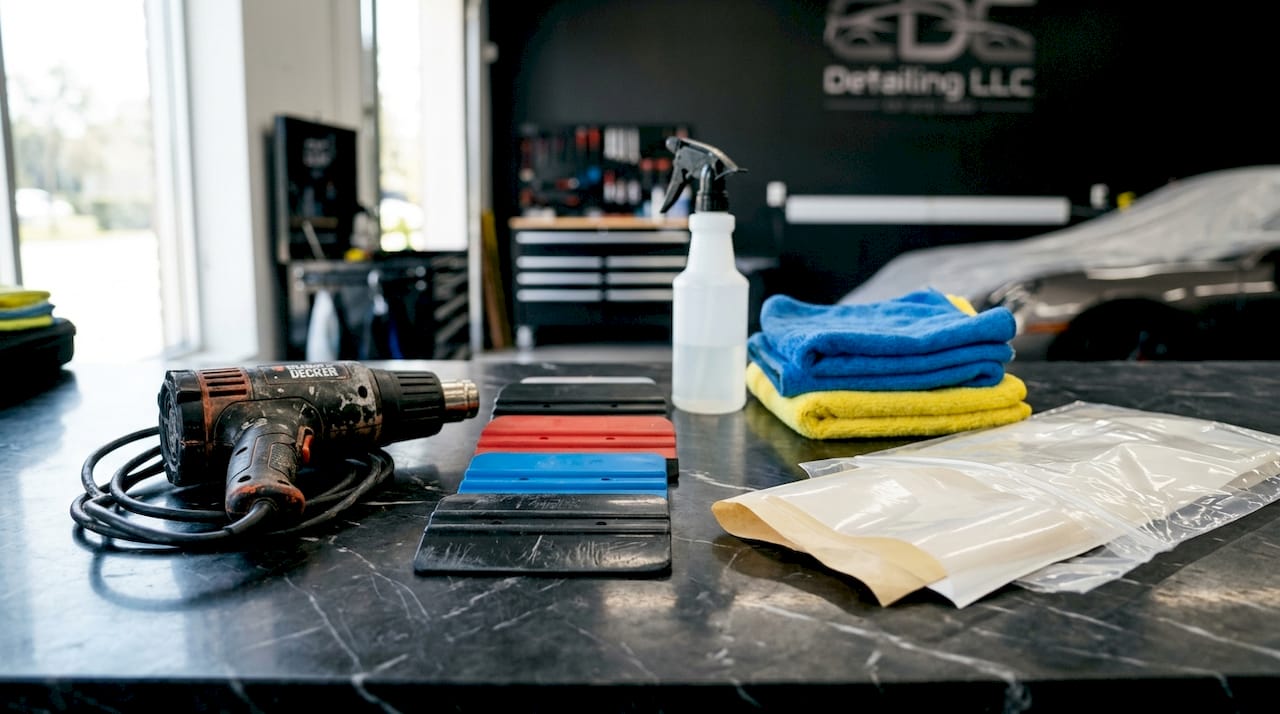
| Tool | Purpose | Key tip |
|---|---|---|
| Pre-cut PPF kit | Provides panel-specific film shapes | Reduces blade work near paint |
| Slip solution | Temporarily neutralizes adhesive for positioning | Mix distilled water with a drop of baby shampoo |
| Tack solution | Locks film edges down after placement | Use sparingly at seams and corners |
| Soft-edged squeegee | Pushes out liquid and air bubbles | Use overlapping strokes from center outward |
| Heat gun | Stretches film around curves and edges | Keep moving to avoid overheating one spot |
| Clay bar | Removes embedded surface contaminants | Follow with IPA wipe-down |
| IPA wipes | Strips oils and residues before film goes on | Non-negotiable final prep step |
| Microfiber towels | Drying and lint-free wiping | Use dedicated towels for prep only |
Slip solution and tack solution serve completely different roles. Slip solution temporarily neutralizes the adhesive so you can reposition the film freely. Tack solution does the opposite: it activates the adhesive at the edges to lock the film down after placement. Confusing the two causes either a film that slides off or one that bonds before you are ready.
Pro Tip: Pre-cut kits are recommended for the vast majority of beginners because they eliminate the need for blade work near your paint. Bulk film gives you more flexibility, but one wrong cut can score the clear coat.
How do you prepare your vehicle surface before applying PPF?
Surface preparation is the most critical phase of the entire process. The film acts as a magnifying lens, so any swirl mark, scratch, or contamination you leave behind will be visible and locked in place for years. Skipping paint correction permanently traps defects under the film, making them impossible to fix without removing and replacing the entire panel’s coverage.
Follow these preparation steps in order:
- Deep wash with pH-neutral shampoo. Use the two-bucket method: one bucket for soapy water, one for rinsing your mitt. This prevents dragging grit across the paint.
- Clay bar decontamination. Run a clay bar across every panel to pull out embedded iron particles, industrial fallout, and road tar that washing alone cannot remove. The surface should feel glass-smooth afterward.
- Paint correction. Polish out swirl marks and light scratches with a dual-action polisher before the film goes on. This step is the one most beginners skip, and it is the one they regret most.
- IPA wipe-down. Wipe every panel with isopropyl alcohol to strip polish oils, wax residue, and fingerprints. This is the final step before film touches paint.
- Inspect under lighting. Use a detailing light or work lamp at a low angle to catch any remaining defects or contamination.
Pro Tip: Perform all prep work in a dust-free, temperature-controlled space. Airborne particles that settle on a freshly cleaned panel will create bumps under the film that no amount of squeegeeing will fix. A closed garage with the HVAC off works well.
For a deeper look at proper paintwork prep, the steps above translate directly into better film adhesion and a cleaner final result.
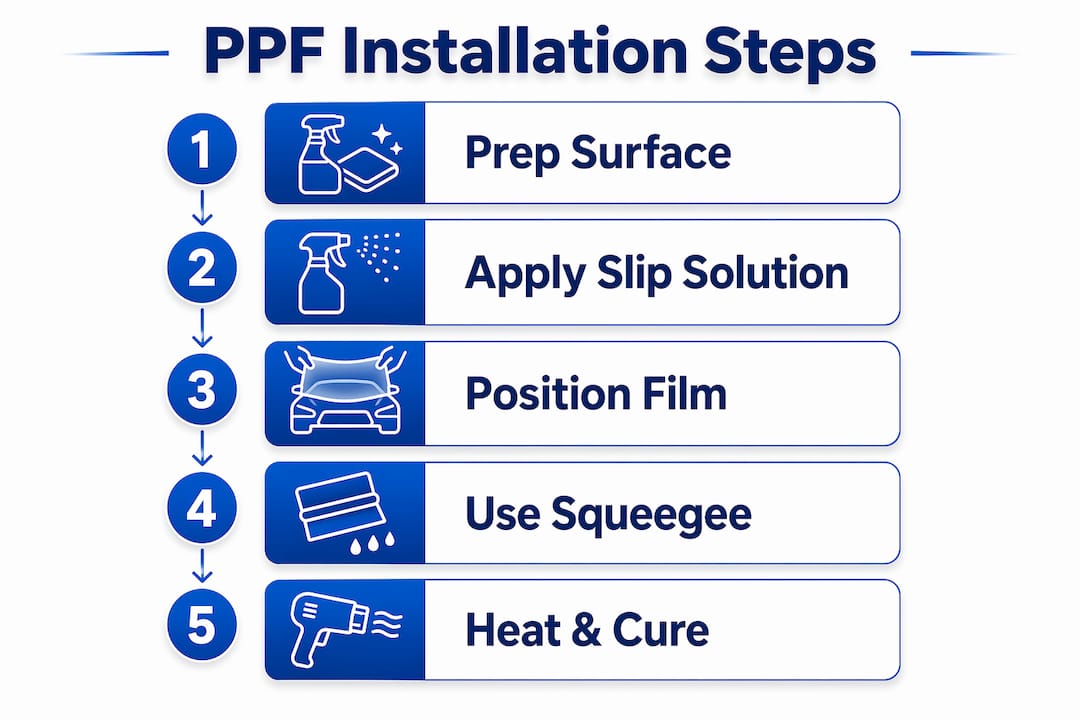
How do you install paint protection film step by step?
The installation itself follows a precise sequence. Deviating from the order creates problems that compound quickly.
- Measure and cut or use a pre-cut kit. Match the film to your vehicle’s make, model, and year using a digital pattern database. Pre-cut kits eliminate guesswork and protect your paint from blade slips.
- Apply slip solution liberally. Spray the painted surface and the adhesive side of the film generously. The film should slide freely across the panel without grabbing.
- Position the film on the wet surface. Lay the film onto the panel and adjust its position while the slip solution keeps the adhesive inactive. Work from the center of the panel outward.
- Squeegee out liquid and air. Use overlapping, unidirectional strokes from the center toward the edges. Never use random or multi-directional strokes. Those trap air pockets and create the ripples known as “fingers” at the film’s edges.
- Heat-form around curves and edges. Apply gentle heat from a heat gun to relax the film material. Forcing film without heat on complex curves causes edge lifting within months. Keep the gun moving constantly and stretch the film gradually.
- Tuck and seal edges. Switch to tack solution at the seams and edges. Tuck the film under trim pieces where possible and squeegee the edges flat to create a durable bond.
- Final inspection. Use a detailing light to check every panel for trapped air, lifted edges, contamination bumps, or wrinkles. Address any issues before the film begins to cure.
Pro Tip: Bare fingers on the adhesive side deposit natural oils that prevent proper bonding and cause premature peeling at corners and seams. Wear clean nitrile gloves throughout the entire installation.
How long does PPF installation take?
Installation time scales directly with how much of the vehicle you are covering. A single bumper takes far less time than a full-body wrap.
| Coverage area | Estimated time |
|---|---|
| Bumper only | 3–6 hours |
| Partial front (hood, bumper, mirrors) | 1–2 days |
| Full front end | 2–3 days |
| Full body | 3–5 days |
A bumper panel alone can take 45–90 minutes per panel, and a fender up to 2 hours. Budget more time than you think you need. Rushing is the direct cause of most installation defects.
What are the most common PPF installation problems?
Even careful installers run into issues. Knowing what causes each problem lets you fix it before the film cures.
- Trapped air bubbles. Caused by insufficient slip solution or multi-directional squeegeeing. Re-lift the film edge with more slip solution and re-squeegee using proper overlapping strokes.
- Fingers (edge ripples). Small ripples at the film’s edge result from squeegeeing too fast or not using heat on curved sections. Apply heat and gently stretch the film flat before re-squeegeeing.
- Premature lifting at edges. Usually caused by skipping the IPA wipe-down or not using tack solution at seams. Lift the edge, clean the surface with IPA, and re-seal with tack solution.
- Contamination bumps. Particles trapped under the film during installation. Prevention is the only real fix. Remove and reapply the film section if the bump is significant.
- Wrinkles on curved panels. Result from forcing film without heat. Use a heat gun to relax the material and work the wrinkle out gradually with your squeegee.
The curing period runs 7–10 days after installation. During that window, the film fully bonds as trapped moisture evaporates. Avoid automated car washes, high-pressure sprayers, and prolonged exposure to extreme heat until curing is complete. Exposing the film to those conditions before full bonding causes lifting and bubbling that requires a costly redo.
Pro Tip: Patience during installation beats speed every time. A bubble-free result comes from methodical technique, not from working quickly. If a section is not sitting right, add slip solution and reposition rather than forcing it.
Key Takeaways
A successful paint protection film installation requires thorough surface prep, correct tool selection, and disciplined technique at every stage, from clay bar decontamination through the full curing period.
| Point | Details |
|---|---|
| Paint correction is non-negotiable | PPF magnifies existing defects, so polish the paint before applying any film. |
| Use pre-cut kits as a beginner | Digital pattern kits eliminate blade risk and reduce installation time significantly. |
| Slip and tack solutions have distinct roles | Slip solution enables repositioning; tack solution locks edges down after placement. |
| Squeegee technique determines quality | Overlapping, center-to-edge strokes prevent air pockets and edge ripples. |
| Respect the curing period | Avoid car washes and high-pressure water for 7–10 days after installation. |
What I have learned after years of watching PPF go wrong
The most expensive mistake I see is not buying cheap film. It is applying good film over unprepared paint. Beginners spend hours researching which PPF brand to buy and then spend 20 minutes on surface prep. The film does not care how premium it is if it goes over swirl marks and IPA residue.
The second thing I have noticed is that people underestimate how physical this job is. Squeegeeing a full hood correctly, with consistent pressure and overlapping strokes, takes real focus. Your arms get tired. When they do, technique slips and air gets trapped. Taking breaks is not laziness. It is quality control.
I also think the DIY PPF route is genuinely worth attempting for vehicle owners who are willing to treat it like a skill, not a shortcut. Start with a bumper or a single door panel. Get comfortable with slip solution behavior and heat forming before you attempt a full hood. The learning curve is real, but it is not steep if you respect the process.
The one thing I would never skip is a proper paint correction before any film goes on. Not a quick polish. A real correction under good lighting. Everything else in this process is recoverable. Locked-in paint defects are not.
— Charles
Cdcautodetailing’s PPF services and DIY support
Vehicle owners in South Jersey who want expert guidance on their PPF installation have a local resource in Cdcautodetailing. Whether you are tackling the job yourself or want a professional to handle the full process, Cdcautodetailing offers both paths.

Cdcautodetailing’s mobile detailing team serves Pitman, NJ and the surrounding South Jersey area, bringing professional-grade surface prep, paint correction, and film application directly to your driveway. For vehicle owners who want to protect their investment beyond PPF, Cdcautodetailing also offers ceramic coating services that complement film protection with an added layer of hydrophobic durability. Book a consultation or schedule a mobile appointment through the Cdcautodetailing website to get started.
FAQ
What is paint protection film made of?
Paint protection film is a clear thermoplastic urethane material applied to vehicle paint to absorb impacts and resist scratches, chips, and UV damage. Higher-grade films include a self-healing topcoat that removes light surface marks with heat exposure.
How long does PPF take to cure after installation?
The film reaches full bond strength after a curing period of 7–10 days. Avoid automated car washes, high-pressure water, and extreme heat during that window to prevent lifting or bubbling.
Can beginners install paint protection film at home?
Yes, beginners can install PPF at home using pre-cut kits, which reduce installation risk by eliminating blade work near the paint. Starting with a single panel like a bumper builds the technique needed before tackling larger sections.
Why is paint correction required before applying PPF?
PPF acts as a magnifying lens over the paint surface. Any existing defect such as swirl marks or scratches becomes permanently visible under the film and cannot be corrected without removing it entirely.
What causes PPF to lift at the edges after installation?
Edge lifting results from skipping the IPA wipe-down before application, insufficient tack solution at seams, or failing to heat-form the film on curved panels. Addressing all three during installation prevents premature lifting.