
Yellowed paint protection film is sometimes fixable and sometimes not: surface staining from contamination often lifts with the right decontamination process, while true material yellowing caused by UV breakdown is permanent. Start with a gentle pH-neutral wash and a professional decontamination test before you touch anything else. Skip abrasive polishes and harsh chemicals until you know which problem you actually have.
TL;DR:
- Surface contamination like bird droppings or pollution can often be cleaned off, but true chemical degradation of the film is irreversible.
- A proper decontamination test, including clay and film-safe stain remover, reveals whether yellowing is removable or indicates polymer breakdown.
- Exposure to UV and heat accelerates material yellowing, especially in older or lower-grade films made with aromatic chemistry instead of aliphatic formulations.
- Replacement is necessary if cleaning does not restore clarity or if signs like edge lift, bubbling, or uniform ambering appear, indicating adhesive or material failure.
- Regular maintenance with pH-neutral washes, prompt spill cleanup, and shade parking prolongs film clarity, while professional removal is recommended for full replacement.
Table of Contents
- What causes paint protection film to turn yellow
- How to tell surface staining from true material yellowing
- Cleaning and restoration methods to try first
- When repair won’t work and how removal and replacement is done
- How to prevent yellowing and keep PPF clear
- Professional inspection checklist and manufacturer guidance
- Differences between types and brands of PPF and their susceptibility to yellowing
- The role and effectiveness of professional PPF restoration services versus DIY methods
- How environmental factors like pollution and regional climate affect yellowing risk
- Long-term durability and lifespan expectations of restored versus replaced PPF
- Author perspective: when to DIY and when to hire a pro
- CDC Auto Detailing’s PPF services and how to book
- FAQ
- Sources
What causes paint protection film to turn yellow
Yellowing comes from a handful of distinct problems, and figuring out which one you have determines whether a fix is even possible.
- Surface contamination such as bird droppings, tree sap, tar, industrial fallout, and fuel splashes sits on top of the film and stains it without changing the material itself.
- Film chemistry matters too. Older or lower-grade PPF products often used aromatic polyurethane, which yellows faster than the aliphatic formulations common in premium films today, according to ISF Film’s breakdown of film chemistries.
- Installation problems, including trapped moisture under the film or edges that were not properly sealed, create pockets where discoloration starts earlier and spreads faster than it would on a clean, flat install.
Adhesive interactions can compound any of these issues. When adhesive begins breaking down from heat or moisture intrusion, it can discolor the film from underneath, which looks identical to surface staining at first glance but behaves completely differently when you try to clean it. That distinction is the whole reason diagnosis has to come before treatment.
How to tell surface staining from true material yellowing
Before you commit to a cleaning plan or start pricing out replacement, run through a short diagnostic sequence. This is close to what a trained installer checks during an inspection.
- Look at the pattern. Localized blotches, streaks, or spots usually point to contamination. Even, uniform ambering across a whole panel usually means the polymer itself has changed.
- Check the edges and seams. Bubbling, lifted edges, or a milky discoloration bleeding in from the perimeter often signals adhesive failure rather than a surface issue.
- Run a decontamination test. Pre-wash with a pH-neutral shampoo, clay the surface with a PPF-safe lubricant, and inspect clarity immediately after. This sequence, which mirrors 3M’s maintenance guidance for protection wrap film, is the accepted way to separate removable grime from permanent discoloration.
- Compare before and after. If clarity improves noticeably, you are dealing with a stain. If nothing changes after a proper film-safe decontamination pass, the film has likely degraded chemically.
Field testing described by ISF Film treats this clarity check as the deciding factor: a lack of improvement after aggressive, film-safe cleaning is a strong sign the yellowing is irreversible.
Pro Tip: Test a small, inconspicuous section first. If decontamination brightens that patch, repeat the same process across the full panel instead of guessing on the whole car at once.
Cleaning and restoration methods to try first
If your diagnostic test showed improvement, work through these steps in order rather than jumping straight to the most aggressive option.
- Start with a basic wash. Rinse thoroughly, use a pH-neutral shampoo, hand wash with a clean mitt, and dry in the shade. 3M’s technical guidance specifies a pH range of 6 to 8 for safe cleaning products, and recommends avoiding automated brush washes until you know the film tolerates them.
- Move to decontamination. Pre-soak loosened grime, clay with a PPF-safe lubricant, and follow up with a stain remover specifically labeled safe for paint protection film. Skipping the lubricant step is one of the most common ways owners accidentally scratch clear film while trying to clean it.
- Consider a mild glaze only if the film allows it. Some PPF-safe finishing products can add temporary clarity and gloss, but manufacturer guidance is explicit that abrasive polishing compounds are off limits because they abrade the clearcoat topcoat of the film.
- Avoid chemical shortcuts entirely. Strong solvents, acidic wheel cleaners used off-label, and anything marketed as a “yellowing remover” with no PPF-safe label can strip the film’s protective layer and make the discoloration worse, not better.
The decontamination sequence recommended by 3M, which includes a pre-soak, phosphate-free prewash, PPF-safe clay lubricant, and film-safe stain remover, is the only process manufacturer documentation endorses for revealing whether yellowing is removable without risking the film’s surface. That sequencing matters because jumping straight to a stain remover without clay first often leaves embedded particles that cause fine scratching.
Heat and chemical shortcuts tempt a lot of owners because they promise a faster result. In practice, a strong solvent can soften the film’s topcoat just enough to trap new contamination or create a hazy finish that looks worse under direct sunlight than the original yellowing did.
When repair won’t work and how removal and replacement is done
Some yellowing is simply beyond cleaning, and recognizing that early saves money on products that were never going to fix the problem.
- No improvement after a proper decontamination pass. If clay and film-safe cleaners produce zero change in clarity, the polymer has already broken down.
- Uniform ambering across a whole panel. This pattern almost always indicates chemical degradation rather than surface contamination.
- Adhesive loss or edge lift. Once the adhesive bond starts failing, the film is also more likely to trap moisture and dirt underneath, worsening appearance over time.
- Visible bubbling that doesn’t flatten after reheating. Persistent bubbles point to adhesive or substrate failure rather than a temporary installation quirk.
When replacement is the answer, professional removal matters as much as the new film itself. 3M’s technical documentation recommends using a heat gun or steamer to soften the adhesive, then peeling at a 30 to 60-degree angle to avoid pulling clearcoat off with the film. Rushing this step, or using too much heat, is how DIY removal attempts end up damaging the paint underneath instead of just the film.
Partial patching can work when yellowing is confined to a small, isolated section and the surrounding film is still in good shape, but matching an existing installation’s seams and edges precisely is hard, and a visible patch line is a common result. Full-panel replacement is more predictable and is usually the better call once discoloration covers more than a small corner. Budget time for an inspection, film lead time if your color or finish needs ordering, and the shop hours a proper reinstall requires: rushing this stage tends to cost more in redo work than it saves.
How to prevent yellowing and keep PPF clear
A short maintenance routine goes a long way toward keeping film clear for its full service life.
- Wash on a regular schedule using pH-neutral, non-solvent shampoos, and avoid dish soap or anything acidic.
- Clean up spills immediately. Bird droppings, tree sap, and fuel splashes cause less staining the faster they come off, and rinsing promptly also prevents hard water spots from baking on in the sun.
- Dry in the shade rather than letting water evaporate under direct sunlight, which concentrates minerals on the surface.
- Add a compatible topcoat. Ceramic boost products applied over PPF, where compatible with the film, add stain resistance and make routine washing easier, per 3M’s maintenance recommendations.
- Park smart. Shade or covered parking reduces cumulative UV exposure, which is the single biggest driver of long-term film degradation.
- Use the two-bucket method for hand washing, or a touchless wash when a hand wash isn’t practical, to avoid introducing fine scratches that trap grime. Diamond Brite’s guide to two-bucket washing covers the technique in detail.
Owners who want a structured schedule instead of remembering all this themselves can follow an installer-backed PPF maintenance timeline built around these same steps.
Professional inspection checklist and manufacturer guidance
A thorough PPF inspection checks more than just color. Installers look at the adhesive bond at the edges, panel uniformity, and how the film responds to a test-clean before recommending anything.
- Adhesive bond and edge condition, checking for lift, bubbling, or bleed-through that signals failure underneath the film.
- Uniformity of discoloration, distinguishing a localized stain from an even ambering that points to polymer breakdown.
- Test-clean results, using the same decontamination sequence 3M documents for protection wrap film to see if clarity responds before recommending replacement.
When you talk to an installer, ask about warranty coverage on both film and labor, what a maintenance plan actually includes, and how long replacement film takes to source for your specific vehicle. Our team at CDC Auto Detailing builds inspection and maintenance recommendations around this same sequence, and walks owners through what proper PPF installation should look like from the start.
Differences between types and brands of PPF and their susceptibility to yellowing
Not all paint protection film ages the same way, and the chemistry behind the film matters more than most owners realize when they’re shopping for it. Film built on aliphatic polyurethane resists UV-driven yellowing far better than older aromatic formulations, a distinction ISF Film highlights as central to how quickly a given film discolors under sun exposure.
Thickness and topcoat quality also play a role. Thicker, self-healing topcoats tend to resist minor scuffing and staining better, which indirectly reduces the surface contamination that gets mistaken for yellowing. Cheaper, thinner films scratch more easily, and those micro-scratches trap dirt and grime that stains faster.
Adhesive formulation is another variable that rarely gets mentioned. A film can use excellent topcoat chemistry but still yellow early if the adhesive layer breaks down and discolors from underneath, something that shows up as a hazy or cloudy look rather than a straightforward amber tint.
For owners comparing options, the practical takeaway is to ask directly about the film’s base chemistry and expected UV performance rather than relying on brand name alone. Premium lines from major manufacturers generally use aliphatic chemistries specifically because of their yellowing resistance, but confirming that for a specific product avoids assumptions.
The role and effectiveness of professional PPF restoration services versus DIY methods
Professional decontamination and DIY cleaning can both work, but they are not interchangeable once you move past basic washing. A professional service typically has access to graded PPF-safe clay lubricants, calibrated stain removers, and the experience to recognize early signs of adhesive failure that an untrained eye would miss entirely.
DIY attempts are reasonable for routine washing and even a basic decontamination pass, provided every product used is explicitly labeled safe for PPF. The risk increases sharply once an owner reaches for anything not designed for film, because a product that’s perfectly safe on bare paint can haze or soften a PPF topcoat.
Where professional service becomes genuinely valuable is in diagnosis. Distinguishing a removable stain from permanent polymer yellowing, as ISF Film notes, is a sequence best run by someone who has seen the difference across many vehicles, not a one-time guess. Getting that diagnosis wrong means either wasting money on products that were never going to help, or giving up on film that actually could have been saved.
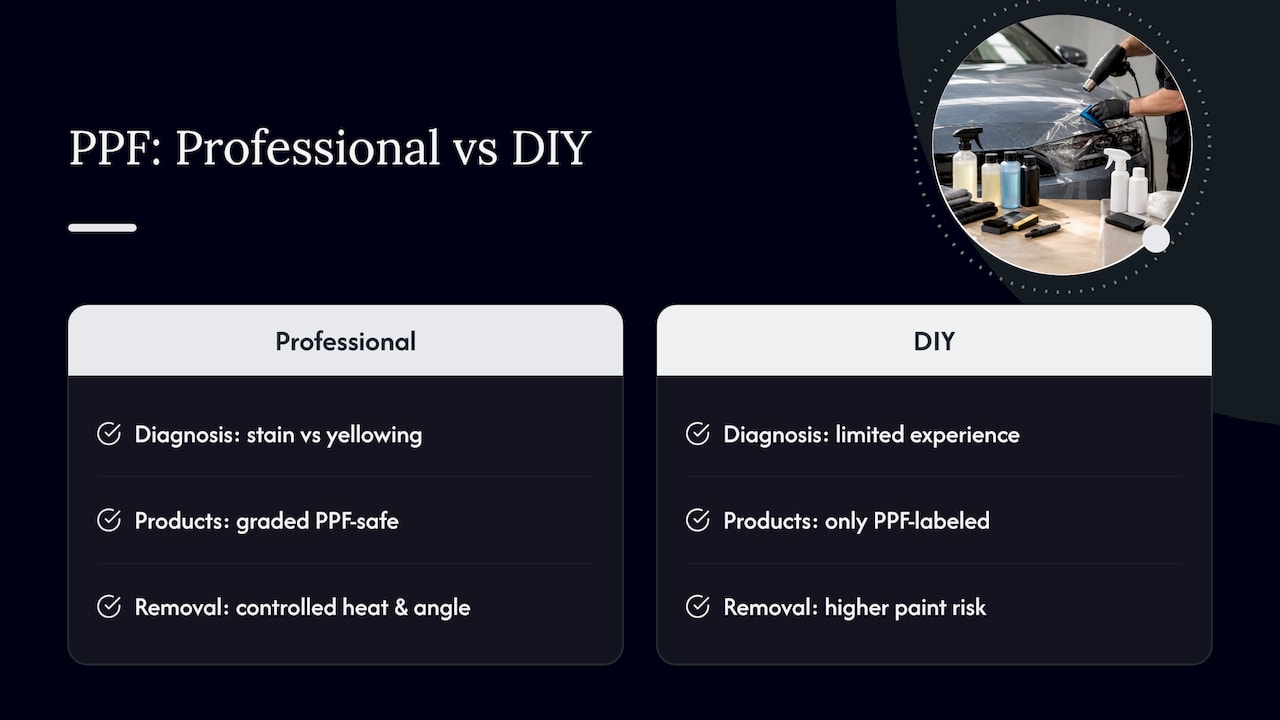
Removal and reinstallation sit even further on the professional side of that line. The heat and peel-angle control that manufacturer guidance recommends for safe removal is difficult to replicate without practice, and a mistake here risks the paint underneath, not just the film.
How environmental factors like pollution and regional climate affect yellowing risk
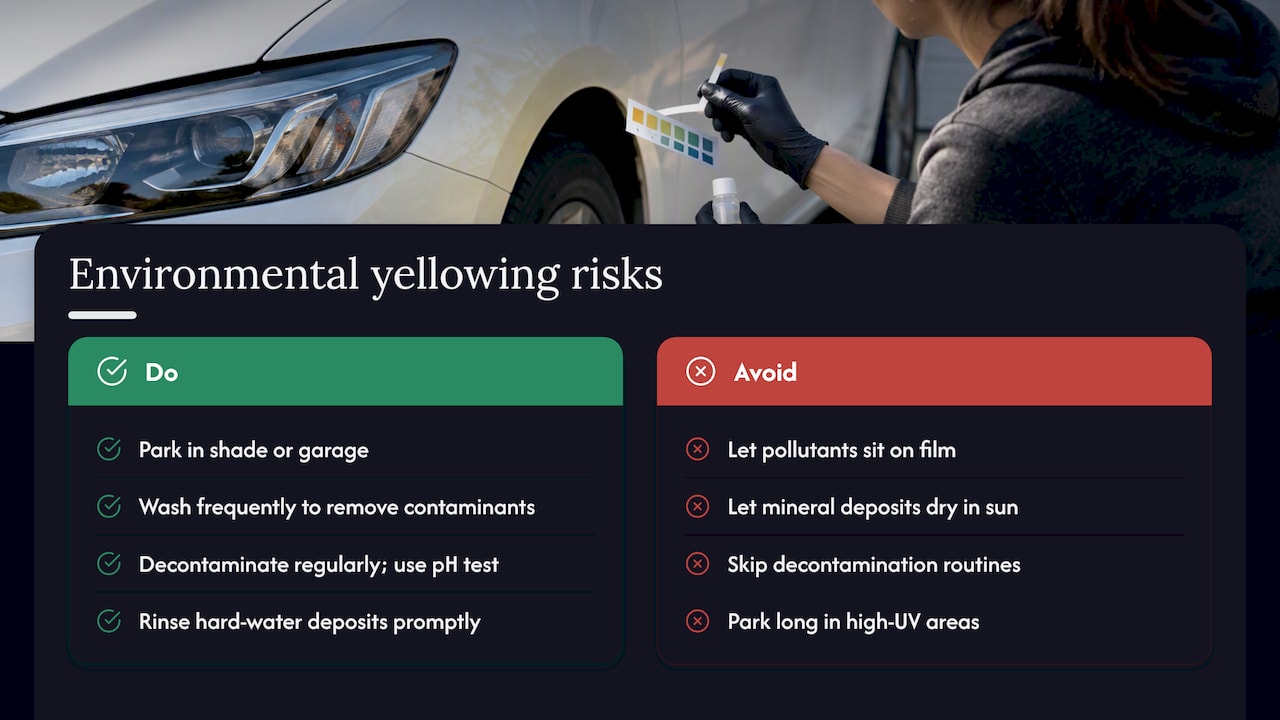
Climate and local environment shape how fast PPF yellows almost as much as the film itself does. UV exposure accelerates the polymer breakdown that causes irreversible yellowing, so vehicles that spend most of their time parked outdoors in sunny, high-UV regions tend to show discoloration sooner than those garaged or parked in shade.
Heat compounds the effect. Hot climates don’t just add UV exposure, they also raise surface temperatures on dark-colored paint, which speeds up the same chemical reactions in the film’s topcoat and adhesive.
Pollution and airborne contaminants add a second, separate risk. Industrial fallout, heavy diesel exhaust, and road grime all land on film surfaces and can stain quickly if left to sit, especially in combination with humidity that keeps contaminants wet and chemically active longer. Areas with hard water also contribute, since mineral deposits left to dry in direct sun can etch into a film’s topcoat over repeated cycles.
None of this means film in milder climates is immune. It means the maintenance schedule that works for a garage-kept car in a temperate region needs to be tighter for a vehicle parked outdoors in a hot, sunny, or industrial area. Owners in those conditions should treat the washing and decontamination routines described earlier as a minimum rather than an occasional task.
Long-term durability and lifespan expectations of restored versus replaced PPF
Film that responds well to decontamination and gets back to a clean, clear state afterward should perform close to its original expected lifespan, since the surface stain never changed the underlying polymer. The restoration simply removed what was sitting on top.
Replaced film resets the clock entirely. A new install, done with current-generation aliphatic chemistry and proper surface prep, should age more slowly than an older film that used aromatic formulations, assuming similar environmental exposure.
What restoration cannot do is reverse actual polymer degradation. A film that has already yellowed at the material level will continue to age at roughly the same rate even after a successful surface clean elsewhere on the vehicle, because the chemical change that caused the yellowing hasn’t been undone, only the dirt sitting over a different section has.
The practical expectation for owners: a properly maintained film, cleaned on a reasonable schedule with pH-neutral products and prompt removal of contaminants, should hold its clarity for years before yellowing becomes a concern. Once genuine material yellowing shows up, replacement resets that timeline, while restoration only extends it on film that was never chemically compromised in the first place.
Author perspective: when to DIY and when to hire a pro
Washing your own PPF and running a basic decontamination pass is a reasonable first move, and most owners can do it safely with the right pH-neutral products. Where I draw the line is removal. Pulling old film involves heat and a precise peel angle, and getting that wrong risks the clearcoat underneath, not just the film you’re replacing. A patch of yellowed PPF costs you appearance. A paint repair after a botched DIY peel costs you real money and resale value. Spend your own effort on cleaning, and spend a professional’s time on anything that involves a heat gun.
— Charles
CDC Auto Detailing’s PPF services and how to book
We handle paint protection film the same way we’d want it handled on our own vehicles: inspect first, clean what can be cleaned, and only recommend replacement when the film genuinely can’t be saved. Our mobile setup means we come to you rather than asking you to find shop hours that work.

- PPF inspection and decontamination testing to confirm whether your film’s yellowing is a surface stain or permanent discoloration.
- Professional removal and reinstallation using manufacturer-specified heat and peel techniques to protect the paint underneath.
- Maintenance plans that keep film clean on a schedule instead of waiting until yellowing sets in.
If your film has already crossed into true material yellowing, the paint protection film service page has the details on replacement, and pricing FAQs walk through what to expect before you book. For film that’s still showing contamination rather than degradation, a maintenance plan through our detail packages can keep it that way for longer.
FAQ
Why is my PPF turning yellowish?
PPF usually yellows from one of two causes: surface contamination like bird droppings, tar, or pollution sitting on top of the film, or UV and heat breaking down the film’s polymer over time. The first is often cleanable, while the second typically is not.
Does PPF turn yellow over time?
Yes, all film can yellow eventually, since UV exposure accelerates polymer breakdown in clear urethane materials. How fast depends on the film’s chemistry, with aliphatic formulations resisting yellowing far longer than older aromatic ones.
Why is my XPEL PPF film turning yellow?
Any PPF brand, including XPEL, can yellow from UV exposure, heat, surface contamination, or adhesive issues at the edges. The underlying causes and the diagnostic steps are the same across brands: check whether the discoloration responds to a proper decontamination test before assuming it’s permanent.
How to tell if PPF needs to be replaced?
Film needs replacement when a professional-grade decontamination pass, including clay with a PPF-safe lubricant, produces no improvement in clarity, or when you see uniform ambering, edge lift, or adhesive bleed. Localized stains that clean up with that same process usually don’t require replacement.
Sources
- 3M — Protection wrap film vehicle maintenance FAQ
- 3M — Scotchgard PPF Pro Series 200 technical data and removal guidance
- ISF Film — Aliphatic vs aromatic chemistries and yellowing