TL;DR:
- Using pH-neutral cleaners protects leather car seats from damage and preserves their natural oils. Applying cleaning products to a cloth and conditioning regularly maintains seat appearance and prevents cracks. Avoid household chemicals like bleach, ammonia, and oil-based conditioners that can harm the leather.
pH-neutral automotive leather cleaners are the most effective solution for cleaning leather car seats without causing damage. The right product choice matters more than most car owners realize. Using the wrong cleaner strips the leather’s natural oils, leading to cracks, fading, and a sticky residue that worsens over time. The good news is that a simple, methodical approach using the right tools and products keeps leather seats looking sharp for years. This guide covers what to use, what to avoid, and how to apply everything correctly.
1. What can you use to clean leather car seats? Start with pH-neutral cleaners
pH-neutral leather cleaners, formulated specifically for automotive use, are the safest and most effective option for cleaning leather car seats. These cleaners fall within a pH range of 6.5–7.5, which mirrors the natural chemistry of finished leather. That balance matters because anything more acidic or alkaline begins breaking down the leather’s protective coating and the oils that keep it supple.
Household cleaners like all-purpose sprays, bleach, and ammonia-based products sit well outside this range. They clean aggressively, which is exactly the problem. Leather is not tile or countertop. It needs gentle chemistry that lifts dirt without pulling out the material’s natural moisture.
Professional detailers recommend automotive-specific leather cleaners over any household substitute because they are formulated with leather’s finish in mind. They clean without leaving a residue, and they do not interfere with the conditioning step that follows. You can find these products at auto parts stores, online retailers, and through professional detailing services like Cdcautodetailing.
- Avoid bleach, ammonia, and undiluted dish soap
- Avoid alcohol-based wipes or sprays, which dry out leather fast
- Avoid silicone-heavy products that create a shiny, dust-attracting surface
- Choose cleaners labeled “pH-balanced” and “safe for automotive leather”
Pro Tip: Check the product label for the phrase “pH-neutral” or “pH-balanced.” If the label does not list the pH range, contact the manufacturer before applying it to your seats.
2. Household products: which ones are safe and which ones cause damage
Household products are a tempting shortcut, but most of them damage leather car seats. 68% of car owners damage their leather upholstery by using incorrect cleaners, including harsh chemicals and oil-based conditioners. That statistic reflects how common and costly this mistake is.
A small number of household items can be used cautiously in a pinch. A very diluted solution of mild dish soap (a few drops in a cup of water) works for light surface grime. A glycerin soap bar rubbed lightly onto a damp cloth can lift mild dirt without stripping oils. Diluted white vinegar (one part vinegar to two parts water) treats light mold or mildew on leather surfaces, though it should be used sparingly and followed immediately by conditioning.
The list of harmful household products is much longer. Baby wipes contain alcohol and fragrance compounds that dry leather out over repeated use. Olive oil and coconut oil feel like logical conditioners, but they go rancid inside leather fibers and attract bacteria. Rubbing alcohol removes stains but also strips the protective finish, leaving leather vulnerable to cracking.
- Safe with caution: Diluted mild dish soap, glycerin soap, diluted white vinegar (for mold only)
- Always avoid: Bleach, ammonia, baby wipes, rubbing alcohol, olive oil, coconut oil, and undiluted soaps
Pro Tip: Before applying any household product to your seats, test it on a hidden area like the underside of a seat cushion. Wait 10 minutes and check for discoloration or texture change before proceeding.
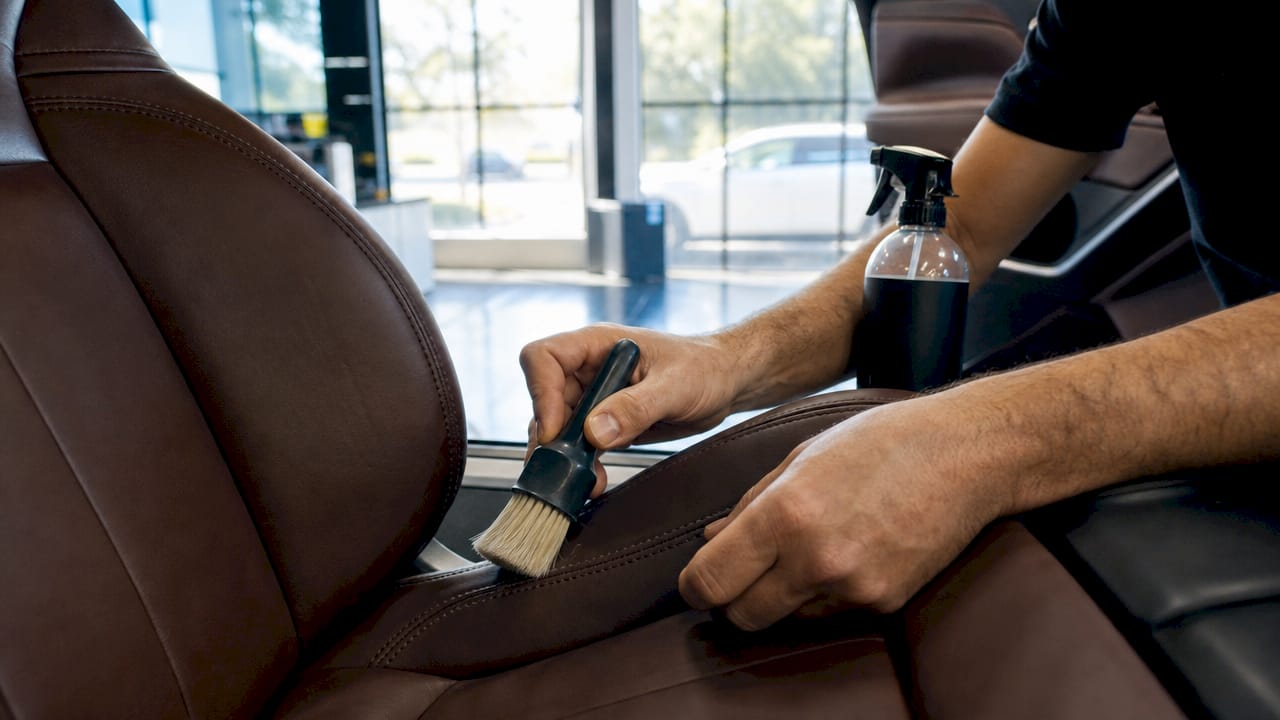
3. Essential tools and techniques for cleaning leather seats safely
The right tools prevent micro-scratches and protect the leather’s surface during cleaning. Vacuuming with a soft brush attachment before any liquid touches the seat is the first non-negotiable step. Dry vacuuming removes up to 70% of loose debris before cleaning begins, which prevents abrasive particles from grinding into the leather when you apply a cloth. Skipping this step turns the cleaning process into a sanding process.
The right applicators
Microfiber cloths and soft-bristle brushes are the correct tools for applying and working in leather cleaner. Rough sponges, paper towels, and stiff brushes create surface scratches that accumulate into visible wear over time. Use multiple clean microfiber cloths during a single session to prevent dirt redeposition onto areas you have already cleaned.
Step-by-step cleaning method
- Vacuum the entire seat using a soft brush attachment. Pay attention to seams and crevices where crumbs and grit collect.
- Apply cleaner to the cloth, not the seat. Spraying directly onto leather risks soaking the stitching and padding. Direct spraying causes thread rot and padding mildew over time.
- Work in small sections using gentle circular motions. This lifts dirt evenly without pushing it deeper into the grain.
- Use a damp cloth, not a soaking one. Excess water swells the foam padding inside the seat and creates conditions for mold growth inside the seams.
- Wipe away residue with a clean, dry microfiber cloth immediately after cleaning each section.
- Apply a leather conditioner once the seat is fully clean and dry. Conditioning replenishes the oils that cleaning removes.
Pro Tip: Work on one seat at a time and let it dry before moving to the next. This keeps you from accidentally transferring dirty cleaner from one surface to another.
4. Choosing the right leather cleaner and conditioner type
Leather cleaners come in three main formulations: spray, liquid, and cream. Each suits a different situation. Spray formulas are the most convenient for regular maintenance cleaning on lightly soiled seats. Liquid formulas work well when applied with a brush for seats with textured grain or visible grime in the seams. Cream formulas are thicker and better suited for deep cleaning sessions on heavily soiled or neglected seats.
Conditioners require the same level of attention as cleaners. Silicone-heavy conditioners create an unwanted shine and attract dust, which accelerates surface degradation. The goal of conditioning is to restore the leather’s natural matte appearance, not to make it look wet or glossy.
Modern car seats almost always have a factory-applied protective clear coat over the leather. Water-based protectants perform better on coated leather than heavy cream or wax-based conditioners. Heavy conditioners do not penetrate the clear coat and sit on the surface, where they attract dirt and fade faster. Older aniline or semi-aniline leather, which has no protective coating, absorbs oil-based conditioners more readily and benefits from richer formulas.
| Feature | Spray cleaner | Liquid cleaner | Cream cleaner |
|---|---|---|---|
| Ease of use | High | Medium | Low |
| Best for | Light soil, maintenance | Moderate soil, textured grain | Heavy soil, neglected seats |
| Moisture control | Good | Good | Requires care |
| Finish effect | Matte | Matte | Can leave residue |
| Coated leather suitability | Excellent | Excellent | Use sparingly |
For a broader look at interior detailing tools and products, Cdcautodetailing covers the full list of what professionals use on every surface.
5. Stain removal, mold treatment, and long-term leather protection
Targeted stain removal requires a different approach than general cleaning. Ink stains respond best to a small amount of isopropyl alcohol applied with a cotton swab directly to the stain, not the surrounding leather. Oil-based stains, like food grease or sunscreen, lift with a dry microfiber cloth first, followed by a pH-neutral cleaner on the residue. For natural stain removal methods that work on multiple seat materials, the process starts with identifying the stain type before choosing a product.
Light mold or mildew on leather surfaces responds to a diluted white vinegar solution. Apply it with a soft cloth, let it sit for two minutes, then wipe clean and condition immediately. Do not let vinegar sit longer than that. Extended contact begins to break down the leather’s finish.
Protecting leather long-term requires consistent habits, not just reactive cleaning.
- Apply a leather protectant or conditioner every 3–4 months to maintain suppleness and prevent cracking
- Park in the shade or use a windshield sunshade, because UV exposure dries out leather faster than almost any other factor
- Wipe up spills immediately with a dry cloth to prevent liquid from soaking into seams
- Avoid leaving leather seats in direct sun for extended periods, especially in summer months
Pro Tip: If your seats feel sticky after cleaning, you likely used too much product or did not wipe away the residue fully. Buff the area with a clean, dry microfiber cloth and follow with a light application of conditioner.
Key takeaways
pH-neutral automotive leather cleaners, applied with microfiber cloths and followed by a water-based conditioner, are the most effective and safest method for maintaining leather car seats.
| Point | Details |
|---|---|
| Use pH-neutral cleaners | Choose products with a pH of 6.5–7.5 to protect leather oils and finish. |
| Vacuum before cleaning | Dry vacuuming removes up to 70% of debris and prevents surface scratches. |
| Apply to cloth, not seat | Never spray cleaner directly onto leather to avoid stitching damage and mold. |
| Condition after every clean | Conditioning restores oils lost during cleaning and prevents cracking over time. |
| Avoid household shortcuts | Baby wipes, bleach, and oil-based products damage leather faster than dirt does. |
What I’ve learned from years of watching leather seats age badly
The single most common mistake I see is car owners who clean their seats and then stop there. Cleaning removes dirt, but it also strips oils from the leather. Skipping the conditioning step is like washing your hands with harsh soap and never moisturizing. The leather dries out, and within a year or two, you start seeing fine cracks along the seat bolsters and headrest.
The second mistake is using too much product. More cleaner does not mean cleaner seats. It means more residue, more moisture in the seams, and a higher chance of mold developing inside the padding. A damp cloth with a small amount of cleaner does the job every time.
I have also seen car owners spend money on premium leather conditioners that are actually hurting their seats. On modern coated leather, heavy wax or oil-based conditioners sit on top of the clear coat and never penetrate. They make the seat look shiny for a week, then attract dust and leave a film that is harder to clean than the original dirt. Water-based protectants are the right call for most vehicles built in the last 15 years.
The best leather care routine is not complicated. Vacuum, clean gently, condition with the right product, and repeat every few months. Consistency beats intensity every time. Leather that gets light, regular attention outlasts leather that gets one aggressive cleaning per year by a wide margin. For a full step-by-step interior workflow, the process applies to every surface in the cabin, not just the seats.
— Charles
Professional leather care from Cdcautodetailing
Cdcautodetailing brings professional-grade leather cleaning and conditioning directly to your driveway across South Jersey. Every session uses pH-neutral, industry-approved cleaners matched to your specific leather type, whether that is modern coated leather or older aniline upholstery.

The mobile service means no drop-off, no waiting room, and no guessing about which products are safe for your seats. Cdcautodetailing technicians follow a structured process that includes vacuuming, targeted stain treatment, gentle cleaning, and conditioning with water-based protectants that preserve the leather’s natural finish. For a full overview of what professional care covers, the auto detailing services guide explains every step. Booking is straightforward through the mobile detailing booking page.
FAQ
What is the safest cleaner for leather car seats?
A pH-neutral automotive leather cleaner with a pH of 6.5–7.5 is the safest option. These cleaners remove dirt without stripping the leather’s natural oils or damaging its protective finish.
Can I use dish soap to clean leather car seats?
A very diluted solution of mild dish soap can be used cautiously for light surface cleaning. Undiluted dish soap is too alkaline and will strip the leather’s finish over time.
How often should I condition leather car seats?
Conditioning every 3–4 months maintains suppleness and prevents cracking. Cleaning removes natural oils from the leather, so conditioning after every cleaning session is also recommended.
Why should I avoid spraying cleaner directly on leather?
Spraying directly onto leather forces moisture into the stitching and seat padding, which causes thread rot and mold growth inside the seams. Always apply cleaner to a cloth first.
Do I need a different product for older vs. newer leather seats?
Modern coated leather seats respond best to water-based protectants, which do not leave residue on the clear coat. Older aniline or semi-aniline leather, which has no protective coating, absorbs richer oil-based conditioners more effectively.