TL;DR:
- Effective car interior cleaning relies on a strict top-to-bottom sequence, proper tools, and consistent disinfection. Removing clutter before vacuuming and using microfiber cloths significantly improve results, while focusing on high-touch areas maintains hygiene. Professional services supplement DIY routines to achieve optimal cleanliness and odor elimination.
Car cleaning hacks for your interior are practical, time-saving methods that use common household items and targeted techniques to keep your vehicle cabin spotless, hygienic, and comfortable. Professional detailers call this discipline interior detailing, and the best practitioners rely on a specific sequence of tools including microfiber cloths, handheld cordless vacuums, and compressed air canisters to get results that last. The difference between a car that smells fresh and one that doesn’t usually comes down to three things: the right order, the right tools, and consistent habits. This guide covers all three, with hacks you can start using today.
1. The best car cleaning hacks interior owners should start with
Before you touch a single surface, remove every piece of trash and clutter from the cabin. Good Housekeeping experts recommend a fast 10-minute clean built around trash removal, surface wiping, and a vacuum sweep as the minimum effective approach. That sequence matters because cleaning around clutter wastes time and hides the dirt you actually need to address.
Start with a small trash bag and clear out receipts, bottles, wrappers, and anything loose in the door pockets. Then do a quick visual pass of the step-by-step car interior before picking up a single cloth. This two-minute reset makes every subsequent step faster and more effective.
2. How to clean vents, crevices, and tight spots
Compressed air canisters and detailing brushes are the fastest tools for blasting dust out of HVAC vents, button clusters, and the gaps around your center console. A single pass with compressed air followed by a microfiber cloth picks up what the air dislodges, leaving vents clean without disassembly.
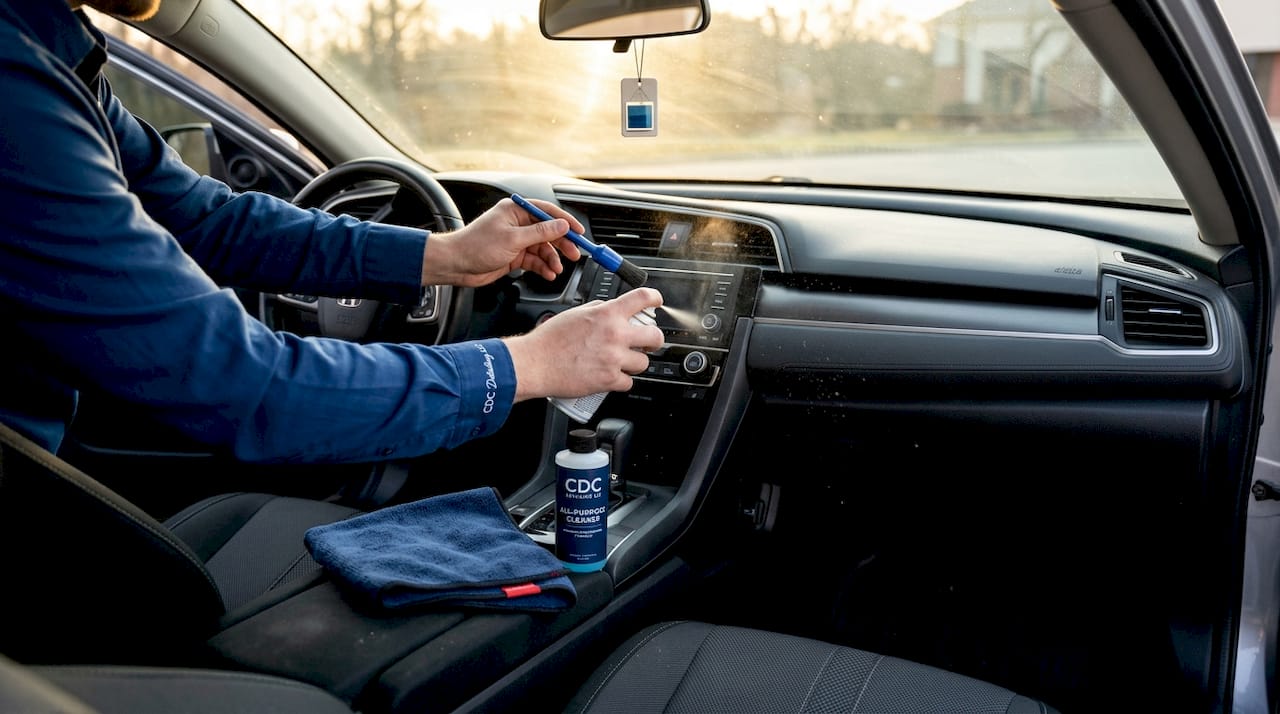
For cup holders, slip a sock over a travel mug or a small bottle, spray it lightly with an all-purpose cleaner, and twist it inside the cup holder. The friction pulls out sticky residue that a flat cloth cannot reach. This is one of those DIY car detailing interior hacks that sounds too simple to work until you try it once.
Pro Tip: Use a flat-head screwdriver wrapped in a microfiber cloth to clean the seam where your dashboard meets the windshield. It reaches a strip of dust that most people miss entirely.
3. Vacuuming the right way to lift embedded dirt
Vacuuming is the foundation of any effective interior clean, and doing it wrong creates more work. Chemical Guys notes that vacuuming before applying any liquid cleaner prevents dirt from mixing with moisture to form a sticky paste that is harder to remove than the original grime.
Use a crevice tool to work along seat seams, under seat rails, and around the base of the center console. For fabric seats, brush attachments agitate the fibers to bring embedded dirt to the surface before suction pulls it away. This two-stage approach, agitate then extract, removes significantly more debris than suction alone.
4. How to maintain hygiene in high-touch areas
The steering wheel, gear shifter, door handles, and touchscreen are the most contaminated surfaces in any vehicle. Real Simple advises daily disinfection of these surfaces with wipes, and contact time is the critical variable most people ignore. A wipe that dries in 30 seconds has not done its job.
PDI Healthcare’s product guidance confirms that disinfecting wipes require the surface to stay visibly wet for the full label contact time to achieve effective germ kill. For most products, that means keeping the surface wet for one to four minutes. Apply the wipe, let it sit, and then follow up with a lint-free microfiber towel to remove any residue.
For leather steering wheels and controls, skip harsh disinfectants and use a pH-neutral leather cleaner instead. Alcohol-based wipes used repeatedly on leather will dry out the surface and cause cracking within months. Check out these vehicle sanitization tips for a full breakdown of safe disinfection by surface type.
5. What are the best DIY upholstery and carpet cleaning hacks?
Fabric upholstery responds well to a simple mixture of one part distilled white vinegar, one part warm water, and a small drop of dish soap. Apply it sparingly with a spray bottle, then blot with a clean microfiber cloth. Blotting rather than scrubbing is the rule that separates effective stain removal from spreading the stain deeper into the fibers.
For grease stains, sprinkle baking soda directly on the spot, let it sit for 15 minutes to absorb the oil, then vacuum it up before applying your cleaning solution. For ink, isopropyl alcohol on a cotton swab applied directly to the mark works better than any broad-surface cleaner. Pet hair requires a rubber glove or a slightly damp squeegee dragged across the seat surface before vacuuming.
Pro Tip: After cleaning fabric seats, crack the windows and run the fan on low for 20 minutes before closing the car. Trapped moisture in seat foam is the primary cause of that musty smell that returns within days of cleaning.
Leather and vinyl seats need a dedicated leather cleaner, not an all-purpose spray. Apply the cleaner with a soft-bristle brush in circular motions, wipe clean with a microfiber cloth, and follow with a leather conditioner to restore flexibility. Skipping the conditioner after cleaning is the most common mistake that leads to cracked leather over time.
6. Which tools make interior car cleaning hacks more effective?
The right tool for each surface type determines whether you get a professional result or a frustrating one. Here is a direct comparison of the most common options:
| Tool or product | Best use | Limitation |
|---|---|---|
| Handheld cordless vacuum with crevice tool | Seat seams, floor mats, tight gaps | Lower suction than full-size vacuums |
| Microfiber cloth (dual-sided) | All hard surfaces, glass, leather | Must be washed frequently to avoid redepositing dirt |
| Compressed air canister | Vents, button gaps, speaker grilles | Single-use cost adds up over time |
| Detailing brush set | Dashboard texture, stitching, emblems | Requires follow-up with vacuum or cloth |
| All-purpose interior cleaner | Plastic, vinyl, rubber surfaces | Not safe for leather or fabric without dilution |
| Distilled white vinegar solution | Fabric stains, odor neutralization | Strong smell until dry |
Microfiber cloths outperform cotton rags and paper towels on every interior surface. Titan Coatings recommends using one side of the cloth to lift dirt and debris, then flipping to the dry side to blot moisture and prevent streaks. That two-stage motion is the single most effective technique for streak-free glass and haze-free dashboards.
7. How to sequence your cleaning hacks for best results
Sequence is the variable that separates a professional-quality clean from one that just moves dirt around. Dyson and Chemical Guys both stress a strict top-to-bottom order: headliner first, then windows, dashboard, seats, door panels, and finally carpets and floor mats. Cleaning from the bottom up means dust and debris from upper surfaces fall onto areas you have already cleaned.
Follow this order for every interior clean:
- Remove all trash and personal items from the cabin.
- Vacuum the headliner gently with a brush attachment on low suction.
- Clean windows and the windshield interior with glass cleaner and a microfiber cloth.
- Wipe the dashboard, center console, and door panels from top to bottom.
- Disinfect all high-touch surfaces and allow full contact time.
- Vacuum seats with brush agitation before applying any upholstery cleaner.
- Clean seat surfaces, then move to carpets and floor mats last.
Dyson warns that over-wetting the headliner can weaken the adhesive backing and cause permanent sagging. Use minimal moisture with a lightly dampened cloth and gentle agitation only. This is one of the few areas where less product always produces a better outcome.
Pro Tip: Vacuum the entire cabin before you open a single bottle of cleaner. This one rule prevents the most common mistake in DIY car detailing interior hacks: turning dry dust into a muddy smear the moment liquid touches it.
For a detailed walkthrough of the full workflow, the interior car cleaning workflow guide from Cdcautodetailing covers every phase with timing benchmarks.
Key takeaways
Effective car interior cleaning requires the right sequence, the right tools, and consistent disinfection of high-touch surfaces to produce results that last.
| Point | Details |
|---|---|
| Sequence is non-negotiable | Always clean top-to-bottom to prevent dust from falling on already-cleaned surfaces. |
| Vacuum before any liquid | Dry debris removal prevents dirt from mixing with cleaners to form sticky residue. |
| Contact time determines disinfection | Disinfecting wipes must keep surfaces visibly wet for the full label time to kill germs. |
| Microfiber outperforms all alternatives | Use the two-sided technique: one side lifts dirt, the other blots moisture for streak-free results. |
| Blot, never scrub, upholstery | Scrubbing spreads stains deeper into fabric fibers; blotting lifts them out cleanly. |
What I’ve learned from years of detailing car interiors
I’ve seen every cleaning mistake there is, and the one that costs people the most time is skipping the vacuum phase and going straight to spray cleaners. The result is always the same: a gray smear across the dashboard that takes three times as long to fix as the original dust would have taken to vacuum up. The sequence is not a suggestion. It is the difference between a 30-minute clean and a two-hour frustration.
The other thing I’d push back on is the idea that you need expensive products to get a clean interior. Distilled white vinegar, dish soap, and baking soda handle the majority of fabric stains and odors that people spend money on specialty products to fix. Where I do think spending matters is on microfiber cloths. Cheap ones scratch glass and leave lint everywhere. Spending a few extra dollars on quality microfiber pays off every single time you use it.
Consistency beats intensity every time. A five-minute wipe-down of your high-touch surfaces twice a week does more for hygiene than a deep clean once a month. Your steering wheel carries more bacteria per square inch than most household surfaces. Treating it like a priority rather than an afterthought changes the entire feel of your daily drive.
— Charles
Take your interior clean to the next level with Cdcautodetailing
DIY hacks get you far, but some jobs require professional equipment and trained hands to finish properly.

Cdcautodetailing offers mobile interior detailing services across South Jersey, coming directly to your home or office so you never have to drop off your vehicle. From deep extraction cleaning on fabric seats to safe leather conditioning and odor elimination, the team handles what household tools cannot. Explore the full range of auto detailing services to see what a professional clean adds beyond your regular routine. For owners who want the best of both worlds, pairing your weekly DIY habits with a professional detail every few months keeps your interior in genuinely showroom condition. Book through mobile detailing services and get a premium result without leaving your driveway.
FAQ
What is the fastest way to clean a car interior?
Good Housekeeping recommends a 10-minute sequence of trash removal, surface wiping, and a vacuum sweep as the minimum effective clean. Starting with clutter removal makes every subsequent step faster.
How do I clean car upholstery at home?
Mix one part distilled white vinegar with one part warm water and a drop of dish soap, apply sparingly, and blot with a microfiber cloth. Never scrub fabric upholstery, as scrubbing pushes stains deeper into the fibers.
How often should I disinfect my car’s high-touch surfaces?
Real Simple advises daily disinfection of the steering wheel, gear shifter, and door handles for effective hygiene. The key is allowing the wipe to keep the surface wet for the full product contact time.
Why does my car smell musty after cleaning?
Trapped moisture in seat foam and carpet backing is the primary cause of post-clean odors. After washing fabric surfaces, run the fan with windows cracked for at least 20 minutes to allow airflow through the cabin before closing it up.
What should I clean first in a car interior?
Always start at the top of the cabin and work downward, beginning with the headliner and windows before moving to the dashboard, seats, and finally the carpets. Chemical Guys confirms this top-to-bottom order prevents dust from upper surfaces from recontaminating areas you have already cleaned.